
Whenever you are bombarded with ample to do or have a lot of task on the plate, we tend to forget things. Therefore, we need a reminder to ensure no important task is left unattended.

Apple HomePod is a smart speaker which is designed to give you a life full of music, especially for music lovers. HomePod comes with tons of mind-blowing features and functionality. Multiple Timers is one of the newly added features to the gadget that allows you to set multiple timers to make your life smoother and easy. However, to get your hands on this feature, you need to ensure you’ve iOS 12 and later version.
In this post, we’re going to share how to set multiple timers on your HomePod with ease to improve your smart speaker experience.
Before Going Further Update Your HomePod
It is recommended to run an update for your HomePad before setting any timer. Moreover, keeping your HomePod software updated will fix minor issues and improve the performance of your gadget. You need to check your HomePod supports iOS 12 and later version to set multiple Timers on HomePod. In case, your device is not updated, or you want to run a new update then you can do it through the Home app installed on your Apple devices.
How to run an update on HomePod?
Firstly, you need to update your iPhone before updating your HomePod. Follow the steps to learn how to run an update on iPhone.
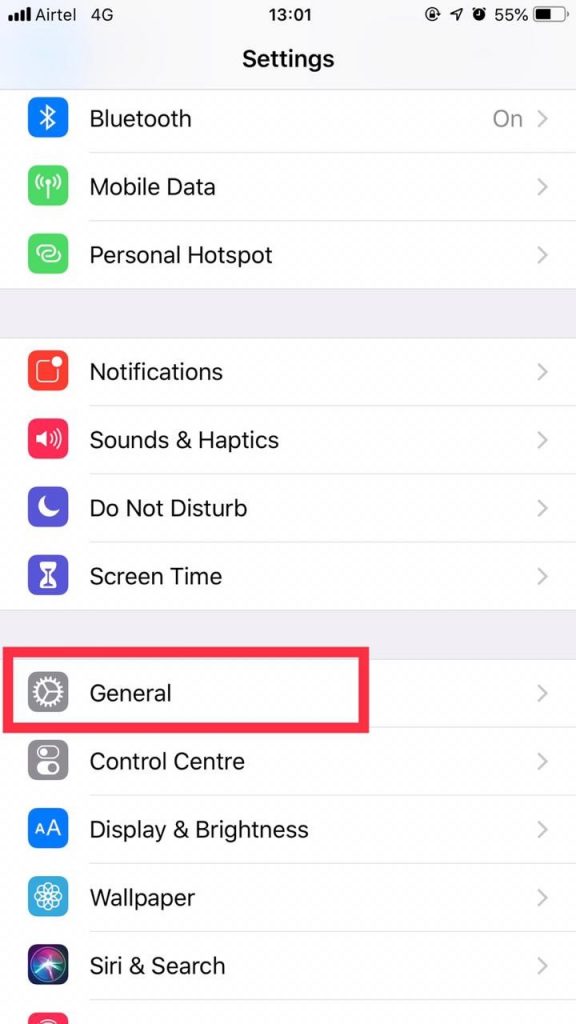
Step 1: Go to Settings.

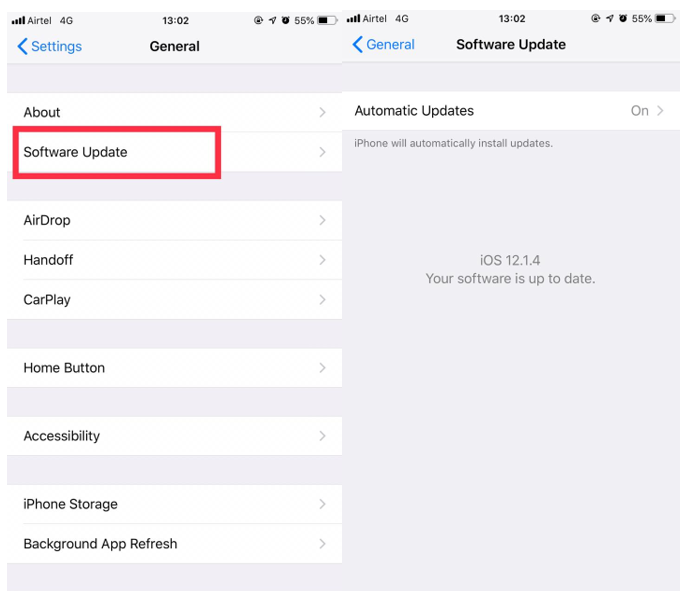
Step 2: Choose General.
Step 3: Tap on Software Update.
Now, to update your HomePod, you need to access your Home app from your iPhone or iPad.
Step 1: Navigate and click on the Home icon from the upper-left corner of your screen.
Step 2: Now, scroll down until to see Speakers.
Step 3: Choose Software Update.
Step 4: If there is a new update then you need to click on the Install.
Steps to Set Multiple Timers Using HomePod
Using multiple timers not only make your life simpler, but it is also extremely effective to improve your productivity. Setting multiple timers is as simple as enabling Siri. Moreover, it is effective to accomplish your chores on time. Follow the steps to set multiple timers using HomePod.
Step 1: You need to enable Siri by saying “Hi Siri”. You can click and hold on the screen on the upper side of the HomePod to do that.
Step 2: Say “Set a timer for (than say a certain period of time) and set your first timer. In fact, to avoid any confusion, you can name the timer like Siri set a time for Doctor’s appointment.
Step 3: Now, you need to enable Siri one more time by saying “Hi Siri”.
Step 4: Say “Set a timer for ” to set another timer.
Step 5: If you want to add more timer then you need to follow the same steps to continue setting timers.
If you want to delete any of the timers that are no longer in use, then you need to say, “Hi Siri” and say delete doctor’s appointment time. The timer will be eliminated from the timer list.
After setting your timers, you can have knowledge about the progress or a particular timer by asking the Siri. You can get an update on the status of your timers by saying “Hi Siri, how is my steak timer?”.
We hope you will find this article useful. Drop a message in case you are facing difficulties while setting up a new timer or multiple timers in the comments below.