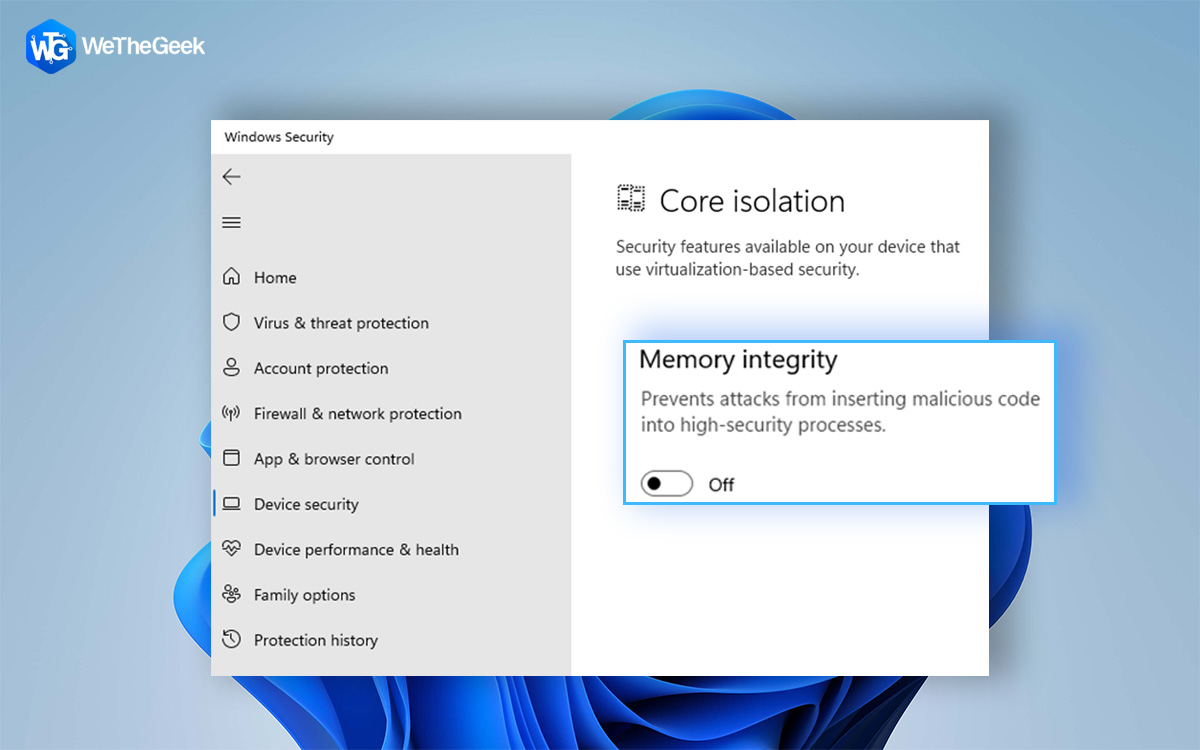
Core isolation has the feature of memory integrity. You can aid in preventing malicious code from gaining access to high-security processes in the case of an attack by enabling the Memory integrity option. A Windows security feature known as Hypervisor-protected Code Integrity (HVCI) makes it impossible for malicious programs to utilize low-level drivers to take control of your computer.
However, there are some issues that cause the memory integrity feature to have a grayed-out appearance. Is your computer stating “Incorrect memory integrity Your device could be at risk, “yet the toggle won’t turn on? This post will cover the reasons why you are unable to activate this function as well as how to locate and resolve the underlying issue.
Also Read: How to Fix Diagnostic Policy Service High CPU & Memory Usage
What Leads To Memory Integrity In Windows 11 Becoming Grayed Out?

Your drivers are the main reason Windows 11’s memory integrity doesn’t function properly. You are likely to experience this issue when they become old or corrupt. The memory integrity feature may also stop operating if your system is equipped with incompatible drivers.
In most cases, the error message itself contains an explanation of the issue, making it easy to resolve. You can update your operating system, roll back an update, remove incompatible drivers, correct broken drivers, fix corrupted system files, and upgrade your operating system. Let’s talk about possible fixes to make the functionality functional once more.
After implementing each of the fixes described below, open the Windows Security app and try turning on memory integrity once more. This way you can avoid following the remaining methods once your issue has been resolved.
You Might Want To Read: Your System Has Run Out of Application Memory; How to Fix?
Ways To Fix The Memory Integrity Feature Grayed Out On Windows PC
1. Determine And Resolve Driver Problems
Since outdated or incompatible drivers are frequently the root of the issue at hand, let’s start by verifying your drivers. Do the following before proceeding to troubleshoot driver issues in the Device Manager:
Step 1: Uninstall a third-party driver if you recently installed it and then have issues with memory integrity.
Step 2: Click on the Device security tab in the left sidebar of the Windows Security app, then select Core isolation details.

Step 3: Enable memory integrity here.
Step 4: Click the Review incompatible drivers link if you see an error message that instructs you to “Resolve any driver incompatibilities and scan again.”

Step 5: Afterward, make a note of any drivers that Memory Integrity believes to be incompatible.

To rule out issues with the driver, carry out the following actions after the checks mentioned above:
Step 1: Select Device Manager by right-clicking on the Windows Start button.

Step 2: Click Show hidden devices on the View tab.

Step 3: Look for the device that has an exclamation point inside of a yellow triangle on it or the driver(s) that have issues as indicated by the Memory integrity.

Step 4: Update the driver by right-clicking on that device.
Step 5: Right-click the driver and choose Properties if updating it does not fix the issue.
Step 6: Read the message in the Device status box under the General tab.

Step 7: Note the problem code, then go to the Microsoft Support website to see a list of all Device Manager-related errors.
Step 8: To solve the issue, locate the pertinent code information and implement the Microsoft suggested remedy.
What if there is no driver with a yellow triangle or the Microsoft advised fix does not resolve the driver issue? You will then need to update the incompatible or corrupt driver using third-party software like Advanced Driver Updater.
Must Read: How To Optimize Memory and Manage System Cache
2. Locate And Remove Unwanted Drivers
Use a third-party program, such as Autoruns, to find corrupt or incompatible drivers and delete them if you are unable to find the incompatible driver in Device Manager. To do it, you can take the following actions:
Step 1: Autoruns can be downloaded from the Microsoft website.
Step 2: Decompress the compressed file.
Step 3: Right-click the executable file of the application and choose Run as administrator.
Step 4: Select the Drivers tab.
Step 5: Locate the problematic drivers because they will be highlighted.
Step 6: Once you’ve found them, uncheck the box to turn them off. If any driver fails to disable, choose Delete from the context menu by right-clicking on it.
Step 7: Install the most recent drivers from the manufacturer’s website, or restart your device to enable Windows to do it for you. You can also use third-party driver updater software like Advanced Driver Updater to update your drivers.
Also Read: How To Clear Memory and Boost RAM on Windows
3. Remove The Inappropriate Apps
You should uninstall the applications or software you installed from the same manufacturer as the drivers if removing the incompatible drivers does not solve the problem. To do that, adhere to the following steps:
Step 1: Access Windows Start by right-clicking on it and choosing Apps and Features.
Step 2: Find the program from the same vendor in the list of installed apps.
Step 3: When you locate them, select Uninstall by clicking the three vertical dots next to them.
Step 4: The problem should be resolved by uninstalling the relevant apps from the same developer.
4. Correct Update-Related Problems
You should make sure your system is up to date and that there are no outstanding updates if incompatible or corrupt drivers aren’t the issue.
Step 1: Right-click the Windows Start button and choose Settings to do this.
Step 2: Next, go to Windows Update and select the button labeled “Check for updates” on the right.
Step 3: Click Resume updates if they are paused.
You Might Want To Read: How To Fix File Explorer Memory Leak on Windows 11
5. Repair Damaged System Files
Another common factor in unforeseen problems with Windows features is corrupt system files. After a virus infiltrated your device and damaged your system files, the Memory integrity functionality might have ceased functioning. To eliminate this possibility, you must confirm that your system files are complete. In this situation, an SFC scan may be beneficial.
Step 1: Use Windows Search to look for “Command Prompt,” then right-click on the resultant Command Prompt and choose “Run as administrator.”
Step 2: Then enter after typing “SFC /scannow”.
Step 3: Wait for the scan to complete.
The Final Word
Memory integrity is a crucial security feature, and if it is not enabled, your device’s security could be gravely jeopardized. Hopefully, by implementing the fixes listed in the post, you’ll be able to fix the issue and quickly enable Memory Integrity.
Please let us know in the comments below if you have any questions or recommendations. We would be delighted to provide you with a resolution. We frequently publish advice, tricks, and solutions to common tech-related problems. You can also find us on Facebook, Twitter, YouTube, Instagram, Flipboard, and Pinterest.