
Whether it’s your smartphone, laptop, tablet, or desktop, webcams are super essential. We need a built-in camera for a lot of things, be it taking pictures, video conferencing, or connecting with our friends and family.
Webcams are pretty useful! Don’t you think so? And especially in this Coronavirus pandemic when working from home has become crucial to our lifestyle. Usage of video conferencing apps like Skype, Zoom has highly increased, which we most often use to connect with our fellow teammates to streamline the work process, assign day-to-day tasks with ease, and connect with our folks at the very comfort of our home.

Wouldn’t it be a bit disheartening if your Mac’s camera suddenly stops working? Don’t worry! This issue can be easily fixed by following a few workarounds. Read on!
Also Read: How to Fix webcam not working issue on Windows 10.
How to Fix your Mac’s Built-in Camera?
Mac camera not working? Here are a few signs that will help you detect that your Mac’s camera is not working, along with a couple of fixes that you can try to troubleshoot this issue.
Check Indicator Light Status

Watch out for the indicator light next to your Mac’s camera. If the light is green and glowing, it means that your Mac’s camera is active. Also, as soon as you close the camera, the green light will disappear, indicating that any of the apps no longer uses your camera.
Update Screen Time Settings
If your camera is active and green light is blinking, and if you’re still unable to use your Mac’s built-in camera, you can try updating the screen time settings of your device.
Tap the Apple icon on the main screen, select System Preferences> Screen Time.
Select the “Content and Privacy” option from the left menu pane and then tap on “Apps.”

Now here, you need to make sure that the Camera option is checked.
Manage App Permissions
Another hack to fix the “Mac webcam not working” issue is accessing the app permissions section. Say, you’re trying to use your Mac’s camera to access Skype or any specific app. There might be a possibility that a particular app doesn’t have access to use the camera. To change this setting, here’s what you need to do.
Tap the Apple Menu icon, select System Preferences> Security and Privacy.
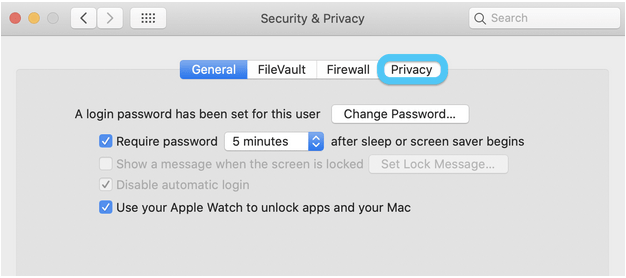
Switch to the “Privacy” tab and select the “Camera” option from the left menu bar.
Scroll down through the list of apps to check whether you have granted permission to use the camera or not. If not, tweak the settings, save your changes, re-launch the app to see whether it fixed the issue.
Reset SMC
If any of the methods mentioned above did not favor your luck, then as a last resort, you can try resetting your Mac’s SMC (System Management Controller). Resetting your Mac’s SMC is a simple solution to deal with various hardware related issues on your device.
To reset SMC on MacBook (with T2 chip), follow these quick steps:
Shut down your device. (While it’s still connected to a power adapter).
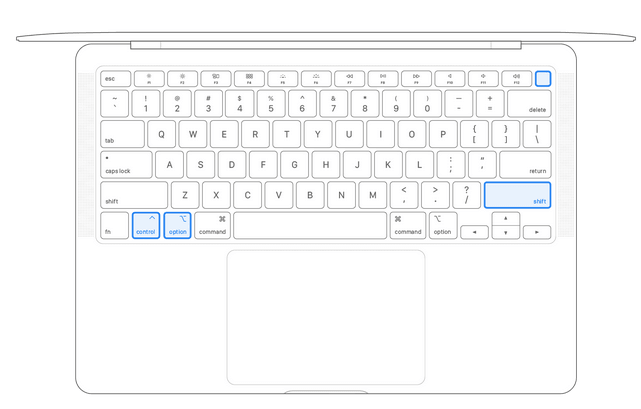
Now, press and hold Control + alt + Shift keys altogether for about 30 seconds, and then restart your device while holding this key combination.
Make sure all these four keys are held down for about 7 seconds until your device restarts. You can also visit Apple’s official support page to learn how to reset SMC on Mac.
To know more on how to reset SMC, PRAM to fix hardware issues on Mac, visit this link.
Resetting the SMC will most probably fix the “Mac camera not working” issue on your device. If not, then you can try contacting a nearby Apple Store and get your device physically checked. If nothing works, you can get in touch with experts at Apple Support Center as they can guide you on what further steps need to be taken, after analyzing the issue.
Don’t Forget to Update your Mac

Before you do all the hard work and troubleshooting, make sure that your device runs on the latest macOS version, and all the apps are up to date. Tap the Apple icon on the main screen, select “Software Update.” Tap on the “Check for Updates” option to know whether any latest update is available for your device. If yes, update your device with the latest macOS version right away!
Anamika
Thanks for the guide. Is there any guide on overheating issues