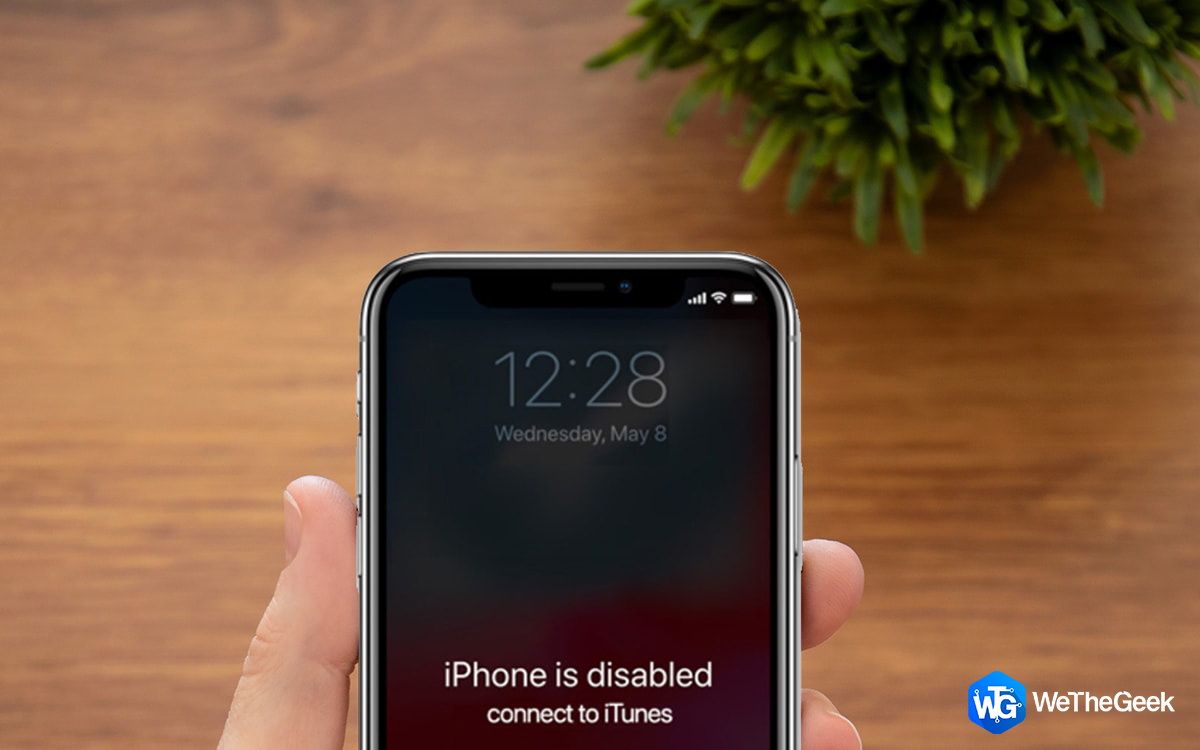
When you enter the wrong passcode multiple times to unlock your iPhone, you get the error ‘iPhone is disabled. Connect to iTunes’ or ‘iPhone is disabled. Try again in 1 minute or 5 minutes’ pop up on the screen. In case you are thinking about why this error is disturbing you, Relax! Because it is meant to keep your privacy intact while not letting an unknown person get into your phone’s information. Such errors can occur when your phone is in the pocket, and accidentally wrong passcode is punched multiple times, or your kids/intruders are trying to unlock your phone.
In any case, you don’t need to worry as we will help you to figure out the solutions.
Why Error iPhone Is Disabled. Connect To iTunes?
When you enter the wrong passcode to get into your iPhone, the following things are likely to happen.
- Enter the wrong passcode 5 times: iPhone is disabled, try again in 1 minute.
- Enter the wrong passcode 7 times: iPhone is disabled, try again in 5 minutes.
- Enter the wrong passcode 9 times: iPhone is disabled, try again in 60 minutes.
- Enter the wrong passcode 10 times: iPhone is disabled, connect to iTunes.
Well, the last one is the most dangerous as it can even wipe all the important data on your iPhone. Let’s figure out different ways to bypass disabled iPhone
| NOTE that if you enter the same incorrect passcode multiple times, it is considered as one incorrect passcode only. Your iPhone is disabled only when you try entering different passcodes. For example, entering 2233 more than five times would count as one wrong passcode only. Whereas entering 2234, 5678, 9812, 9032, 7823, etc. count as different passcodes. |
How To Fix ‘iPhone is disabled. Connect to iTunes’?
As you have learned that this is the most dangerous or worst situation, it is because you won’t be able to save your data now, although you can get into your iPhone. It would be great if either you remember your passcode or have taken the backup recently.
 Additional Tip
| Recommendation
We advise you to use Right Backup to store your photos, videos, documents and other files in one place. With Right Backup:
|


Now as we are considering that your iPhone is disabled and you have taken the data backup, all you need is a computer system and a lightning cable. In case you don’t have any one of them, you can visit the Mac store for further assistance.
Step 1: Let’s start with entering the Recovery mode. For this, press and hold the side button along with one of the volume buttons. Now, wait till the power slider appears on the screen.
Step 2: Turn off the phone by dragging the slider.
Step 3: Now press the Lock button of your iPhone and connect with the Mac using a lightning cable. Make sure you keep pressing the button till the recovery screen appears.
Step 4: Now on the computer system, locate iTunes and launch it. Here, select ‘Sync’ and enter the correct passcode and unlock the device. It helps in taking backups on the computer.
Step 5: As you find the ‘Restore’ button, click on it. You may need to wait for 15 to 20 minutes so that the necessary software can be downloaded.
Step 6: Now follow the on-screen instructions, and your data will be backed up on the computer.
Your data from the device will be erased, and you can, and you will be able to set up the iPhone for reuse.
Alternatives To iTunes To Unlock Disabled iPhone
When your iPhone is disabled and gives the error ‘iPhone is disabled. Connect to iTunes’, it is required that you take the backup of the phone and reset it for overall new use.
- Using Finder (Mac updated to Catalina)
For this method,
Step 1: Connect your iPhone to Mac Catalina with a USB cable. Select ‘Trust this computer’ or enter the correct passcode.
Step 2: Go to the Finder menu and select your device. Here, choose Restore Backup.
Step 3: Choose your backup. Now keep your device connected to the computer until it restarts and syncs.
- Using iCloud
In this section,
Step 1: Go to icloud.com/find.
Step 2: Enter your Apple ID & Password and select All Devices.
Step 3: Choose your iPhone and select Erase iPhone. Confirm the action.
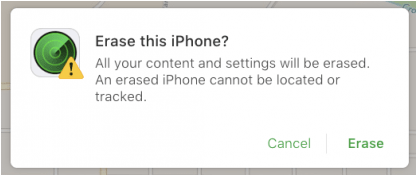
Step 4: As the authentication is approved, your iPhone would appear as a new one. Now you can restore from the backup using iTunes or iCloud, as preferred.
How To Avoid The Error Of An iPhone Is Disabled In The Future?
Now we understand that you don’t want to face the situation of iPhone being disabled ever again, so here are some quick tips:
- Long and complex passcodes (which of course you remember) so that no accidental touches create a complex situation.
- Keeping the phone at a safe place so no unwanted person, kid or even you can touch it randomly.
- Keep backing up your device regularly for any worst-case scenario.
Conclusion
Have you been able to solve your problem of iPhone disabled? If yes, don’t forget to send us a thumbs up below. Well, you can also take out some time to read:
- How to factory reset and force start your iPad?
- How to securely erase iPhone data and make it completely recoverable?
- How to transfer contacts from one iPhone to another iPhone?
Follow us on social media – Facebook, Instagram and YouTube.
Srishti Sisodia
Faced the same challenge. Thank you for the simple steps, they resolved my issuesBryna Beauchamp
a friend gave me his old iphone and he cant remember how to get into it and cant get past the start up page, [ disabled connect to iTunes. I want to factory reset out of the box my iphone 4 please help me .