
Up until now if you thought that driver-related issues only surfaced on Windows, this might come as a little surprise but there are Mac users who often have to deal with Mac driver conflicts. To bring things in perspective, here are some real-life examples where it is important to update drivers on Mac so that peripherals or overall functionality of Mac doesn’t suffer –
- Inability to handle printing tasks because of outdated or mismatched printer drivers.
- Poor graphics driver resolution.
- Slow internet speed or other Wi-Fi issues because of Wi-Fi driver glitches.
- No sound output or distorted sound output because the audio driver is malfunctioning.
Also Read: How to Update Drivers on Windows 11
How To Update Driver On Mac Or MacBook
Solution No. 1 – Check The Hardware
Instead of first jumping on any advanced measures, first, check if your hardware is working fine. For example, in case of a problematic USB connection, check if the USB cable that you have connected to your Mac is not damaged or connected loosely. You can try and connect to some other Mac and then ascertain if it’s still causing any issues or not.
Solution No. 2 – Allow To Update Drivers from App Store and Identified Developers
There are instances when your Mac doesn’t accept drivers from third-party developers and hence doesn’t install them. In case you trust the developer, you can enable the settings as mentioned below. However, if Mac’s Gatekeeper’s security is prompting you not to, it is advisable that you also have an Antivirus ready as a second line of defense. Here’s how you can allow to update drivers from App Store and identified developers.
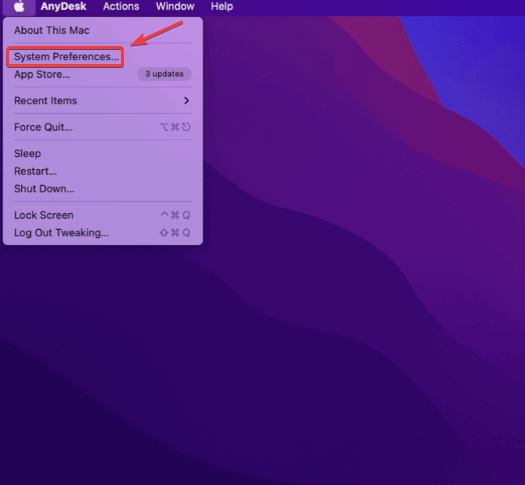
Step 1 – Click on the Apple icon and click on System Preferences.
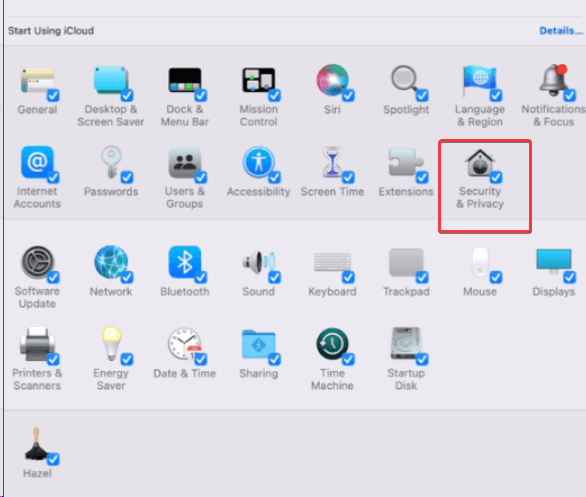
Step 2 – Click on Security & Privacy.
Step 3 – Click on the lock icon and enter your Mac’s password.
Step 4 – Click on App Store and identified developers and click the lock icon to save.
Solution No. 3 – Download Drivers By Updating Mac
Updating Mac to the latest version also helps update drivers. This will further ensure compatibility with the latest hardware and peripherals. To update your Mac, follow the steps mentioned below –
Step 1 – Click on the Apple icon.
Step 2 – Click on System Preferences.
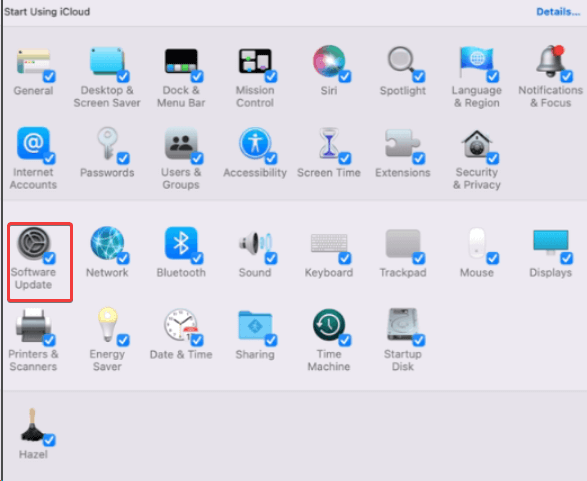
Step 3 – Click on Software Update and check if there are any updates available.
Step 4 – Click on Update Now and follow the on-screen instructions to install the updates.
Step 5 – Once the updates are installed, restart your Mac.
Solution No. 4 – Head to The Device Manufacturers Website
If you are aware of the particular peripheral that’s creating issues. You can head to its manufacturer’s website and download the driver. Once you have done that, follow the steps mentioned below –
Step 1 – Double click and extract the driver to extract it.
Step 2 – Run the .pkg install file.
Step 3 – Like we said before, if you trust the publisher, go to System Preferences > Security & Privacy and click on Open anyway.
Step 4 – For authentication, you will be required to enter your username and password.
Step 5 – Click on install to continue the process.
Step 6 – Restart your Mac.
Step 7 – Since a driver on macOS is either implemented as a kernel or system extension, follow these steps –
- Head to Preferences.
- Click on Security & Privacy.
- Click on General.
- Unlock the pane by clicking on the lower left corner and entering the password.
- Click on Allow.
Solution No. 5 – Check Driver Compatibility
While not a very common scenario, you may be dealing with a non-class-complaint hardware. In that case you will have to first ascertain whether the hardware is compatible with your Mac. You will have to search for its updated driver. To do that head to your Mac’s web browser, search for OS Compatibility of [hardware name].
Were You Able To Resolve Driver Conflicts
We earnestly hope that by now you have been able to resolve driver conflicts on Mac and that your peripheral is working fine. If you find value in this post, do give it a thumbs up and share your experience in the comments section below. For more such content, keep reading WeTheGeek. You can also reach out to us on Facebook, Pinterest, Instagram, YouTube, and Flipboard.