Audio issues are among the most common problems that can appear on Windows 10 PC, and there might be times when merely tweaking the volume button up and down might not be of much help. That is the time you might wonder how to restore sound to my computer.
Maybe the volume buttons might not be of much help to you but tweaking few settings here and there will. Now, again, you might ask what settings I can tweak to restore sound to my computer? Let’s begin with a very positive frame of mind and say, “I can.”
Five Ways I Can Restore Audio To My Computer
1. Check Plugs, Cables, Jacks, Speaker, Volume And Headphone Connections
- Check if all the cords and cables for speakers and headphones are not loose and are properly plugged in.
- Check if you have inserted the right jack in the right chord. If you are unaware of which jack goes into which cord contact your hardware manufacturer
- Check whether the volume is on mute or not, and turn up all the volume controls.
2. Update/ Uninstall And Reinstall Your Audio Driver
You might have thoroughly checked your cords, cables, and jacks and might have even consulted your hardware manufacturer and find that there is no problem with them. And, now you are wondering why I am not able to restore sound to my computer?
Maybe the culprit is your sound or audio driver. It could be that you are running an old audio driver that does not comply with the configuration of your PC, or maybe there is a glitch in your existing driver that you need to uninstall and reinstall.
While manually dealing with the issue is one way to solve the problem, this may take a considerable amount of your effort and time. So, cut short the hard work and install a utility that can automatically download an audio driver, which is compatible with your computer, install it, and, if required, even update your sound driver. Though, we’ll also discuss the old-fashioned way of dealing with the issue too.
One of the best driver utilities that can help you update audio drivers is Advanced Driver updater. It consists of thousands of drivers in its database and supports a large number of devices.

Here’s why you should install Advanced Driver Updater to restore audio in your Windows 10 PC –
- Install Missing Drivers
It installs missing drivers and fixes any audio errors by rectifying missing frequencies and channel loss.
- Update Audio Drivers
Helps you update audio drivers so that you can enjoy games with audio in high definition
- No Audio Lags
It even fixes audio, and video lags.
- Backup And Restore
Advanced Driver Updater helps you take a backup of drivers to avoid any compatibility issues, and it also lets you restore to the last working driver as well
Install Advanced Driver Updater Now
Now, we’ll even a look at the manual ways of reinstalling audio drivers in Windows 10 –
Step 1 Diagnose The Issue
- Right-click on the Windows icon and select Device Manager
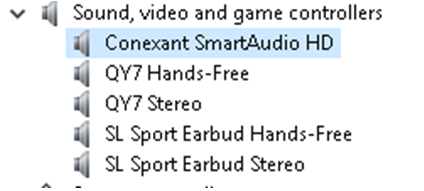
- Click on the Sound, video and game controllers
- As you can see, the audio driver in this PC is Conexant SmartAudio HD; yours could be different. If you see a yellow sign with an exclamation mark against your audio driver, you could be facing audio issues.
Step 2 Reinstalling The Driver
Let’s say that the Conexant SmartAudio HD Driver is faulty, and I wish to restore audio to my computer by reinstalling this driver. Here are the steps that I need to follow to reinstall this driver –
- Press Window Key + R which will open the run dialog box
- Type devmgmt.msc in the search barand press enter or click on OK
- Now, click on the Sound, video and game controllers dropdown
- Right-click on Conexant SmartAudio HD (or your Audio Driver)
- Click on disable driver
- Click on checkbox Delete the driver software for this device checkbox and press OK
- Restart your PC
- Again open device manager by following the steps mentioned above
- Right-click on the audio driver again and click Scan for hardware changes
Note: If your system fails to find the missing driver and is unable to install it automatically, you can check the official Conexant website and download the audio driver based on whether you have a 32 or 64 bit PC.
3. Run The Windows 10 Troubleshooter
If you cannot find out what’s troubling the audio in your PC, let Windows 10 troubleshoot it for you. Once you employ the troubleshooter in Windows, it will scan the system for probable issues and offer fixes.

Now there are multiple ways to open the Windows 10 troubleshooter; you can either press the Windows key and type Find and fix problems with playing sound in the search bar. Hit Next and the system will start detecting issues if any.
You can even choose the path – Start > Settings (cog icon) > System > Sound > Troubleshoot. This way, the troubleshooter will scan for audio devices, and then you can troubleshoot the device, creating problems.
4. Check If Your Sound Settings Are Appropriate
Here you will mainly check if your audio devices aren’t disabled or muted. To check this follow the steps mentioned below –
- Right-click on your speaker’s icon and select Open Volume Mixer
- Make sure that none of the volume controls for any of your devices are muted. If they are, you’ll see a red circle with a slanting line against these
- You could also check if you have muted or disabled your devices mistakenly by following the path below –
Start > Settings > System > Sound
- Now, select Device properties of both output and input audio devices
See if you have mistakenly checked the Disable box. If you have, uncheck it
5. Reset Or Restore Your PC

Resetting the PC should be your last resort because when you choose to reboot your PC, you might have to let go of crucial data. You should take a backup of all the settings and data so that even if something goes wrong, you can restore previously saved data.
Which is when you can choose to create a restore point. For this
- Open Control Panel
- In the search box type recovery
- Select Open System Restore
- Choose Next in Restore system files and settings
- Now, select the restore points from the given list of results.
Note: You may have to configure System protection. To do this, go to the Control panel and select Recovery > Configure System Restore > Configure and check if the Turn on system protection option is selected. If not check the radio button against Turn on system protection
In The End
It was indeed frustrating for me when, despite my laptop’s volume on full, I could not hear anything when I was watching a movie. To restore sound to my computer, I contemplated all the above options. Though I tested my device’s audio jacks and audio settings personally, the one fix that worked for me was updating my audio driver.
So, if you have been in a similar situation and have tried and tested fixes like the ones mentioned above, do share with us in the comments section which one worked for you. You can find more of such troubleshooting content and a lot more on Systweak Blogs. You can also find us on all social media platforms and subscribe to our YouTube channel as well.