
Zipped files take up less storage space and can be transferred much faster when compared to their uncompressed versions. Another aspect is that you may be compressing documents that contain sensitive data. In this case, it is advisable to password-protect your files so that you can protect them from prying eyes, especially, if your Mac is used by multiple users. There are multiple ways in which you can password-protect zipped files on your Mac.
In this post, we’ll demonstrate some of the best in which you can password-protect or encrypt zip files on your Mac. With the methods mentioned below, you can password-protect zipped files containing documents, photos, audio, video, or any other type of file.
Why Zip Files On Mac With Password?
Some files or folders such as photos, official documents, videos, etc are not to be accessed by every user who uses your Mac. In this case, merely compressing files won’t suffice. By putting your zipped files behind a password, you can restrain their access. This means only you or the other user who has the password will be able to access files.
How To Password Protect Compressed Zip Files on Mac
Method No. 1 – Using Terminal
If it’s just about zipping a file for transfer or emailing purposes where data protection isn’t required, you can use the steps mentioned in this post to zip files on Mac.
But, if you regularly archive files with sensitive data, compressing files with passwords can be a life savior. Your Terminal can help you with both zipping files as well as password-protect zipped files on Mac. Even though it requires a few lines of commands, you can directly copy-paste commands and follow the steps –
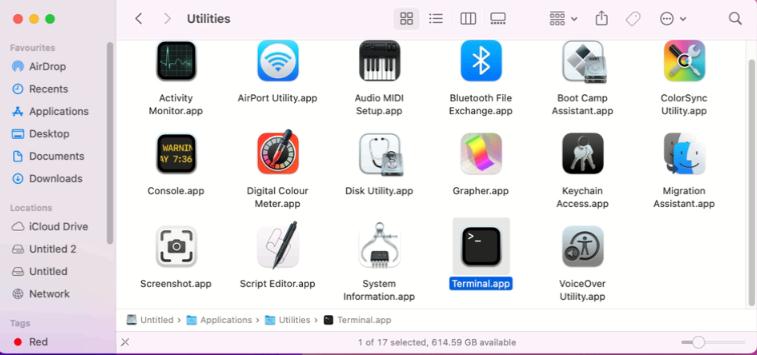
Step 1: Open Terminal by going to Finder > Utilities and then click on Terminal.
Step 2: When the Terminal opens, go to the folder whose contents you want to zip and password-protect.
Step 3: Here we are going to use the cd command to move the Terminal to the folder where the contents are placed. To do that first, type cd “path of the file”. To get the path of the file, right-click on the intended folder and click on Get Info. Copy the path from the Where section and paste it in the inverted commas as shown in the example below.
Example – admin$ cd “/Users/admin/Desktop”
Step 4: In the next line, enter the command zip -er “FILENAME.zip”. In this command replace the FILENAME with the name of the file. Here add a space after .zip and then, in the second argument, pass the name of the target file.
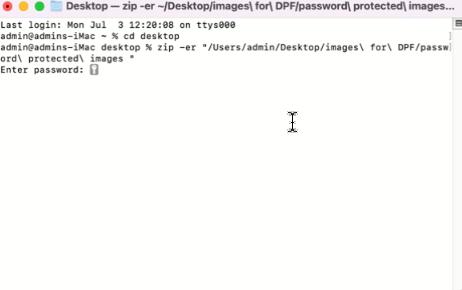
Press the Return or Enter key to move to the next step.
Step 5: If you have followed the steps correctly, you will be asked to enter and verify the password. Enter the password twice.
You will see that a zipped file will be created and when you will try to extract it it will ask for a password.
Method No 2. – Use A Third Party Utility
To compress and encrypt zip files quickly and in a hassle-free manner, you can use a tool like Archiver. It has a clean and easy-to-understand drag-and-drop interface where you can drag any folder or file into the app. Next, you can click on a single button to create an archive. To password-protect or even archive files using Archiver, follow the steps below –
- Download, run, and install Archiver
- Head to the location whose files or folder you want to archive and password-protect.
- Drag the file or folder into the Archiver window.
- Choose the archive format. In our case, we’ll select ZIP.
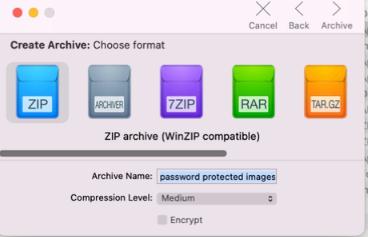
- Under Compression Level, click on the checkbox next to Encrypt.
- Set a password.
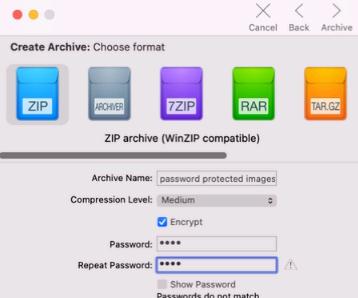
- Click on Archive from the bottom right-hand side of the screen.
Another tool that is equally easy to use and that can help you with both compressing as well as password-protecting files is BetterZip. One of the best aspects of this tool is that it can even help in repairing corrupt zip files too.
Zip Files With Passwords and Keep Compressed Data Safe
After going through this post, you can easily compress and password-protect files on your Mac and keep your data safe from being exploited. Found this post helpful? Do let us know in the comments section below. For more such content, keep reading WeTheGeek.
Need help with an issue you are facing on your device? You can reach us on Facebook, Instagram, YouTube, Pinterest, and Twitter.