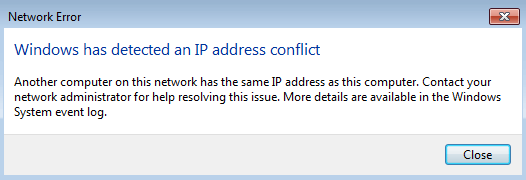
Whether you can’t access the Internet on Windows Operating System or are getting the annoying “Windows has detected an IP address conflict” error? You’re not alone! Many computer users have also reported facing the same problem. But we are right here with multiple solutions to help you resolve this troublesome IP Conflict Error on Windows PC.
But before that, we need to know what IP address is and why the “Windows has detected an IP address conflict” error message appears. In case you missed our previous guide on how to find your IP address on Windows 10? Check out our blog post to find different ways!
What is an IP address?
Internet Protocol, popularly known as IP address, is a unique digital address assigned to your computer. When your system is connected to the network and you go online, the network can easily identify your device.
But when two devices share this IP address, you end up receiving Windows detected IP address conflict messages. How can two devices have the same IP address?
This happens when there is an issue with either PC settings, router, or network card drivers.
Therefore, when you receive conflicting IP address messages to avoid complications, you should fix it immediately.
 Additional Tip
Additional Tip
Most issues you face on Windows are caused due to outdated or corrupt drivers. Therefore, we suggest keeping them updated. You can do it manually, but it can be time-consuming, complicated, and complex.
Hence, we bring an easy solution for you, and that is the Driver Updater module of Advanced System Optimizer. Using this feature offered by the best system optimizer in no time, you can update outdated drivers and fix all driver-related issues. Not only this, but you can also even use this PC cleaning tool to get rid of unwanted junk files, cache, invalid registry errors, and a lot more. This trustworthy app for the Windows operating system has been in the market for more than a decade and has helped millions of users.
If you want to see how it works, download it now by clicking here.

To learn more about Advanced System Optimizer, you can check out the detailed review right here!
Quick Fixes: Windows Has Detected An IP Address Conflict Error
There are several ways to fix the IP address conflict error. So, we will explain all of them one by one.
Note: We recommend you to follow the steps as explained. Do not skip them as they are in order. If a simpler method works, it’s great; else, you can switch to advanced ways and restore your IP address to fix Windows IP address conflict.
Method 1: Restart your router
Each device connected to the network router assigns an IP address. If the router fails to assign an IP address to the device, you might receive Windows has detected an IP address conflict error message. Therefore, to fix it, you need to restart the router. To do so, follow the steps below:
1. Press the power button on your router to shut it down.
2. Wait for a few minutes until you are disconnected from the internet.
3. Now power on your router.
4. Since we restarted the router, you might have to reconnect the device to the network.
Once you are connected, check if the IP address conflict error message is gone or not.
If not, you can move to the next solution!
Method 2: Disable and re-enable your network adapter
A network adapter is a hardware piece that acts as the interface for a computer to a network. It can be an ISB adapter or anything. Shutting down and restarting the adapter can help fix network connection issues on Windows operating systems.
Note: To follow this method, you need to have a local user with administrative permissions.
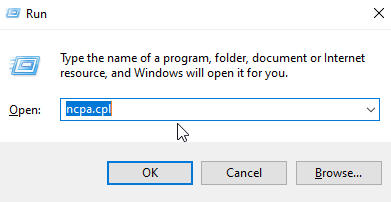
1. Press Windows + R keys to get the Run window.
2. In Run window, type ncpa.cpl and click OK.
3. This will open the Network connections window. Here right-click the adapter you are using and select Disable from the context menu.
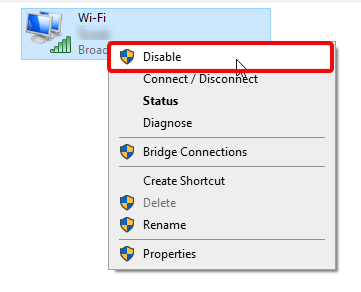
4. Once disabled, you will be offline. Now again, click the same adapter, and this time click Enable from the context menu.
5. Reboot the device you were trying to connect to and check if the IP address conflict message is still appearing or not.
Now carefully witness if you are still struggling with the annoying “Windows has detected an IP conflict” error on Windows. If the issue persists, go ahead with the next workaround!
Method 3: Refresh IP Address
When it comes to network problems, especially ones with IP addresses, this method always works. We will need to use certain commands to release the old IP address and assign a new one for this solution.
Note: To follow this method, Local user accounts should have administrative privileges.
1. Type Command Prompt in the Windows search bar.
2. Select Run as administrator from the right pane.
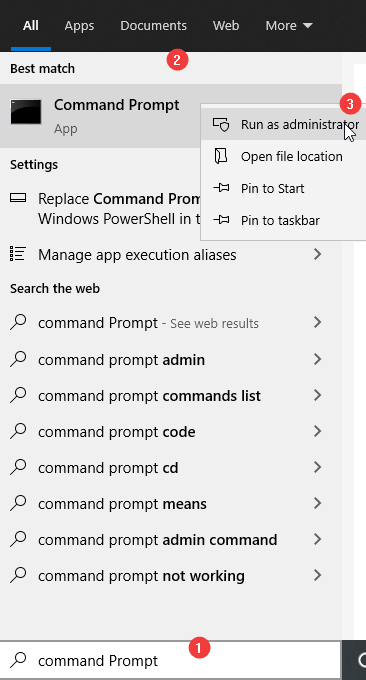
3. This will launch Command Prompt as an admin.
4. Now, here type the following command and press Enter after each command:
netsh int IP reset c:\resetlog.txt
ipconfig /release
ipconfig /renew
5. Let the process finish. Now use the device to see if you are still getting Windows IP address conflict messages.
Hopefully, the error message “Windows has detected an IP Conflict” should be resolved by now. If not, we have other advanced methods to fix it.
Method 4: Clear Static IP
Static IP means the address your computer is using is manually configured. Sometimes this too creates problems. Therefore, it is recommended to let the router assign an IP address. Even after following the above three solutions, if you are still encountering Windows has detected IP address conflict, we need to use an automatic IP address.
To do so, follow the steps below:
1. Press Windows + R keys to the Run window.
2. In Run window type ncpa.cpl and press Enter key.
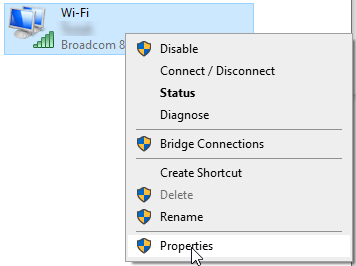
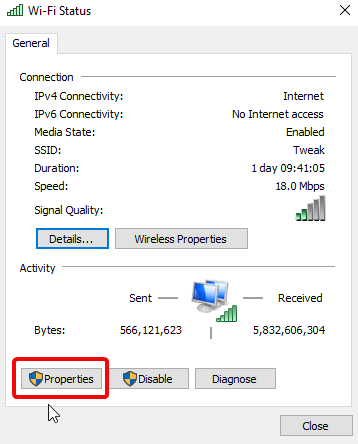
3. Right, click the adapter, and this time select Properties from the context menu.
4. Again, click Properties.
5. Here, look for Internet Protocol Version 4 (TCP /IPv4) and double click it.
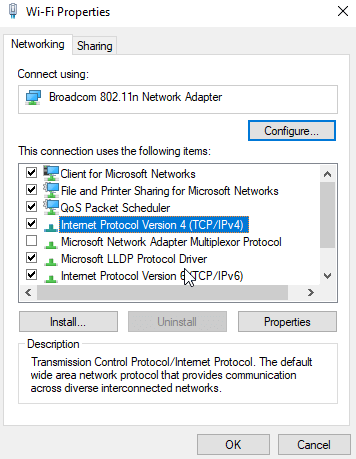
6. You will now see a new window where under the General tab, you need to make sure Obtain an IP address automatically and Obtain DNS server address automatically options are selected.
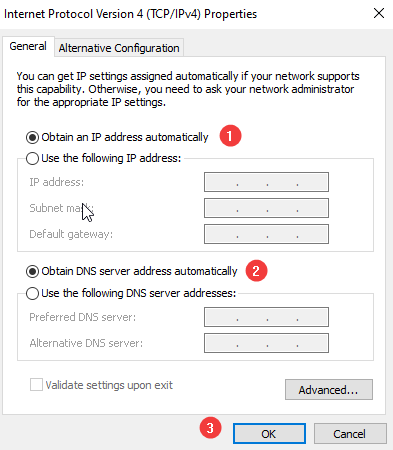
To apply changes, restart your PC and check for the IP address conflict message. Hopefully, you will be free from the vicious loop now!
Must-Read: Steps on How to Change your IP Address in Windows 10?
Method 5: Update Network Card Driver
Alongside causing Windows has detected an IP address conflict, error outdated network drivers can cause serious problems.
Therefore, when you get conflicting IP address messages, try updating the driver.
You can do so by heading to the Device Manager, visiting the manufacturer’s website. But both the methods are time-consuming, and they require you to know a lot of things. Therefore, if you want an easy way to do it, we’ve got it covered.
But before that, we will explain how to do it manually via Device Manager.
1. Press Windows + R to open the Run window.
2. Here, type denmgmt.mscand press Enter
3. This will open the Device Manager window.
4. Here unhide Network adapter section > right-click the driver > Updater Driver
5. You’ll now see a window with here click Search automatically for updated driver software and follow on-screen instructions.
6. If Windows can find the driver update, it will automatically download and install it.
7. Once done, restart your computer to see if the problem is resolved.
If you find this process lengthy and time-consuming, try using Advanced System Optimizer.
1. Download and install Advanced System Optimizer.
2. Now, click the Windows Optimizer module from the left pane and select Driver Updater.
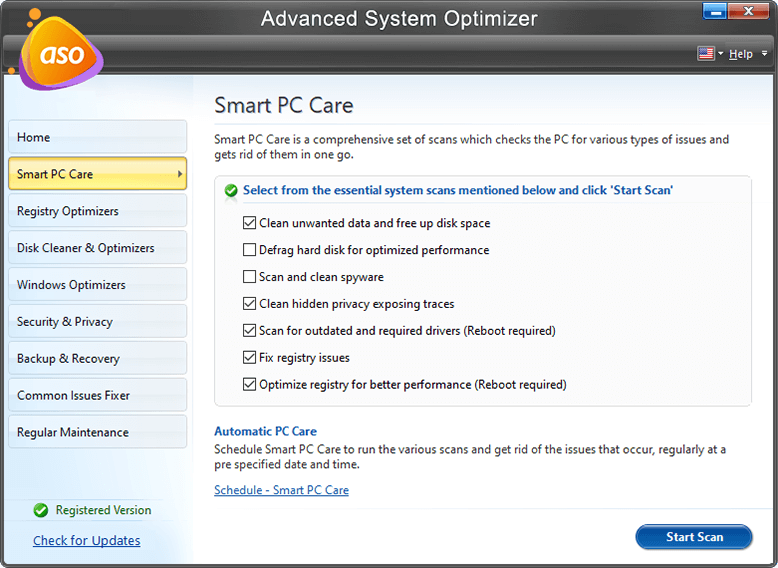
3. Double click it to launch the module.
4. Click Start Scan Now to detect outdated drivers.
5. Once the scan is done, select the driver, you wish to update and click Update Selected Drivers.
6. Restart your computer. The problem should be fixed.
Were you able to fix the IP Address Conflict error on Windows 10 PC? If updating the drivers didn’t help, then we are left with only one way.
Method 6: Disable IPv6
This new technology sometimes creates problems, and you get Windows IP address conflict messages. To fix it, follow the steps below:
1. Press Windows + R to open the Run window.
2. Type ncpa.cpl, press Enter key
3. Right-click adapter and select Properties
4. Here, uncheck Internet Protocol Version 6 (TCP/ IPv6)
5. This will disable the latest technology.
6. Reboot your PC
This should surely fix Windows has detected an IP address conflict error!
Tada! This is all. We hope you were able to fix the IP address conflict error using the steps we explained above. Do let us know which steps worked for you in the comments section. If the guide was helpful, share it with others who might need it!
Frequently Asked Questions: Fixing IP Conflict Error On Windows
Q1. Which Command Will Allow Me To View IP Address Conflicts?
Simply launch the Command Prompt and execute the following command: IPCONFIG /ALL. As soon as you press the Enter button, it will automatically identify the conflicting device.
Q2. Is an IP Address Conflict Dangerous?
Well, having the IP Conflict error means there’s an issue in your system settings or your router. Getting an error message “Windows Has Detected An IP Address Conflict’ can lead to multiple complications while using the network.
Q3. What Is The Main Culprit IP Conflict Error?
If one or more devices in a specific network have the same IP Address or if the DHCP server encounters a problem & a lot the same dynamic IP address for two or more devices, you can witness the annoying IP Conflict Error on Windows PC.
NEXT READ: How to Hide My IP Address for Free and Maintain Anonymity?
hitesh gupta
The info on IP address has been quite helpful.. thank you for the information