What is the Host Process for Setting Synchronization?
Popularly known as SettingSyncHost.exe, the file is used to sync system settings with other devices.
Therefore, when changes are made to one PC, they are reflected on other devices too. Windows Host Process can sync mail, wallpaper, scheduled services, Xbox, OneDrive, and other useful applications.
This process is found in the System32 folder and is known to be an important process on Windows. However, it causes various problems like High CPU Usage.

Many Windows users have reported facing this problem. Therefore, to resolve this problem, we explain how to fix 100% CPU usage caused due to settingsynchost.exe.
How to Fix the Host Process for Setting Synchronization with High CPU Usage Error?
Here, we explain the best methods to fix host processes for settings synchronization CPU usage.
Before we learn how to fix the Windows Host Process, let’s know about a tool that helps fix common Windows errors. This tool is called Advanced PC Cleanup. Using this best PC cleaning and optimization tool, you can fix PC problems and prevent various other problems from happening on the system. To use it, follow the steps below:
Step 1: Download and install Advanced PC Cleanup.

Step 2: Click “Start Scan Now” to start scanning the Windows registry system and other issues that could be causing PC problems.
Step 3: Click “Clean Now” to fix all issues.
That’s it. By following these 3 simple steps, you can fix most Windows-related problems. In addition to this, you will be able to recover space and speed up system performance.
To know more about Advanced PC Cleanup read the complete review.
Now, let’s come to the point and learn how to fix the host process for setting synchronization that has stopped working.
Method 1: Update Windows
To fix the Host Process for Setting Synchronization with high CPU usage error, we will try updating Windows. To do so, follow the steps below:
Note: When updating Windows, make sure you are connected to the Internet. If you are not online, you may not be able to update Windows.
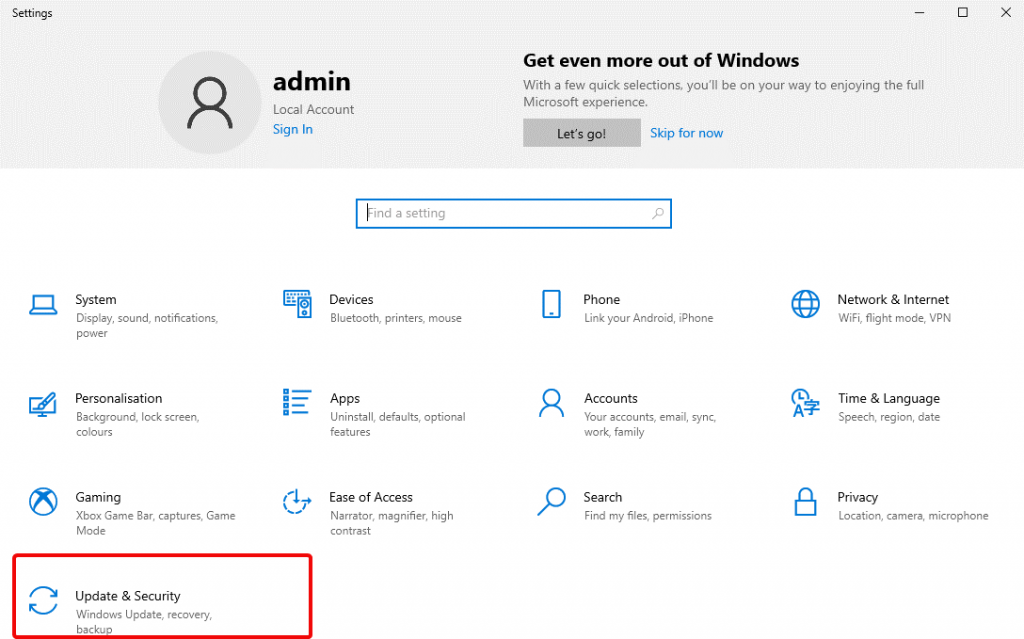
Step 1: Press the Windows key + I and click Update & Security.
Step 2: Click Windows Update > Check for updates.
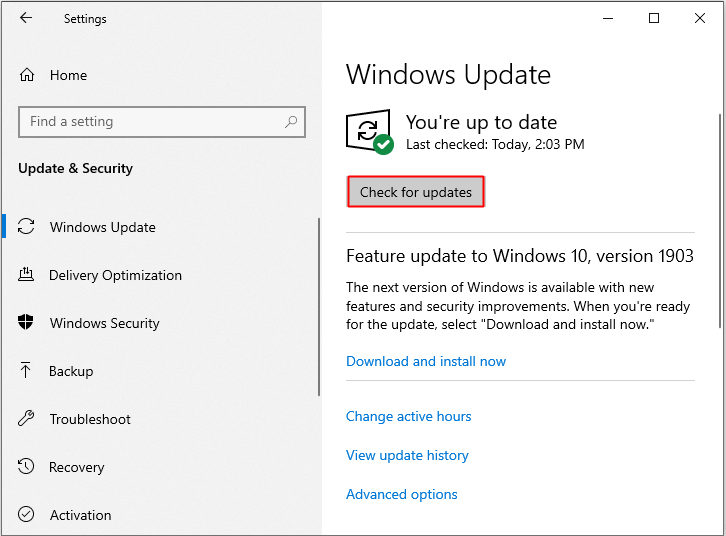
Step 3: If there are any pending updates, Windows will start downloading them. Once done, reboot the system to apply updates.
Now check the system and see if the settingsynchost.exe problem is resolved or not. If it still consumes High CPU resources move to the next step.
Method 2: Add Ownership for a Registry Key
When changes are made to Windows Registry Settings, the Host Process for Setting Synchronization problem occurs. To fix this problem, add ownership for a registry key. To do so, follow the steps below:
Step 1: Press the Win + R
Step 2: In Run Window, type regedit.exe and click OK. This will open the Registry Editor window.

Step 3: Now head to: HKEY_CURRENT_USER\Software\Microsoft\InputPersonalization\TrainedDataStore.

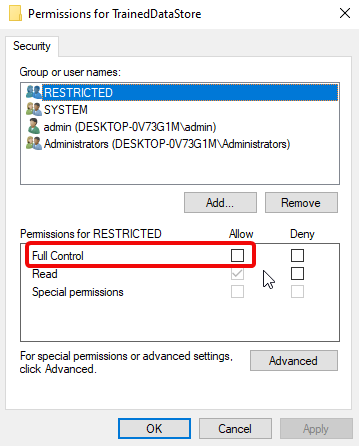
Step 4: Right-click TrainedDataStore > Permissions….
Step 5: Check the box next to Full Control > Apply > OK.
Step 6: Restart Windows and see if the Host Process for Setting Synchronization problem is resolved.
 Additional Tip
PRO TIP: If you face High CPU Usage due to some problems with the system, try using Advanced PC Cleanup. You can download it by clicking here. This top PC cleaning tool will help fix most of the PC related errors in no time.
Method 3: Run Windows in Clean Boot
Running Windows in Clean Boot means only the essential services and drivers will run. To do so, follow the steps below:
1. Press Windows + R > type msconfig click on the OK. This will open the System Configuration window.

2. Click Services tab > check Hide All Microsoft Services option > Disable all.
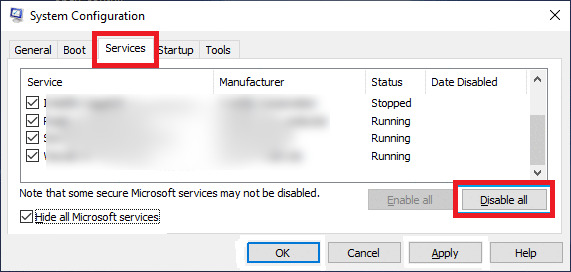
Note: We recommend hiding Microsoft services because differentiating between essential and third party services is not easy for a novice.
3. Click Apply > OK to save settings.
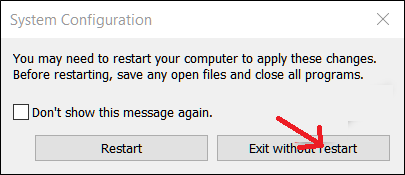
4. Restart PC to apply changes. However, if you are doing something important, you can select Exit without restart.
5. After this, press the Ctrl+Shift+Esc key, and this will open the Task Manager window. Here click the Startup Tab.
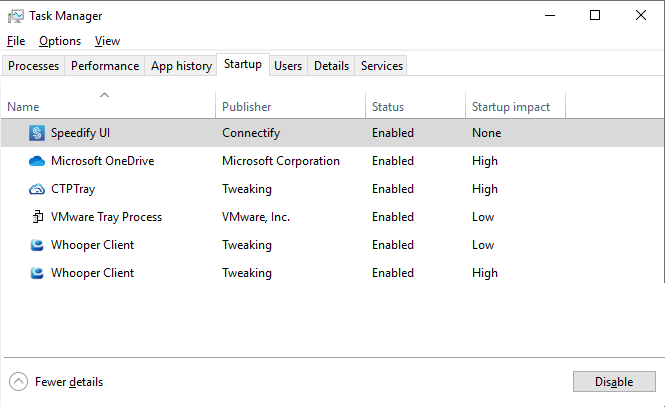
6. Select apps and disable all startup items as there is no option to do this at once. You will have to disable them one by one.
7. Reboot your Windows 10 computer.
Your computer will now start with essential services. Now see if Host Process For Setting Synchronization High CPU is resolved or not.
If this too doesn’t work, you can try using PowerShell Script.
If you are a beginner, don’t try following this step. This is for only Advanced Users.
Method 4 – Run a PowerShell Script
The following script will kill the ‘SettingSyncHost.exe’ service from your computer every five minutes.
Note: You need to have admin rights to run PowerShell
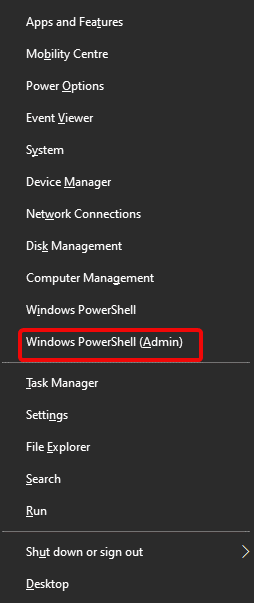
1. Press Windows + X and select Windows PowerShell (Admin).
2. Paste the following code:
Get-ScheduledJob |? Name -eq “Kill SettingSyncHost” | Unregister-ScheduledJob

Register-ScheduledJob -Name “Kill SettingSyncHost” -RunNow -RunEvery “00:05:00” -Credential (Get-Credential) -ScheduledJobOption (New-ScheduledJobOption -StartIfOnBattery -ContinueIfGoingOnBattery) -ScriptBlock {

Get-Process | ?{ $_.Name -eq “SettingSyncHost” -and $_.StartTime -lt (::Now).AddMinutes(-5) } | Stop-Process -Force

}
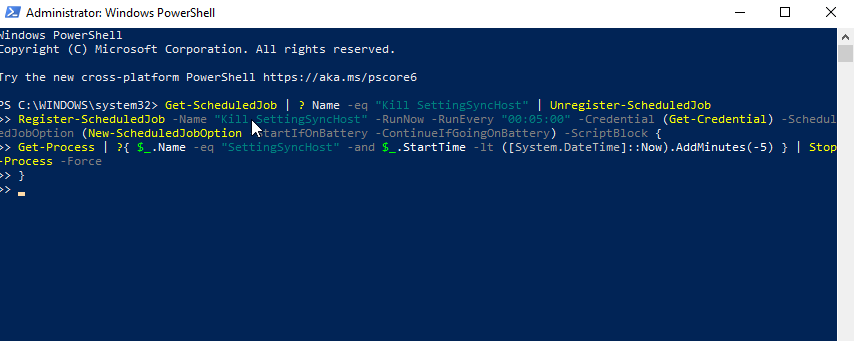
3. When asked, enter admin account credentials.

4. After entering the details, check if SettingSyncHost is terminated. If it is still running, try restarting the PC.
5. Now check Host Process For Setting Synchronization should be stopped.
In addition to this, we suggest closing the host process to define synchronization. To do so, follow the steps below:
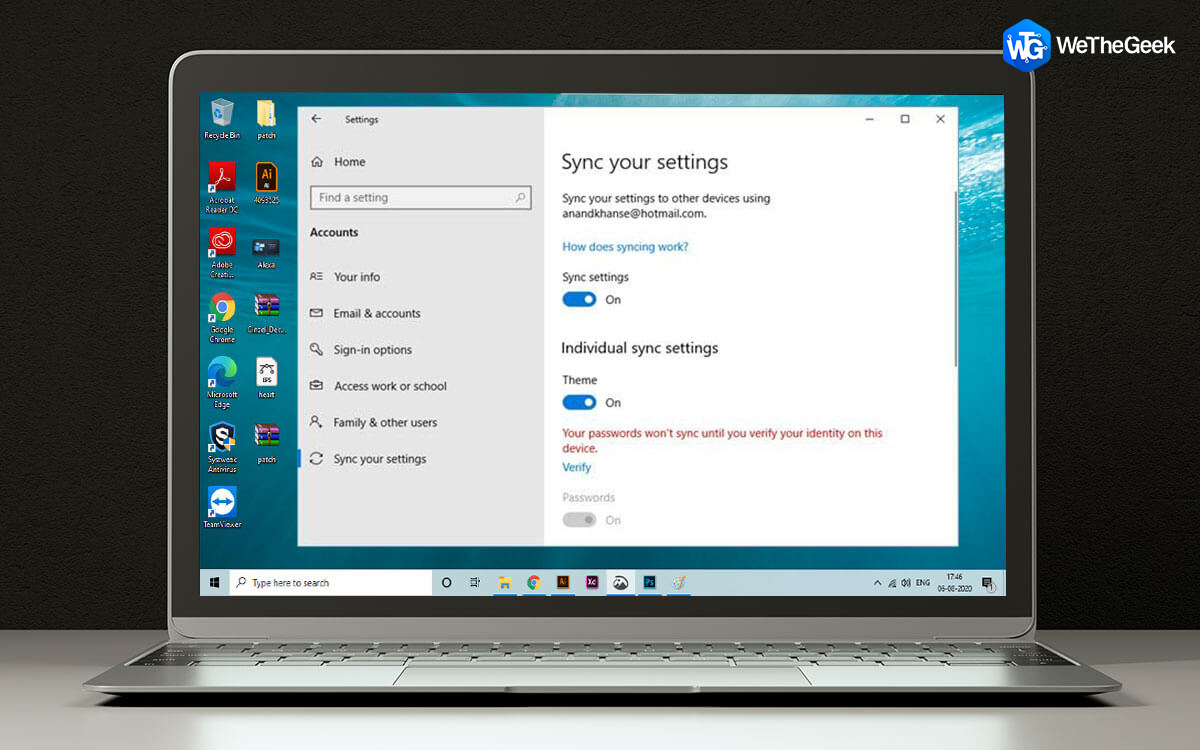
1. Press Windows key + I
2. Click Accounts
3. Select Sync your settings from left pane > disable synchronization settings.
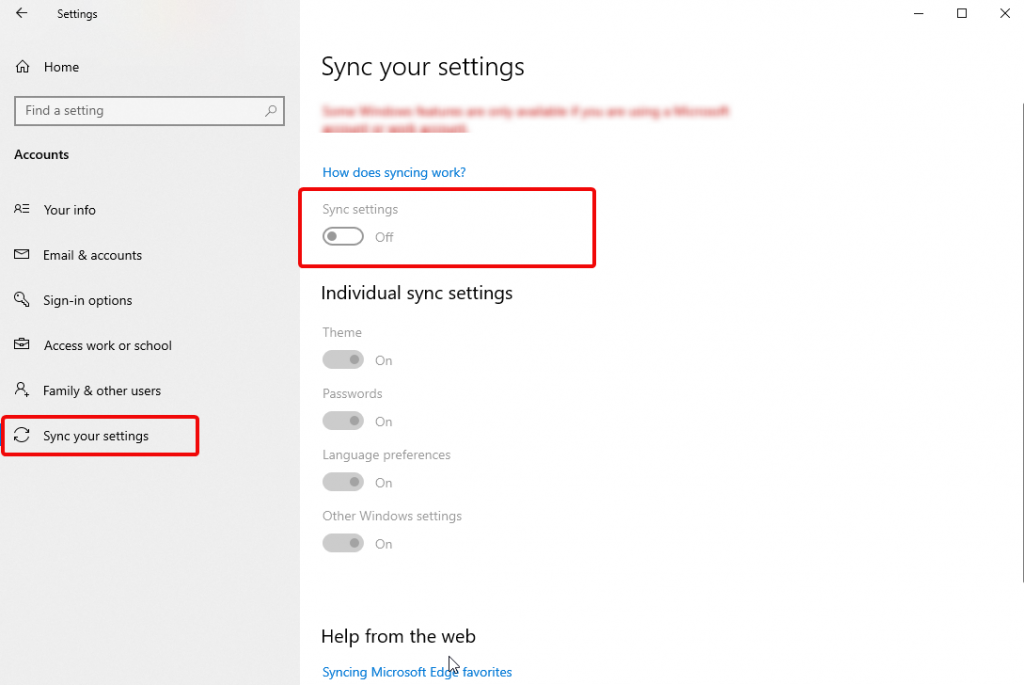
Restart Windows and see settingsynchost.exe or Host Process For Setting Synchronization should now not be running.
Final Words
Using these simple steps, you can easily fix the Host Process for Setting Synchronization High CPU Usage. To fix other Windows-related errors, try using Advanced PC Cleanup. This excellent PC Cleaning tool can do wonders. You just need to give it a try.
Frequently Asked Questions-
Q1. How do I stop the host process for setting synchronization?
If you wish to stop the host process for Synchronization on your computer, follow the steps. Go to Start Menu>Settings>Accounts>Sync Your Settings. Here turn off the Sync Settings by clicking on the toggle button.
Q2. What is the host process for setting Synchronisation?
The host process for setting Synchronisation on your computer is located as SettingSyncHost.exe. It is used for syncing all the settings on your computer to all other devices.
Q3. What is SettingSyncHost EXE?
SettingSyncHost.exe is a system process that is required to synchronize the settings on your computer with other devices. Settings such as wallpaper, browsers, OneDrive, Xbox, Mail app services.
Q4. How do I disable Host Process for Windows Services?
If you see Windows Host Process consuming high CPU usage, you must not disable it as it is one of the important processes running for Windows.
Amara Smith
is it necessary to restart pc after these changes?lawrence westwood
Updating Windows worked fine for me. I hope I never have to try out the other methods ever again.