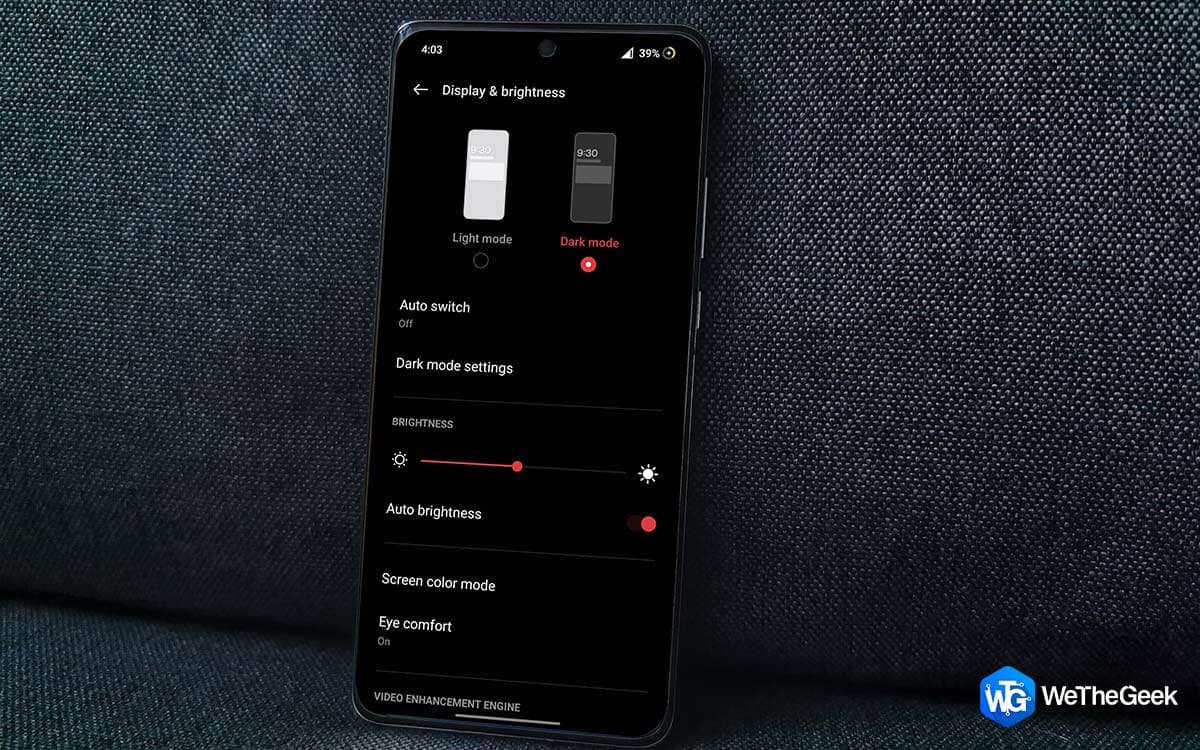
The adaptive brightness feature on Android intelligently utilizes the sensors on your phone. It automatically adjusts and discovers the ideal brightness level that matches your comfort in diverse lighting conditions. Whether you are surrounded by bright daylight or immersed in the darkness of night, maintaining an appropriate screen brightness is crucial.
This is where the auto brightness feature comes into play it ensures that you can enjoy an optimal viewing experience regardless of the lighting conditions. Occasionally, the auto-brightness feature may cease to function, requiring you to manually adjust the brightness settings. In this article, we will explore several troubleshooting steps that can assist you to fix Android auto-brightness functionality.
Fix Auto Brightness Not Working on Android Devices
It can get tedious when you have to constantly change the brightness manually to account for various lighting situations. We have gathered a number of troubleshooting suggestions to help you in order to lessen this strain. Let’s delve into them and fix auto brightness not working on Android smartphones.
1. Turn Off and Turn On Auto Brightness Feature
While it’s possible that you’ve already attempted this step, it’s worth giving it another try. Please follow the steps below to toggle the Adaptive brightness option on your Android device by turning it off and on again. Each phone may have its unique interface, but in many cases, you can enable or disable Adaptive Brightness conveniently from the Notifications panel. We are doing it on OnePlus 5 Android smartphone.
From the home screen of your device swipe down and pull up the Notification panel. Now just swipe right to find the auto brightness feature and tap on it.

Read Also: Google Strikes Back! Android’s 3 Most Dangerous Bugs Squashed for Good
2. Reset Auto Brightness
While Adaptive brightness can be convenient, it’s not without its flaws. Since it relies on your past brightness preferences, there can be instances where the feature encounters issues or adjusts the brightness incorrectly. Fortunately, Android provides you with the option to reset the Auto brightness feature. Follow the steps below:
Step 1: Open Settings of your Android smartphone and click on Apps, Apps & notifications, or Applications option.
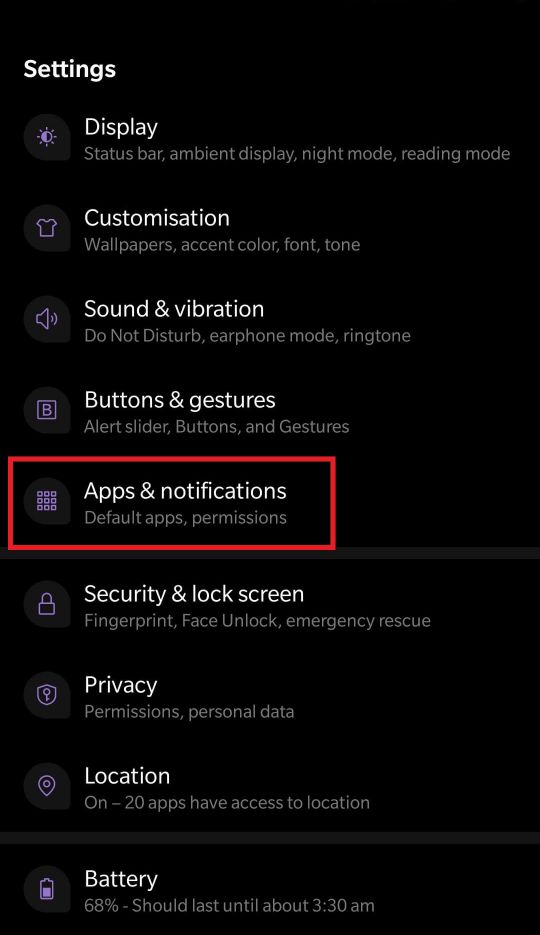
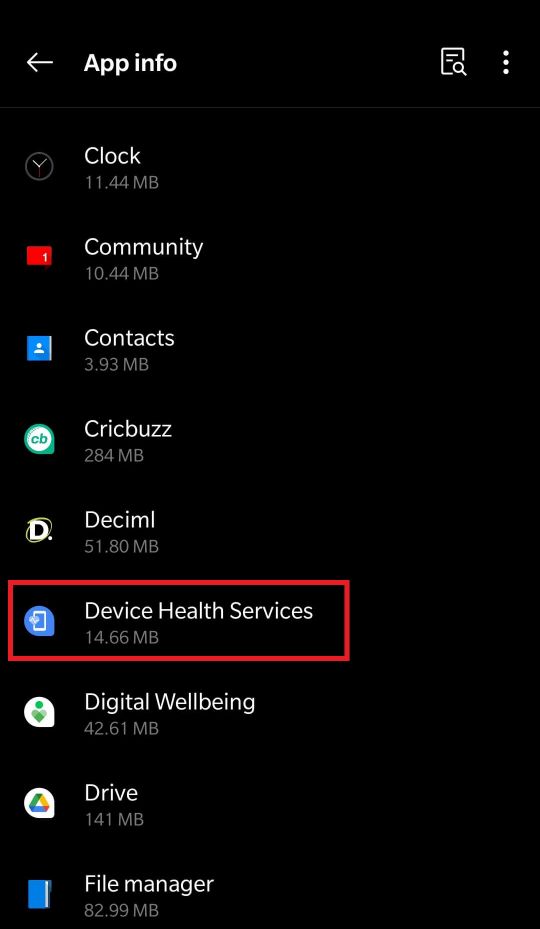
Step 2: Tap on See All Apps options and scroll down & tap on Device Health Services.
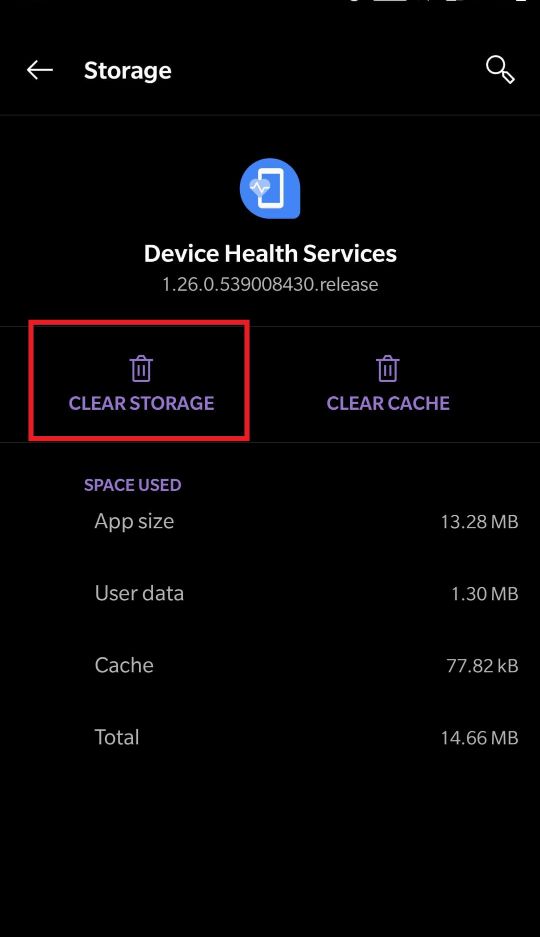
Step 3: Click on Storage & cache.
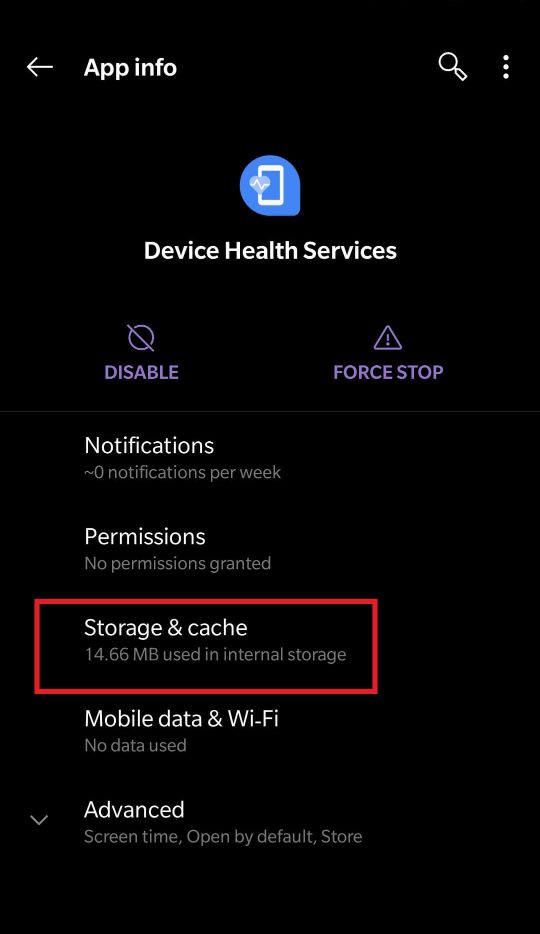
Step 4: Hit the Clear Storage option.
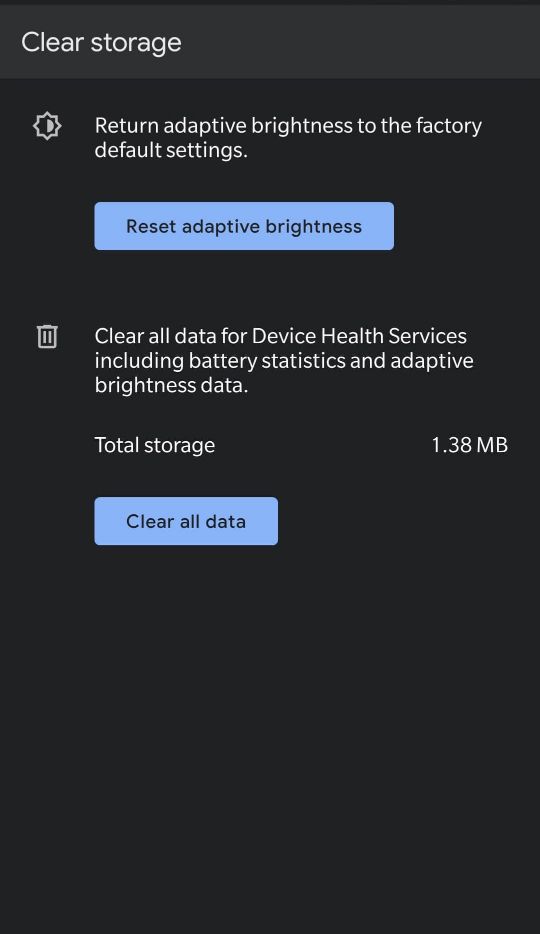
Step 5: Now click on the Reset adaptive brightness button.
3. Update Version of Android
Keeping your Android device up to date is essential for optimal performance. Make it a habit to regularly check for system updates in the settings menu. By installing any available firmware or software updates, you can effectively address known bugs and fix Auto-Brightness.
Step 1: Open Settings of your Android smartphone.
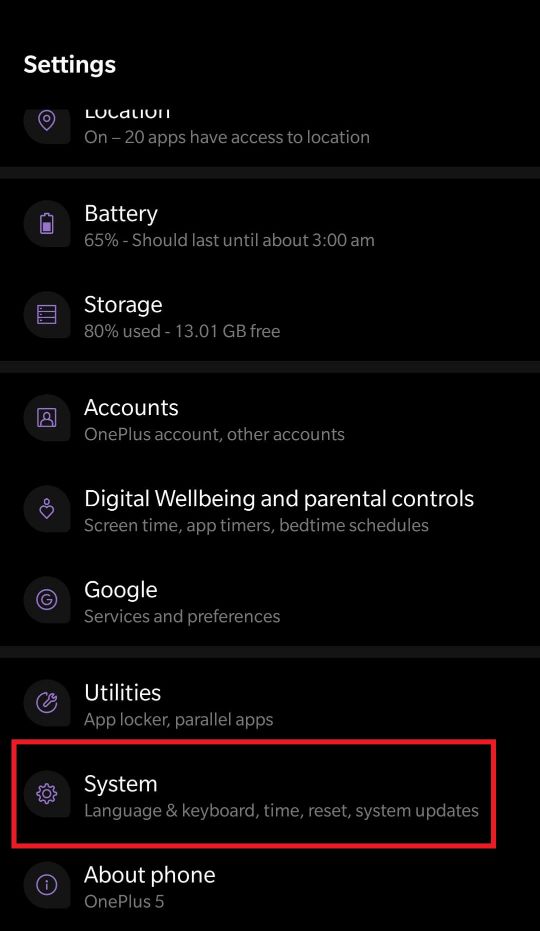
Step 2: Scroll down and tap on System or About phone. ( Varies with the devices)
Step 3: Now click on System updates or Software update.

Once you initiate the update check on your phone, it will scan for available updates and prompt you to install them if any are found. After the update installation is complete, your phone will restart. Upon restarting, verify whether the auto-brightness feature is functioning as intended once again.
Read Also: Android Emerges Victorious, Outperformed iOS in 10 Crucial Categories! Here’s How!
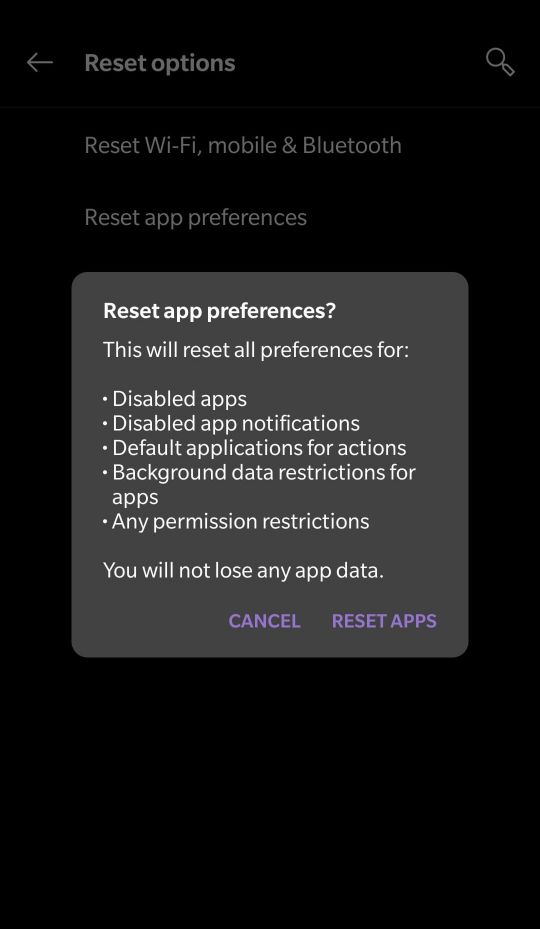
4. Reset App Preferences
Adaptive brightness problems may arise if you recently changed the permissions for any apps or disabled any system apps. You might try resetting the app options on your phone to start over and fix any potential issues as a solution to this issue.
Step 1: Open Settings and tap on System.
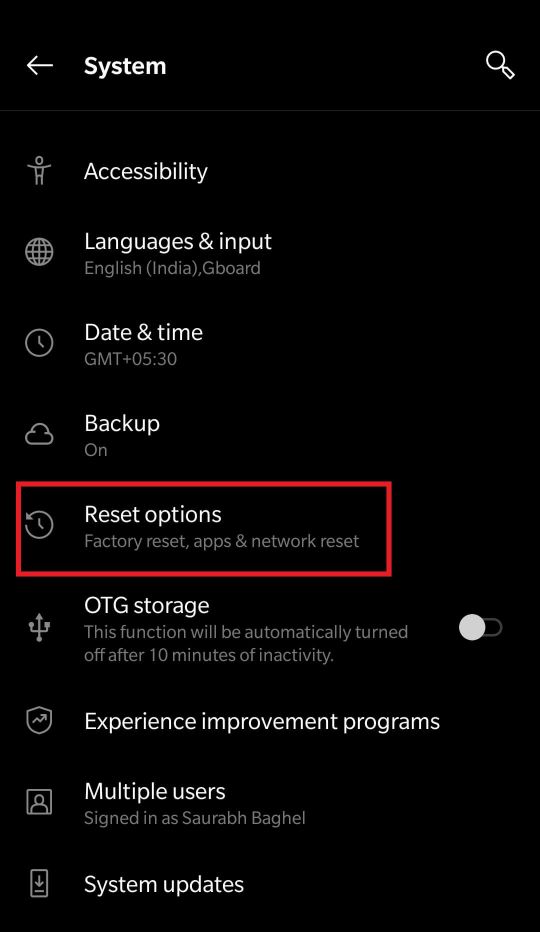
Step 2: Click on Reset options.
Step 3: Tap on Reset App preferences.

Step 4: Hit the Reset Apps option.
Read Also: How To Fix Android Phone’s Proximity Sensor Stops Working
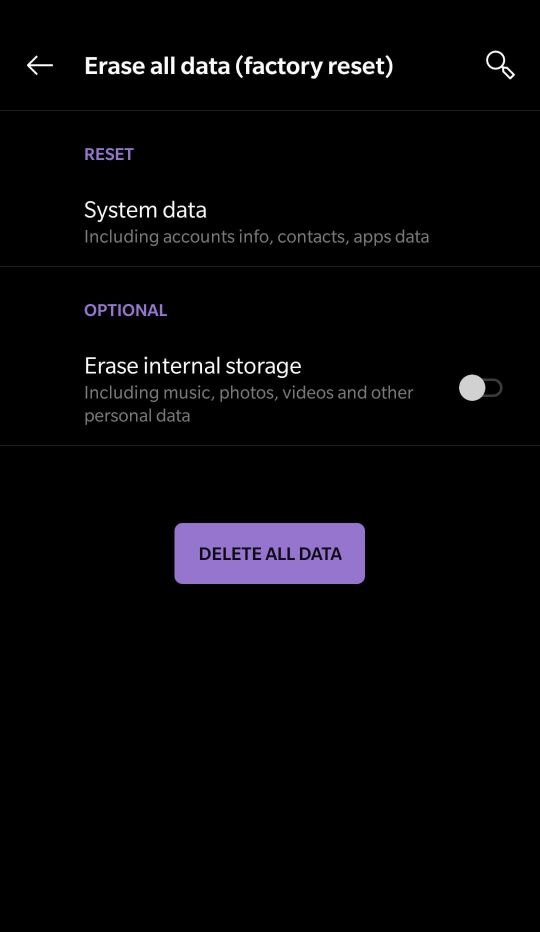
5. Factory Reset
If all else fails, a factory reset may be your last option. Back up your important data and perform a factory reset to revert your device to its original settings. Exercise caution, as this process erases all data and settings from your device.
Step 1: Open Settings and tap on System.
Step 2: Click on Reset options.
Step 3: Choose to Erase all data (factory reset)

Step 4: Tap on Delete all data.
6. Take Professional Help
If none of the aforementioned solutions prove effective, it is possible that the issue lies with the hardware. In cases where the sensors on your phone are malfunctioning, it can result in improper functioning of Adaptive brightness. In such instances, it is advisable to visit an authorized service center where professionals can assess and address the hardware problem accordingly.
Read Also: How to Block Websites on Your Android Phone or Tablet
Fixed: Auto Brightness Not Working on Android
Android Auto-Brightness issues can be a real annoyance, hindering the usability and comfort of your device. With the provided solutions, you should be able to resolve any problems you encounter with adaptive brightness on your Android phone. Embrace the brilliance and convenience that Auto-Brightness brings, enhancing your Android journey to new heights of visual delight.
For more such troubleshooting guides, listicles, and tips & tricks related to Windows, Android, iOS, and macOS, follow us on Facebook, Instagram, Twitter, YouTube, and Pinterest.
Next Read: Truecaller Restores Call Recording on Android and iPhone