
If you’re ready to sell or trade your macOS for something newer, you’re probably thinking about wiping all your hard drive data. After all, securely erasing data ensures that no personal information or private files are transferred to anyone.
If you think that deleting your stuff & then emptying the Trash, would permanently erase your data, then you’re mistaken! Today we’ll talk about How To Erase Hard Drive On Mac Securely before tossing it out!

How To Erase Hard Drive Without Losing Data?
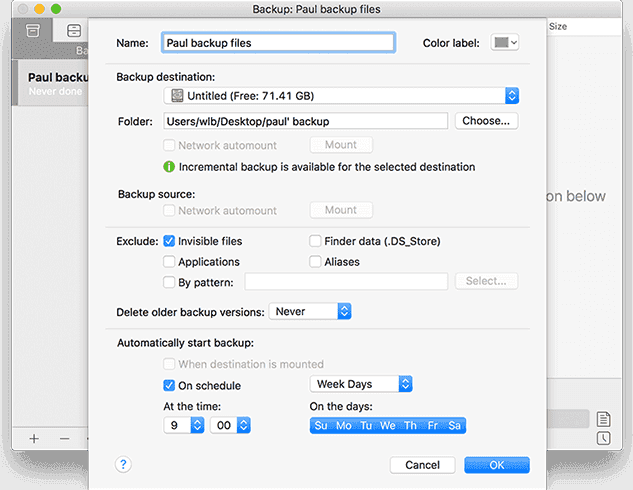
You can manually back up all your files and apps by copying everything to an external drive or iCloud. However, the faster & more secure way to do so is through a third-party tool like EaseUS Todo Backup. It is one of the easiest, safest & most protected data storage platforms that keeps all your important photos, videos, documents, and other data in one place.
The backup service supports all popular versions of operating systems including Windows & Mac. Since EaseUS Todo Backup works with AES-168, AES-256, Blowfish, or Triple DES, it ensures the highest level of security for your files. It also offers multiple backup options for taking full, differential, or incremental data backups, that can be customized according to your preferences for taking a backup of all your data. Additionally, EaseUS Todo Backup allows cloning the entire disk volume that can be booted at any moment, no matter if you have new APFS or traditional HFS+.

You Might Want To Read About: Best Antivirus Software For macOS
How To Erase Hard Drive On Mac: Manual Way
It’s time to give your macOS a fresh start. Go step by step to wipe hard drive data:
STEP 1 – Restart Your Mac In Recovery Mode
Go to the Apple Menu located at the top-left corner of your screen & restart your machine. As soon as the Mac begins to restart > press & hold Command + R keys altogether to get into Recovery Mode.
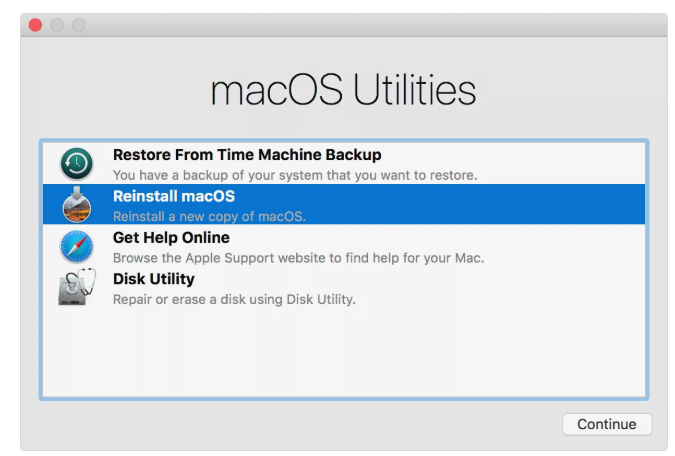
STEP 2 – Erase Hard Drive On Mac Via Disk Utility
From the macOS Utilities Window > Access Disk Utility > Continue > Choose the Startup Disk > Select Erase button from the footer of the window > Next, select Mac OS Extended (Journaled) > Click Erase!
When the wiping gets completed > head towards the Disk Utility & choose to Quit Disk Utility!
STEP 3 – Reinstall Operating System
That was easy right? You’ve successfully formatted your hard drive & now you can reinstall the new OS to make it a new one. Reinstalling macOS is super-easy, boot into Recovery Mode and select the option to Reinstall macOS from the macOS Utilities application > select Continue to begin the installation process!
Things To Keep In Mind While Wiping Hard Drive on Mac
There are certain things that should be kept in mind before you securely delete data on Mac:
1. Deauthorize Your iTunes Account
Chances are that your iTunes account is connected to your machine. If yes, then the new owner would be able to access it. Here’s how you can sign out of iTunes:
- Launch iTunes on your macOS.
- Click on Account
- Authorizations > Deauthorize This Computer
- Enter your Apple ID & Password to proceed
- Confirm Deauthorize

2. Sign Out Of iMessage & iCloud
Similar to iTunes, you are required to sign out of your iCloud account too. If you aren’t signed out, then the new owner will somehow be able to access it. To disable iCloud and sign out from iMessage, follow the instructions below:
To turn off iCloud:
- Apple Menu
- System Preferences > Choose iCloud
- Click Sign Out
- Confirm to remove data from your Mac
To sign out of iMessage:
- Launch Messages
- Click Messages located at the top-left corner > Preferences
- Choose your iMessage account
- Click to Sign Out

3. Turn Off FileVault
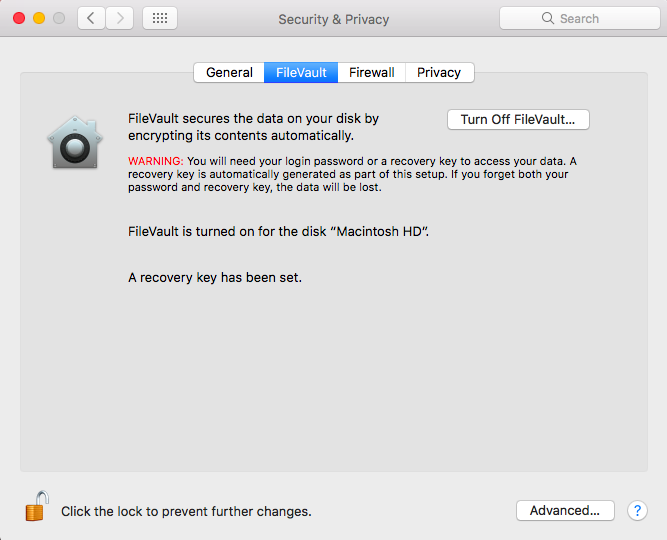
You must be aware of how Filevault encrypts your important data & prevents your hard drive from unauthorized access. But now that you’re all set to erase the hard drive on mac, it would be a great idea to turn off FileVault.
To disable FileVault on macOS, follow the steps below:
- Go to Apple Menu
- Click on System Preferences
- Under Security & Privacy > click on FileVault > Click on the Lock icon to Unlock FileVault
- Type & Enter Administrator Name & Password to turn off FileVault
4. Remove Touch Bar Data
Make sure that your Touch Bar has no data stored, to erase those files & information, follow the steps below:
- Right after your macOS restarts, press & hold Command + R keys altogether
- Select Utilities > Terminal from Utilities window
- Execute the following command in Terminal: xartutil – -erase-all
- Hit Return & type Yes when asked about confirmation
- Hit Return button again
- Choose Terminal > Quit Terminal
All your Touch Bar Data would be successfully erased!
Now that you’ve fruitfully signed out of all the services and backed up all your important stuff. You’re all set to permanently delete data on mac.
You Might Want To Read About: Best Mac Apps & Utilities For Better Productivity
Wiping Your Hard Drive On Mac Is Dead Simple!
Erasing hard drive on mac might sound confusing at first place. But with the steps mentioned in the blog you can manually remove the data securely without any hassles!
Subscribe to our Newsletter to receive all the trending tech-related content right on your email!