
Multiple users were introduced in Windows XP to make it easier to share a computer. The fast user switching enables to jump from one user account to another without losing each session. The advantage of the feature which is disable fast user switching was to make the shared machine useful for more than one user. Multiple user accounts are widely used in workplaces and educational institutions. With Windows 10, its usage has increased due to intuitive user-interface along with software and hardware enhancements in new gen computers. Thus, using it became more feasible for people making the decade long feature more popular.
Now as we know it switches in between the user profiles with all the programs and apps still running on the system. It hampers the system performance largely and due to which all user accounts suffer. Your apps and programs might respond late, and it can also become unresponsive. Besides the main function, it is making the computer lag as the resources are busy in keeping other user sessions alive. If your system is filled with unwanted junk, use Advanced System Optimizer to boost the performance by optimizing it. It updates drivers, cleans the Registry and protects your system from lag and freeze.
The major disadvantage is that it stops you from restarting the computer or shutting it down as other User accounts are active. Even if you do it’s at risk of losing any unsaved data from the other user accounts. If you share the system with multiple users and wish to disable the feature Fast Switching In Windows 10. This works similarly for most versions of Windows, the reach to the methods may vary.
Also Read: best system speed up software
Methods To Disable Fast User Switching In Windows 10 –
The two methods we use here in the article are – Group Policy and Registry.
Method 1 – Group Policy
It is most efficient to try to change the Fast User Switching settings is with Group Policy as trying to edit Registry can be a little risky. This method is recommended to use as it will be easier on the part of a layman. Group policy is a feature which lets you control the user accounts and make changes to the system. Know how to apply group policy to non- administrative users in Windows 10, 8 and 7.
The only administrator has the right to change the system settings with Group Policy. So login with the Administrator User account and then follow the steps below to disable fast user switching:
- Open the search bar in Start Menu and type gpedit.
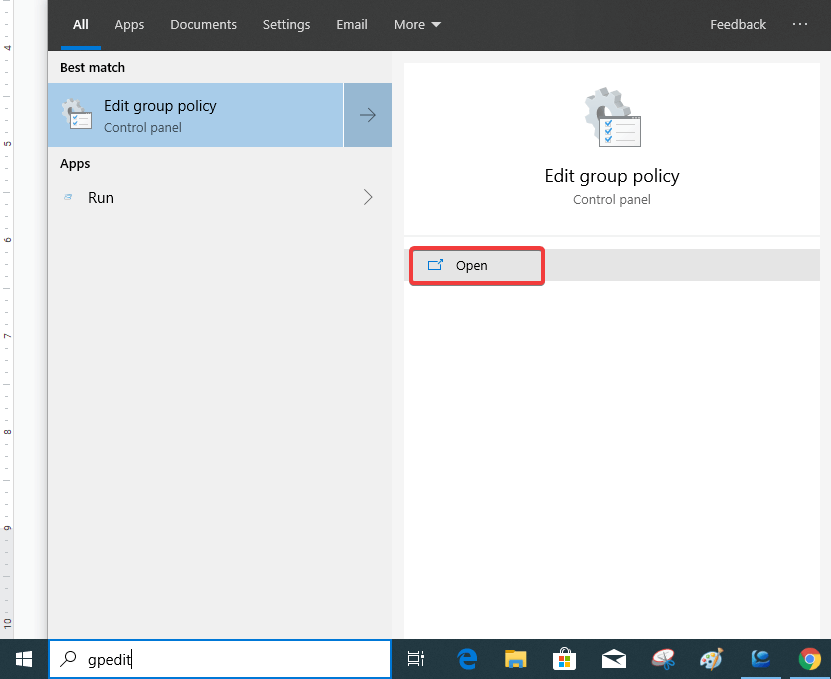
You can see the Edit Group Policy appear to be a part of the Control Panel. Click on Open. Another method to Open the Group Policy settings is to Open the Control Panel and search for Group policy in the search bar. It will appear under the section Administrator Tools.
For Windows XP, 7 and 8 you need to run command gpedit.msc to the Edit Group Policy.
- The tab appears with a name Local Group Policy Editor with the Computer and User configuration on the left panel. On the right panel, it shows you the selected items in detailed view.

- Under the Local Computer Policy, proceed with the Computer Configuration, and go to Administrative Templates>System>Logon.
- On the right panel, you will get a number of settings with its state and comments. Click on Hide entry points for Fast User Switching. A short description will appear with what the setting is used for. This shows you the Switching user settings can be hidden from the Start Menu.
- Double click on the same to get to edit this setting.


As you can see it can see three options – Not Configured, Enabled, Disabled. Choose Enabled to disable Fast User Switching and click on the Apply and later click OK. As you can see it will hide the option of switching the user from Start Menu, Task Manager and Sign in Screen. Thus you require to Restart the computer every time you wish to switch the user account. This will prevent the high usage of resources and run the functions smoothly.
Method 2 – Registry Editor:
Note: Before using this method, we recommend taking a backup of your system settings within Registry Editor. Go to File and click on Export to create a backup file and save it on a location which is suitable to be found. Later click on Import and click on the file you created earlier.
This is another method to disable fast user switching with the steps below.
1. To open Registry Editor, open Run Command with Windows key + R and type regedit. Click OK.

OR
Open search bar in Start Menu and type Registry Editor and open the app.

Now go to Run as Administrator.
- The Registry Editor, go to Computer> HKEY_LOCAL_MACHINE> Software> Microsoft> Windows> CurrentVersion> Policies> System.

On the right panel, you will see a number of keys. Right click on this side of the panel and click on New and then choose the DWORD (32 -bit) Value.
- Name the new value as HideFastUserSwitching. And further, click on it to change the value to 0 to enable the Hide Fast User Switching and Click on OK to apply the changes. Note that enabling this feature will disable the Fast User Switching for Windows. It will instantly disable fast user switching in Windows.

Conclusion:
These are the two methods to disable Fast User Switching in Windows 10. You can choose from the two whichever is easy to implement- Change settings in group policy to disable Fast User Switching for your system. An alternate method to create a New value in system settings with Registry Editor can be used too but with caution and backup. Both the methods work with User Switching feature to be changed for saving resources of your system. Please let us know in comments what method you preferred using. Also subscribe to our newsletter to keep getting more such articles regularly.
You can also get the tech updates in your social media feed, follow us on Facebook, Twitter and YouTube channel.