
Google Chrome’s most popular unique selling point is its Chrome Webstore extensions. Users tend to switch to Chrome because it supports unlimited extensions that make their browsing session more flexible, efficient, and user-friendly.
But then, some extensions are resource-hungry and eat up our system’s RAM more than the usual amount. For a small extension, using up to 50 MB of RAM is usual. Some may even consume up to a 100MB of RAM on your system. But any extension eating up RAM exceeding this amount is behaving unusually and shall be disabled.
Thanks to Chrome’s built-in task manager, the process of disabling such extensions has become quite easier. The task manager on Google Chrome also allows you to disable such extensions rather than removing and then reinstalling them.
Read More: Google Chrome Will Block “Mixed Content” On Chrome For Better Browsing Security
Here’s how you can disable unwanted RAM-eating extensions on Chrome:
How to Find RAM-Eating Extensions on Chrome?
Step 1: Open Google Chrome on your computer.
Step 2: Click on the vertical ellipses, which is the Chrome Menu button.
Step 3: Head to More Tools. In the new extended menu, select Task Manager.

Step 4: Find the active Extensions at the bottom of the Task lists.
Step 5: For convenience, click on Memory Footprint. This will arrange the tasks and processes
in descending order of the RAM/Memory, they are consuming your system.
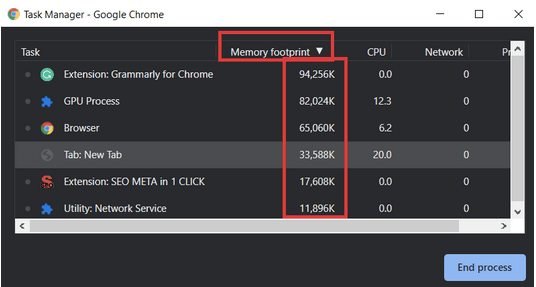
Step 6: While 100 MB is a common footprint amount, but to take an example, let’s suppose you want to disable Grammarly.
Step 7: Click and select the extension you want to disable.
Step 8: Click on End Process.

This will cause the extension to crash, and it will also be removed from your Chrome taskbar. However, this does not mean that the extension is permanently removed from your Chrome browser account. It’s disabled for that particular session only. Once you restart the Chrome browser, the extension will start functioning afresh.
Read More: How To Add Chrome Extensions On Desktop From Your Android Phone
How to Permanently Delete or Disable a RAM-eating Chrome Extension?
In case you want the extension chewing upon your RAM completely removed or permanently disabled, then you can do that by going into the extension menu.
Begin by once again heading to the More Tools section of the Chrome menu. There, you’ll find a separate option for Extensions. Click on it, and you’ll be redirected to the extension tab of your Chrome browser account. There, all the extensions activated on that Chrome account will be listed.

Here you can perform two different functions –
1. To disable the extension, turn the toggle button to off mode. This way, the extension won’t be deleted, but become non-functional on your Chrome browser account.

2. To permanently delete the extension, click on Remove button. Once you do that, confirm the command for deletion. The extension will no longer bother you with excessive RAM consumption.

Extensions are a great way to make your browsing session efficient and get work done in a much faster way. However, since many of these extensions come from third-party developers, they can lead to unusual behavior may be due to some unattended bug or dysfunctionality. Using these methods, you can disable or reboot that particular extension so that it does not eat up your system’s RAM and help you reduce stress on your computer’s memory. Moreover, getting rid of such resource-hungry extensions on Chrome will also lead to a faster session on the browser, totally free of lags and crashes.
You May Also Like
How To Choose The Best VPN For Chrome