
The Windows context menu is the small box that appears when you make a right-click on specific items in the Windows 10 operating system. This small box that appears provides users with a list of with further options that can be carried out with a file or folder. The most common context menu used is when the users make a right-click on the desktop and get options like View, Screen Resolution, Personalize etc.
Windows context menu is designed to provide the user with a bunch of options in a single click. This makes it easy to use Windows features and saves time and effort. But the default context menu provided by Windows may not necessarily have all the options that you require. And also many applications installed in your system create a self-shortcut in the context menu, whether you need them or not.
In this article, we will discuss how to use a Windows 10 Context Menu Editor to customize the context menu and make it more convenient to get on with our tasks.
How To Use A Windows 10 Context Menu Editor?

Windows Context Menu can be modified with items in the list added or deleted as per user’s discretion. Unlike Apple, Microsoft does not provide any options to do so, and we will have to use a free third-party tool that will ease things for us. The tool I recommend and have been using for months now without any issues is the Ultimate Windows Context Menu Customizer.
Download Now: Ultimate Windows Context Menu Customizer.
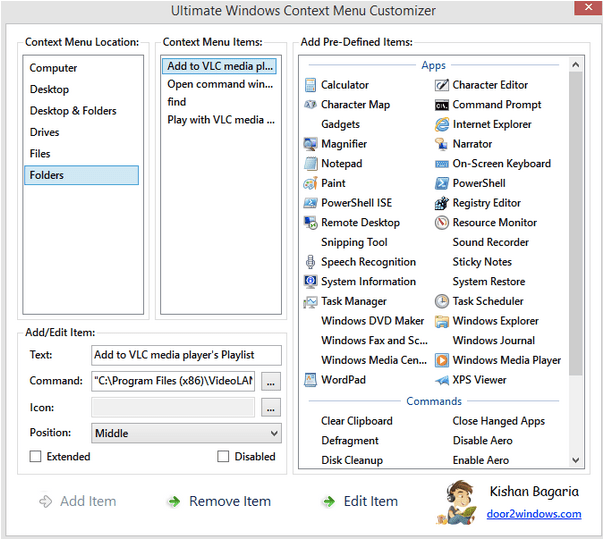
Ultimate Windows Context Menu Customizer is a free and easy to use, lightweight tool that allows users to add, remove, edit, enable and disable items from the Windows context menu. Once you download and install this program, you can launch it, and the user interface will display six types of Windows Context Menu in your computer namely, Computer, Desktop, Drivers, Files, Folder and Desktop and Folders.
Also Read: How To Fix Windows 10 Spotlight Images Not Working?
How To Remove Items From The Windows Context Menu.
Once you have launched the application, you can click on each menu from six options to check the existing contents and remove or disable them. Here are the steps to remove items from the Windows context menu:
Step 1: Open the application and click on any menu item in the Windows context menu location and then click on any of the options in the next box labelled as context menu items.
Step 2: Once you click on the item you wish to remove, you can then click on “Disabled” to keep the item, but it will disappear from the context menu. You can enable it by removing the checkmark next to the disabled box.
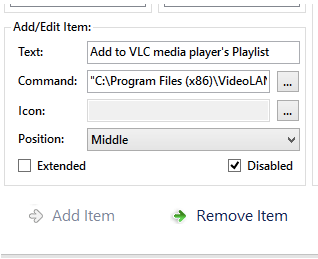
Step 3: Else you can click on Remove Item at the bottom of the application window to obliterate the item. You will not be able to add this item again.
The following image will make things more evident where I have taken a specific entry of “ Add to VLC media player’s playlist” that appears every time, I make a right-click on any folder in my computer.
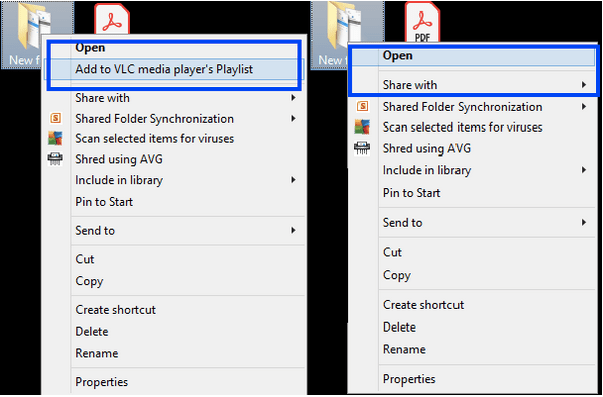
Note: The option of Add to VLC media player‘s list has been disabled and hence is not visible in the second image.
Also Read: 10 Best Context Menu Editors for Windows 10
How To Add Items To The Windows Context Menu.
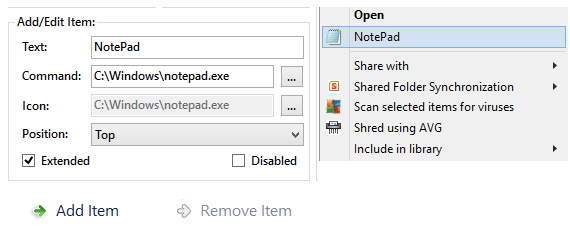
Before we start on adding important shortcuts to the context menu, it is essential to know about the specific fields that we must complete to add an item in the Windows context menu. The list of entries includes:
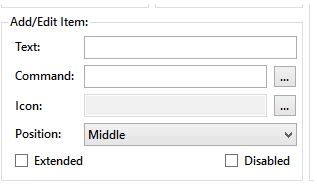
Text: Add a name of the entry you wish to add in the context menu.
Command: Click on the three dots button to select the executable file of the program you wish to add.
Icon: This is to select the icon that will be displayed in the context menu against the newly added item.
Position: Select the position as to where the new item would be placed: Top, Middle, and Bottom.
Also Read: How to Boot into Windows 10 Safe Mode
Steps To Add Item In Windows Context Menu
Step 1: Click on one of the six items available in the top left window labelled as Windows Context menu.
Step 2: Enter the information in the four fields described above.
Step 3: Click on Add Item button at the bottom of the application window.
That’s it! Close the application and check the context menu for the new addition. You will be surprised to find that the changes will reflect almost instantly.
Also Read: How To Backup, Restore And Edit Files Using The Registry Editor Windows 10?
The Final Word On How To Customize Windows Context Menu
The Windows Context Menu is an important feature that can provide shortcuts to launch specific applications and functions in the Windows Operating System. Microsoft should have allowed customization of this tool to the users and permitted them to make customizations through an inbuilt tool. There are a few Registry tweaks that can allow a user to make customizations in the right-click menu without having to use the Windows 10 Context Menu Editor, but those hacks or tweaks are way too complicated.
Follow us on social media – Facebook, Twitter, LinkedIn, and YouTube. For any queries or suggestions, please let us know in the comments section below. We would love to get back to you with a solution. We post regularly on the tips and tricks along with solutions to common issues related to technology.
Next Read: