
In the past, Apple did not allow the creation of Apple IDs for kids under 18 years of age. In those conditions, children under the age of 18 had to use their parents’ IDs to download music, apps, movies and books. However, when the child grew up, those purchased could not be transferred to his separate account and would remain always with the parent account. With a major change in its policies, Apple has introduced a feature of family sharing which can create accounts for children up to 13 years of age. The master ID can add kids to the family account on all Apple devices including iPod, iPad and iPhone.
Why Should You Create an Apple ID for Kids?
If you have purchased an iPhone or iPad for your kid, then it is important to create a unique Apple ID for them, so they don’t use your ID. This ID will also act as their iCloud Account and iTunes account. The child IDs created under one master Apple ID are under full control of what the child is doing, their location and any purchases made through the child account need to be approved by the parent account. This feature introduced by Apple is known as Family Sharing and parents can share apps, music and eBooks among the family members. Also, if one member purchases a game from the App store, other members can download the same game for free and play it on a different device.

Steps to Create Apple ID for Kids Family & Sharing
Creating an Apple ID for a child is not difficult but a lengthy process. But once you get it done, it is worth the trouble you went through to set it up. Here are the steps to enable the Family Sharing option in your iPhone first:
Step 1. Locate the Settings app on your iPhone and tap once to open it. Tap on your name and choose Set Up Family Sharing.
Step 2. Tap on Get Started button to begin the process.
Step 3. Next tap on the first option which is labelled as Tap iTunes & App Store Purchases.
Step 4. On the next screen, tap Continue.
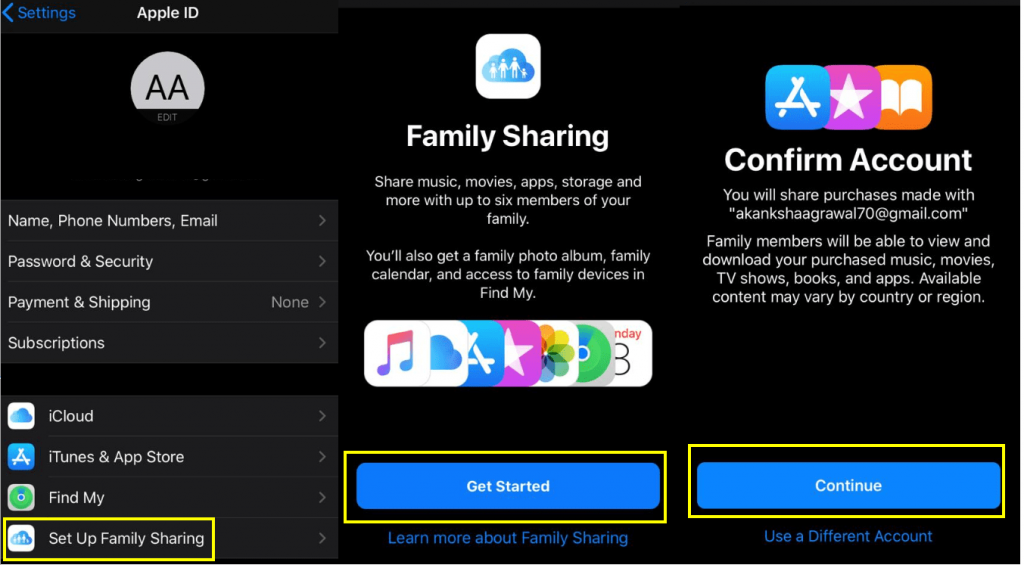
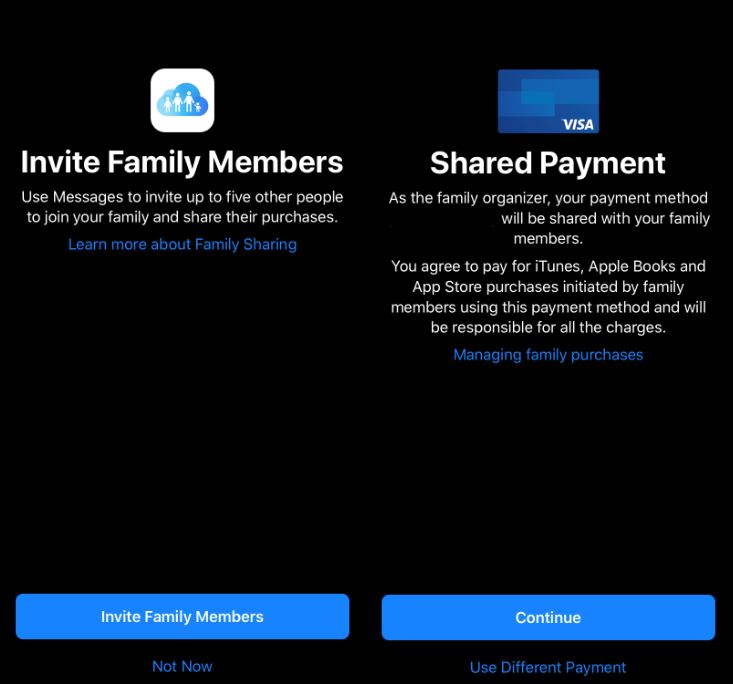
Step 5. The Next screen will ask for your confirmation to use the same payment method as used by you and other family members associated with your master account.
Note: The Payment option for purchases can also be shared only if you have registered a Credit Card for your payments.
Step 6. The next step would allow the users to invite all the family members to join the master account. Do not tap on Invite Family Members Button and instead click on the link stating Not Now beneath the button as we only want to create an apple id for kids for now.
Also Read: How To Change Your Apple ID From Third-Party Email To iCloud?
Steps for Creating an Apple ID for a Child
The above steps enable the Family Sharing options on your iPhone. For creating an Apple ID for a child, follow these steps
Step 1. From your Account page, Tap on Family Sharing.
Step 2. From the next screen that follows, tap on Add Family Member and then tap on Create a child Account.

Step 3. Read the conditions listed on the next screen and once you agree, click on Next, located on the top-right corner of the screen.
Step 4. The following screen would ask you to enter the child’s birthday and then tap on Next.

Step 5. The next screen involves reading and giving your consent to the Parent Privacy Disclosure.
Step 6. Apple will not ensure that you are the owner of the credit card registered as a payment method by asking you to enter the CVV which is a 3-digit number on the back of your credit card. Click on Next after entering the correct CVV number.
Step 7. Once the setup process verifies your CVV number, it will ask you to enter your child’s name and set up a new email address which will also act as an iCloud account for your kid.
Step 8. Click on create button and then the setup process will ask you o enter a password
Step 9. The next step involves you to choose three security questions and set answers for them in case you or your child forgets the password.
Step 10. The final step is not compulsory, but it requires you to write the ID and the password along with the security questions and their answers somewhere safe because it is difficult to remember all those IDs and passwords.
Also Read: How To Change Your Apple ID Country Or Region
Important things to consider while creating an Apple ID for a child.
The above-mentioned steps will create an Apple ID for your kids but there are two useful features that must also be configured.
1. Ask To Buy – This feature must always be set to ON which will enable you or anyone with the master account to approve/deny purchases made by the child account. This way you can monitor the content that your child is consuming and maintain your expenses.

2. Location – This feature when activated will capture and notify you of the location of the iPhone in which the child account is signed in. Assuming that your kid carries his iPhone with him/her at all times, you will easily be able to track your child and send directions using apps like Find My iPhone, Messages and Find My Friends.
The final word on Creating an Apple ID for a Child.
These steps will allow any user to set up an Apple ID for a kid and enable Family Sharing. This will ensure that you can share the relevant content with your children without having to purchase again. Any child account created will automatically be added to your Family Group and you share your movies, music, apps, and books with them if you choose to. Do subscribe to Systweak Blogs and YouTube for the latest Tech News and Updates.
Shashank
Can the location setting be used to track the child’s location at all times when they are carrying the phone? How does one do that?Dheeraj Manghnani
Hi Shashank, It is possible to track the location of any iPhone that has been added to your Family Sharing Group, provided that the iPhone is connected to the internet and has location settings turned on. This is possible through Apple’s Find My App. For more information on how you can to that, you can check this article: https://wethegeek.com/steps-to-use-family-sharing-with-find-my-iphone-feature/ To stay updated and get more articles like this, do subscribe to our notifications and follow us on Social Media.