Over the last few years, wireless or WiFi printers have changed almost everything around us! The task of printing was never this fascinating and convenient. Right? Just imagine, giving a print command from your smartphone without even connecting the printer to your device. Thanks to the power of technology, the 21st century does amaze us, indeed!

Wireless printers make our lives so much better as we don’t have to worry about connecting a PC or laptop to the printing machine. You can easily install a wireless printer anywhere around your house or workplace, and still, be able to print in a few clicks no matter where you are. And yes, you can connect multiple devices while ensuring that your PC and printer are connected to the same WiFi network.
Moving on to our subject, are you facing any issues connecting to the wireless printer after upgrading your device to Windows 11? Don’t worry! We’ve got you covered. In this post, we have listed a few solutions that will allow you to fix the “Wireless printer not connecting” issue on Windows 11 and Windows 10 devices.
How To Fix Wireless Printer Not Responding on Windows 11/10
Let’s get started.
1. Check the Physical Connections
Before you begin troubleshooting and make changes in your device’s settings, take a moment and check all the physical connections. Make sure that the printer is turned ON and connected to the WiFi network.
Also, turn off your printer and then remove the USB cable. After a few seconds, again turn it ON and connect it to the WiFi network. Once you’ve done that, reboot your PC or laptop as well and then reconnect it to the WiFi. You can perform this basic check before moving on to troubleshooting.
2. Run the Printer Troubleshooter
To run the printer troubleshooter on Windows 11, follow these quick steps.
Open Settings> System> Troubleshoot. Tap on the “Other Troubleshooters” option.
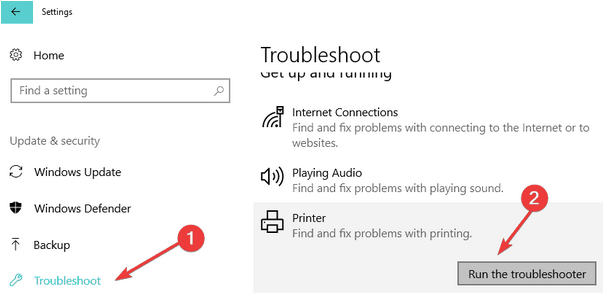
Look for the “Printer Troubleshooter”. Tap on it and then hit the “Run the Troubleshooter” button placed next to it.
Also read: How To Connect Your Wireless Printer To Windows 10
3. Verify WiFi Network’s Name

Did you recently change your WiFi network’s name on your PC or laptop? Well, if the answer is affirmative then you will have to reconnect the printer again. Your printer only recognizes the old WiFi network’s name and hence you now need to set up your printer again and reconnect it to the newly named WiFi network.
Also read: How to Set Up a Wireless Printer on Windows 10
4. Update Printer Drivers
The next workaround to fix the “Wireless printer not responding” is to update the printer drivers using the Windows Device Manager application. Here’s what you need to do:
Press the Windows + R key combination to open the Run dialog box, type “Devmgmt.msc” in the textbox, and hit Enter.
In the Device Manager window, tap on “Printers” and then right-click on your printer device’s name. Hit on the “Update Driver” button.
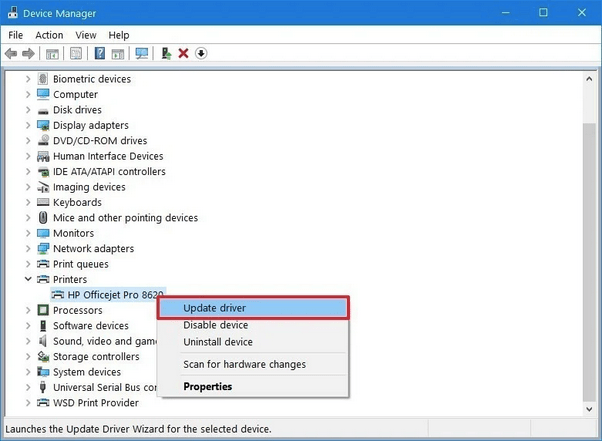
Follow the on-screen instructions and then reinstall the latest update of printer drivers on your device. After updating the drivers, reboot your device and then try connecting the Wireless printer to check whether it fixed the issue.
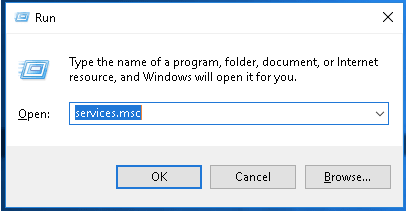
5. Reset Printer Spooler
The Printer Spooler is a dedicated service on Windows that manages all the printer jobs and processes. To fix any printer-related issues, it is advisable to reset the Printer spooler to start afresh. Here’s what you need to do.
Press the Windows + R key combination to open the Run dialog box. Type “Services.msc” and hit Enter.
In the Services window, look for the “Printer Spooler” service. Double-tap on it to open Properties and then Disable the service. Hit the OK and APPLY buttons to save changes.

Now open File Explorer and then navigate to the following folder location:
%WINDIR%\system32\spool\printers
Press Control + A to select all the files present in the folder, right-click on your selection, and hit the “Delete” button.
Head back to the Services window again and double tap on the “Printer Spooler” service. Enable the Printer Spooler service again.
Also read: How To Fix “Not Able To Connect Wireless Mouse” Issue On Windows
Conclusion
So folks, this wraps up our quick guide on how to fix the “Wireless printer not responding” issue. You can use any of the above-mentioned solutions to make your wireless printer functional again.
For any other queries or assistance, feel free to hit the comments box!