Zoom is one of the best video conferencing tools that lets you conduct video meetings with your friends, family members, and colleagues. Sometimes, we even record a Zoom meeting to save precious moments. In an official setting, recording a Zoom meeting can be helpful as it can be used for later reference. In case you are new to the concept and wish to know how to record a Zoom meeting on a variety of platforms, check out this post.
Now, let’s consider a situation where you have recorded an important office meeting that lasted for a few hours. You now have to make this video memo more focused. You have to trim unwanted sections (some of which might not be relevant to your team).
How would you cut or trim unwanted sections of your zoom recording so that only the essential sections can be referenced? This is where you can take the help of a screen recording tool. Screen recording software won’t just help you record a Zoom meeting but even help you with more useful tasks that we’ll discuss in this post.
For the purpose of this post, we are going to use Advanced Screen Recorder which is regarded as one of the best screen recording utilities for Windows.
4 Ways To Edit A Zoom Recording On Windows PC
With Advanced Screen Recorder you don’t just get to trim the recorded video but extract the audio files and take screenshots as well among other things. You can skip to the exact part you want to refer to –
Part – I: How To Record A Zoom Meeting With Advanced Screen Recorder?
Let’s quickly see how you can record a Zoom meeting with the help of this recording software –
- Download, install and run Advanced Screen Recorder
- Select the region of the screen that you want to record.
- Click on the Record button.
- Choose the audio settings i.e. the audio you want to record.

- Click on the Start Recording button.
- Once done, click on the Stop button.


The recorded video will appear under the Recordings section. You can access the recording by clicking on the dropdown towards the left of Recordings as shown in the screenshot below.
Part – II: How To Trim Your Zoom Meeting?
As we discussed earlier, it could be that you want your recording to focus on only the important parts. This means, here you would want to only select the important part. So, here’s how you can do that –
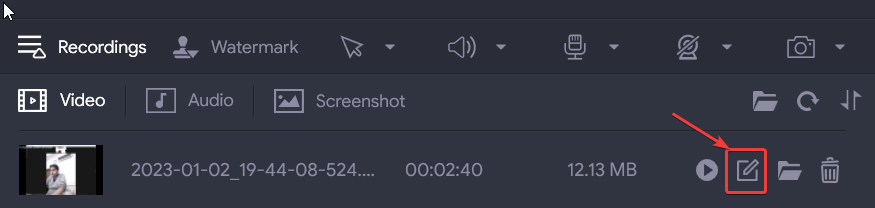
- Click on the Recordings dropdown and locate the recording that you want to trim.
- Click on the Edit button as shown in the screenshot below.
- If you are trimming the video for the first time, you’ll be asked to install additional components for the utility. Install it.
- Once installed, another Window will open, where you can trim the video.
- To make sure that you select the right start and end point, you can play the video and drag the slider.
- On the right-hand, you can also see all the other recordings as well.
- Click on the Save button, once you have recorded the video.
Part III: How To Annotate Your Zoom Meeting?
Advanced Screen Recorder also lets you annotate while you are recording your screen. You can add elements such as rectangles, circles, arrows, lines, and text boxes while recording. You can even change the color of these elements as well.

If Need Be, How Can You Clean These Elements?
Let’s say you want to erase these elements. For this, you can click on the wiper icon that will clean all the elements.
Part IV: Other Things That You Can Do?
Advanced Screen Recorder is an easy-to-use feature-packed screen recording software. While you can click on this link and dive deeper into the various features of this tool, here’s a glimpse of features other than the one we discussed just now –
- Record videos up to 4K resolution.
- Schedule recording
- Auto Split and Auto Stop.
- Watermark recordings.
- Live stream screen recording.
- Webcam overlay while recording the video.
Wrapping Up
A well-trimmed and edited Zoom recording is much better than its full version as it helps you cover only the parts that you want your end user to focus on. If this post helped you make your Zoom recording better and more focused, do share your experience in the comments section below. For more such tips and tricks, keep reading WeTheGeek. You can also find us on Facebook, YouTube, Flipboard, Pinterest, Twitter, and Instagram.