
| HELP! Disk Utility Can’t Repair The Disk |
When a disk stops responding properly on Mac, most of the users navigate to the Disk Utility to run First Aid to repair the disk. However, when it fails to repair the disk, users might encounter the message ‘Disk Utility Can’t Repair This Disk’.
Getting the error message ‘Disk Utility Can’t Repair This Disk’ is one of the most annoying issues, you can witness when First Aid functionality gets failed. Often, it gets followed up with these messages:
- “First Aid process has failed. If possible, back up data on this volume. Click done to continue.
- “macOS can’t repair this disk. You can open or copy files on this disk, but you can’t save changes to files on this disk. Backup the disk and reformat it as soon as you can.”
- “Disk Utility stopped repairing your disk. Disk Utility can’t repair this disk. Back up as many of your files as possible, reformat the disk, and restore your back-up files.”
What To Do When Disk Utility Can’t Repair This Disk” Error Appears On MacBook?
We always recommend backup your data first and then apply the following solutions to repair the error on your Mac.
|
IMPORTANT: Backup Your Data, Before The Situation Gets Worse If the aforementioned solution didn’t help you to fix the ‘Disk Utility Can’t Repair This Disk’ error message, then it’s probably a time you need to resort to other workarounds. For starters, you need to backup your disk, and the easiest way to do that is to use the built-in macOS backup tool – Time Machine! To get started with the backup process, all you have to do is: Step 1- Click on the Apple icon, located at the top-left corner of the screen. Step 2- Select System Preferences and go to the Time Machine utility. Step 3- From the next window, hit the button Select Disk. . . Step 4- Check the box ‘Show Time Machine in the menu bar’. Step 5- Once, done, hit the Time Machine menu bar item and press the Backup Now button.
If you don’t want to get into the Manual process, you can take help from a variety of third-party tools to backup, or clone the drive that might be causing the error. Even if it fails, you at least have a backup of your important data. Read Also: Time Machine Backup Failed? 5 Easy Ways To Fix Time Machine Problem |

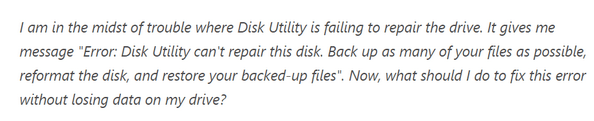
METHOD 1- Run First Aid Again
Running the First Aid again is one of the most tried and tested solutions to repair the disk.
Step 1- Navigate to the Applications > Utilities & choose Disk Utility.
Step 2- Launch the tool and click on the View section, located at the top-left corner of the window. Select the View all devices option.
Step 3- From the sidebar, you need to select a disk or volume.
Step 4- Hit the First Aid button and click on the Run to start the process.
If the error message appears again, it’s a sign that your Hard Drive is failing and you should start the backup process as soon as possible.
| Note: If the disk you are trying to repair is your Start-up Disk, then you’ll be required to boot into the Mac Recovery Mode. Once done, choose Disk Utility from the Startup Screen. To use macOS Recovery Mode, you can follow the detailed guide, right here! |
METHOD 2- Perform System Maintenance
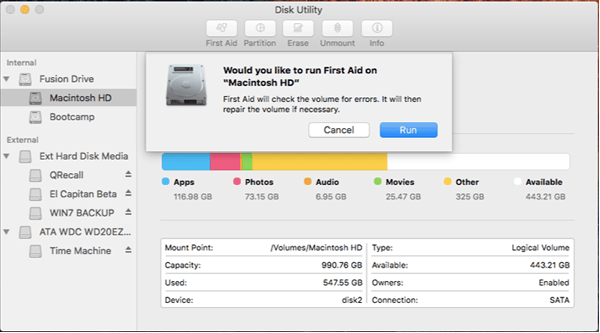
Using a reliable cleaning and optimization utility like Disk Clean Pro can help you resolve tons of common issues on your MacBook. It features multiple modules that can perform intensive care for your drive, for Junk cleaning, Privacy cleanup, Logs cleaning, and so on. Fortunately, the remedy may be as simple as a Disk Cleanup. Cleaning up the unnecessary accumulated junk files, caches and residues repair the software conflicts – which could be the main issue to ‘Disk Utility Can’t Repair This Disk’.
To run Disk Clean Pro, all you have to do is:
Step 1- Install and launch Disk Clean Pro.

Step 2- From the main dashboard, hit the Start System Scan button.
Step 3- Once the scan gets completed, you’ll be notified about how much junk & privacy exposing traces are found by the tool.
Step 4- You can hit the ‘Clean Now’ button to remove all the unwanted traces in one-go.
Using Disk Clean Pro now and then can help you keep your Mac maintained in tip-top shape and you can certainly observe a significant performance boost. Once scanned, you should restart your Mac and see if you observe the Disk Utility error message again!
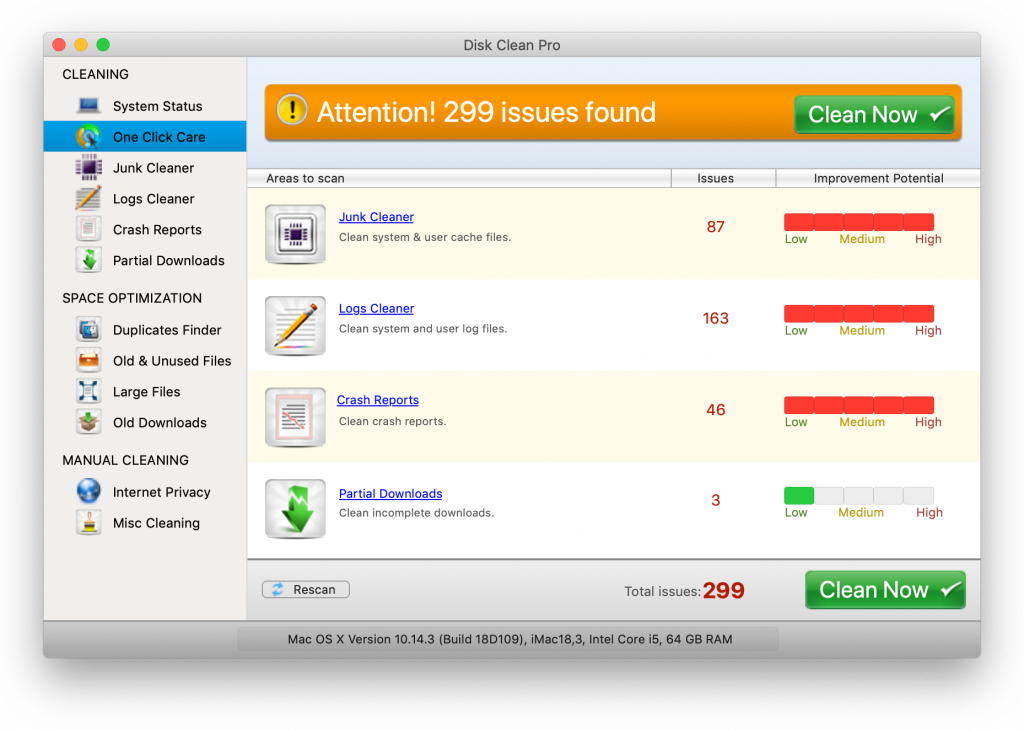
METHOD 3- Try Repairing The Disk Error In Single User Mode
If the issue persists, you can try repairing it by running the FSCK command line on your MacBook. The process holds the potential to verify and repair external hard drives through Terminal.
Step 1- Restart your MacBook and before the Apple logo appears on the screen, press Command + S altogether.
Step 2- This will make your system enter into the Single User Mode.
Step 3- At this point, you need to type: /sbin/fsck -fy
If you get the pop-up = File system was modified, you need to execute the command line again and repeat the process until you get the message = The volume_appears to be OK.
Step 4- Type: reboot to restart your Mac normally.
Hopefully, you should not get the ‘Disk Utility Can’t Repair This Disk’ error message again!
RESOLVED: Disk Utility on macOS can’t repair this disk
If you fail to fix the disk issue using Single User Mode, then the last resort is to reformat the disk in Disk Utility. (Applications > utilities > Disk Utility > Select the hard drive > Erase > Provide a Name and Format to begin the wiping process) Note that the reformatting process will simply wipe all your data from the disk, so make sure you have all your files backed up to an external drive or on the Cloud.
Did This Post Help You? Share Your Opinions In The Comments Section Below!