
When you have thousands of files & folders stored on your Mac – it can be certainly difficult to get the correct path. In this article, we attempt to solve this issue and quickly Retrieve & Copy File Path On Mac OS X.
In case you’ve missed our previous guide on How to View Hidden Files and Folders On Your Mac With Terminal? Here’s the process!
5 Ways To Copy File Path On macOS X
How To Find & Copy File Path Via Context Menu?
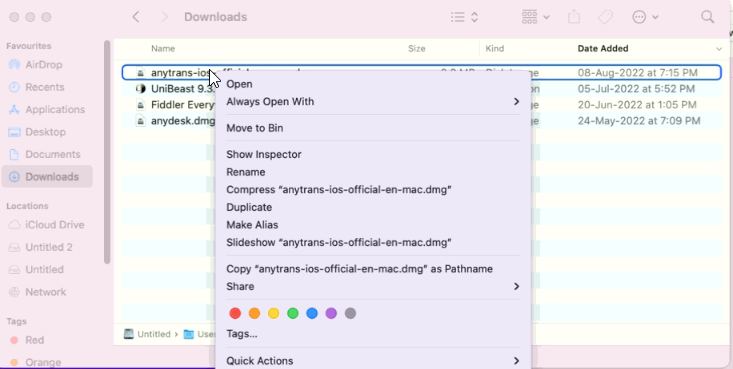
Undoubtedly one of the easiest ways to achieve the task. You might not realize but the Copy Path option is hidden by default, to unveil it, all you have to do is:
STEP 1- Choose the file or folder, you want to retrieve the path for and right-click on the same.
STEP 2- As soon as the context menu appears on your screen. Press & hold the Option key, until the Copy “file-name” as Pathname option appears.
STEP 3- Once it pops-up, click on the option to copy the file path to the Clipboard.
Must-Read: 10 Amazing Mac Tricks That Will Blow Your Mind
How To Find & Copy File Path Via Finder?
Finder is a versatile file management application, but it still lacks a dedicated functionality to copy file paths on Mac OS X. However, that doesn’t simply mean that there’s no way to view the file path and copy the same. Follow the steps below to achieve the tasks:
STEP 1- While you are in a Finder window, hit the Go option located at the top of the window and select Go to Folder.
STEP 2- Spontaneous dialog box will appear on the screen. Here you need to drag and drop the file into the Input field you wish to reveal the path for.
STEP 3- As soon as you do that, the input field will be filled automatically with your file’s path. You can perform the Copy shortcut – Command + C to copy the file path on Mac OS X.

Easy, right? Alternatively, you can give a shot to the Terminal application to locate and copy the path of files or folders on Mac.
How Can I View File Paths Using Terminal On Mac?
To locate the directory path of a particular file, you can rely on Mac’s Terminal as your ultimate solution. Remember the name of the file & follow the instructions below:
STEP 1- Navigate to the Applications and click on Utilities menu.
STEP 2- Launch the Terminal app & make sure you are logged in as Super User.
| Note: Super User means you are logged in the machine as an Admin. Type sudo su command line and hit the Return key. |
STEP 3- In the Terminal window, type the following command line (In the middle you need to place the file name) find / -name randomfilename
STEP 4- Keep patience and let the Terminal execute the command line properly.
STEP 5- After some seconds, a list of file names will appear on your screen. Some might be useless with endings such as ‘operation not permitted’. Instead, look for something like: /Library/Application Support/randomfilename/settings/
Once you locate the desired path of the file name, simply Copy the file path on Mac OS X.
Must-Read: 10 Mac Terminal Commands You Should Try
How Can I Retrieve & Copy File Path Via Get Info Option?
Similar to the Windows Properties, macOS had a dedicated option known as Get info, located in the Context menu. As the name entails, the option lets you explore all the information and details related to any file or folder saved on Mac. To view and copy the file path on Mac, all you have to do is:
STEP 1- Locate the file/folder you want to reveal the path for and right-click on the same.
STEP 2- From the context menu that appears on your screen, find and click on the Get Info option.
STEP 3- From the window that pops up on your screen, look for ‘Where’ and you’ll be able to see the file path. Check the screenshot below to see the highlighted part.

This method will help you find the location of a file or folder properly. You can view it but can’t use it in the Terminal app or anywhere else.
BONUS TIP: Create Your Own ‘Copy Path’ Service For Easy Access From Context Menu
If you find yourself in constant need to copy file and folder path on Mac, you should consider making an Automator Service, which will make your life certainly easy. So, whenever you’ll use this shortcut, the path of the selected file will automatically be opened and copied to the clipboard.
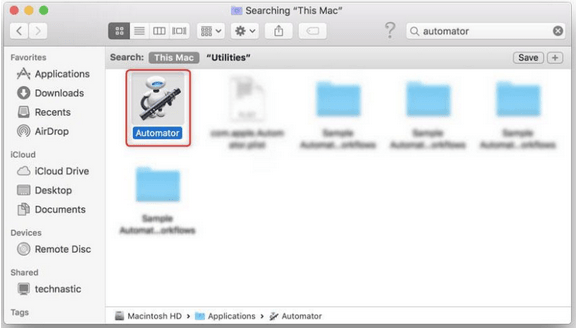
STEP 1- Launch Finder menu and look for Automator under the Applications.
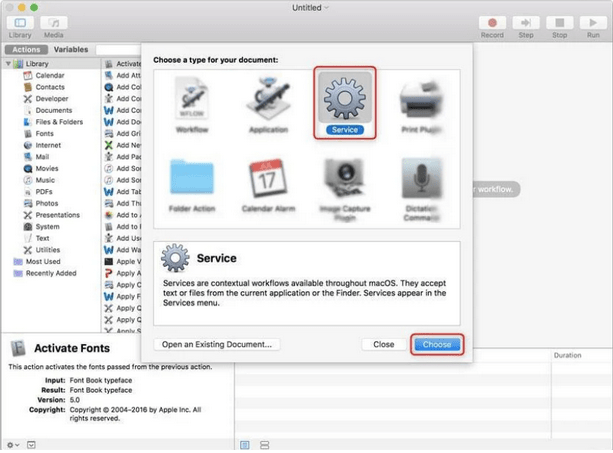
STEP 2- From the next screen that pops-up on your screen, locate Service and hit the Choose button to create a new one.
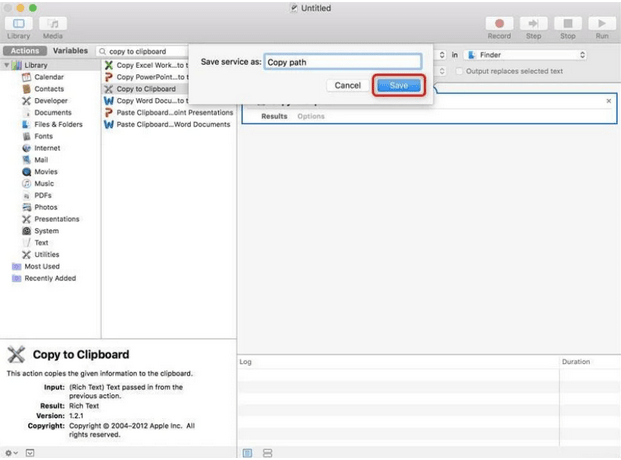
STEP 3- From the search input box, you need to type Copy to Clipboard.
STEP 4- Now simply drag the Copy to Clipboard into the right pane.
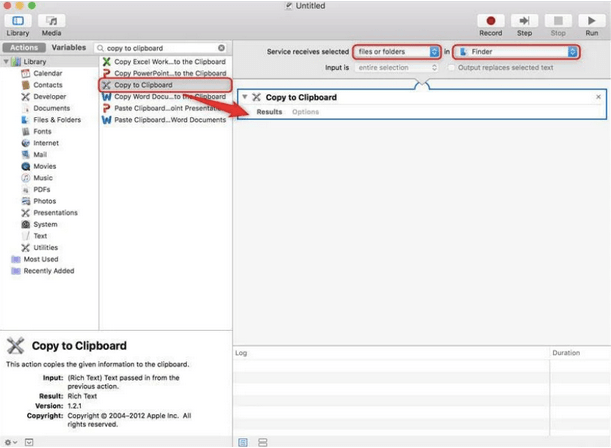
STEP 5- At this point, you need to configure the two options under the Service receives selected tab as files or folders and Finder.

STEP 6- Simply Save your new service as Copy Path.
STEP 7- Now every time you choose any file or folder, right-click on it and choose the Copy Path option from the Context menu.
Click on the same & you’ll be able to copy the file path on Mac OS X.

So, this was all folks! These were some of the quickest ways to find and copy file paths on Mac OS X. If we missed any other beneficial tip to locate the path, do mention it in the comments section below!
mariya jonsan
One of the best quick ways and it is very helpful i must share this with my friend.