
One of the most overlooked parts of computer systems is file organization. You’ll have to travel through a lot of folders, subfolders, and drives to find an image if your photo albums aren’t organized properly. Unwanted clicks can waste a lot of time and make you less productive. Over time, your photo library will increase and get unorganized.
The purpose of creating a folder organizer is to make it appear as though it was created by you. For example, if you’re a photographer, you should create a separate folder for each of your clients and then organize them by year, month, and date. Because of this ideal folder organization, your files will be easily accessible, and you will not lose sight of them even after many years of photographing.
What Is the Best Way to Organize Photos on A Windows PC?

The Systweak Photo Organizer is an excellent tool that may work wonders for your photo collection, as categorizing thousands of photos is nothing short of a miracle. The following steps will help you to use this software for the purpose of folder organizer:
Step 1: Go to the Microsoft Store and download Systweak Photo Organizer, or click the download icon below.

Step 2: Run this program, and the Wizard will allow you to choose between a System scan and a Folder scan.

Step 3: Once you’ve chosen your decision, go to the bottom right corner and select the Next button.
Step 4: Click the Next button after selecting a target folder.
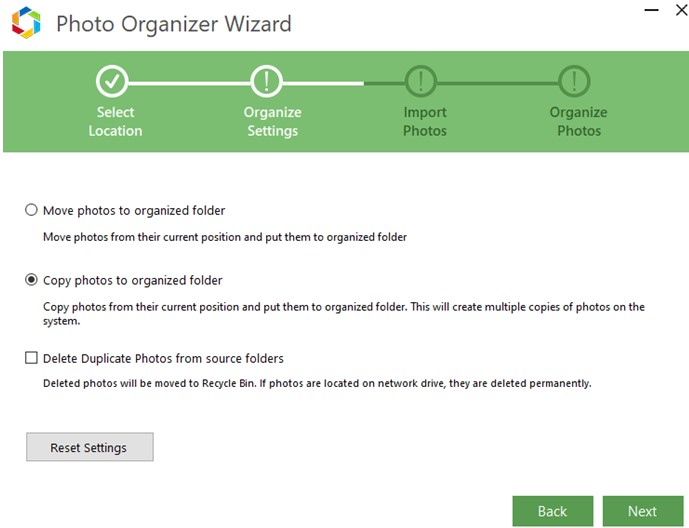
Step 5: Next, choose Copy Photos to Organized Folder from the drop-down menu.
Step 6: To import the photographs, click the Next button.
Step 7: When you click the Finish button, the wizard will close when it has imported all of the photographs into your chosen folder.
Step 8: Systweak Photo Organizer’s main interface will now open, with all photographs neatly categorized by date.
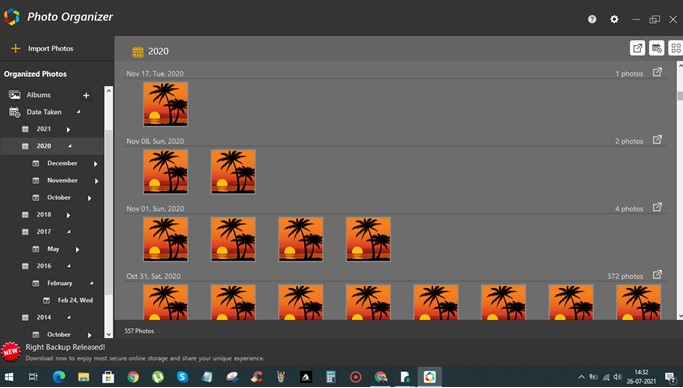
Note: If you look at the left panel, you’ll notice that several folders were formed automatically based on the day, month, and year.
Step 9: You can save any folder by clicking on the export button on the far right after clicking on it.
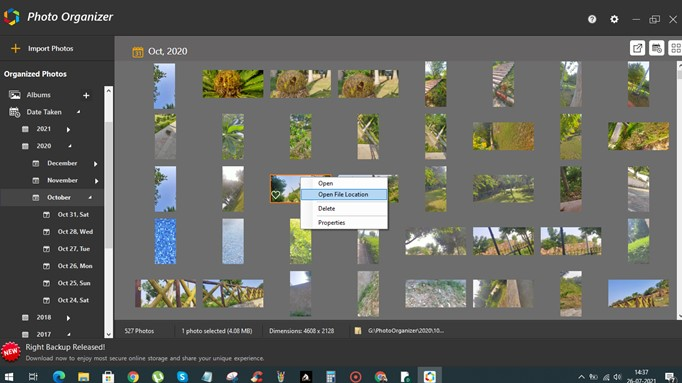
Step 10: Alternatively, right-click on any photo and select Open File Location from the context menu to navigate to the location of the arranged photos folder.
And with a few mouse clicks, the daunting process of sorting your images into distinct folders classified by day, month, and the year has been reduced to a manageable size.
What Is the Systweak Photo Organizer And How Does It Work?
You may not realize that there is more to a snapshot than meets the eye when you take it. Although you may see the image as a result of what you clicked on, there is a lot of data being collected along with the image. This information is known as metadata, and it includes the date and time the photo was taken, as well as device information and geolocation coordinates if the device has a navigation capability enabled.
To put it another way, if you take a picture with your smartphone and have your Internet and Location set on, it will be easy to tell when and where the picture was taken without ever looking at it. This isn’t magic, but it can be done with the help of another tool called Photo Exif Editor, which allows users to access all of the data saved in the image while it’s being taken.
Systweak Photo Organizer arranges images by date into several folders based on day, month, and year using the same metadata stored with the photos. It also allows users to rename multiple images by adding a prefix or suffix to all the images selected.
The Final Word on Best Software To Organize Your Photos On A Windows PC
The Systweak Photo Organizer is a fantastic program that may do wonders for your photo collection, as categorizing a thousand or more photos is nothing short of a miracle. However, there is one drawback: it only works with metadata that is provided. If you look closely at the above folder image, you’ll notice a folder called “Unknown Date taken,” which means that any image that lacks the essential metadata information will be placed there. This is only true for a small number of images that you have obtained from the internet or received from a friend who has purposely altered the metadata for whatever reason.
Follow us on social media – Facebook, Instagram and YouTube. For any queries or suggestions, please let us know in the comments section below. We would love to get back to you with a solution. We regularly post tips and tricks, along with answers to common issues related to technology.