Windows Defender failed to initialize? Well, often known as “Windows Defender error code 0x800106ba”, this probably occurs due to a third-party antivirus’ interference or when the related DLL files go missing on your device.
Windows Defender is the built-in security package that comes along as default with Windows 10 update. It offers real-time protection against viruses, malware, spyware across your device, web, and mails. Windows Defender guards your device and data, protects it from malicious threats, and keeps a check on potential harmful files.
The “Windows Defender application failed to initialize” error indicates that a problem has occurred due to which the Windows Defender is not functioning on your system. In this post, we have covered 5 useful solutions that will allow you to get Windows Defender services up and running within no time.
Also read: How to Fix Windows Defender Error Code 0x8e5e021f
Fix: Windows Defender Application Failed to Initialize
Let’s get started and see how we can fix error code 0x800106ba on Windows 10.
1. Remove Third-party Antivirus Tools
To make sure that the Windows Defender application functions seamlessly on the Windows OS without any interruptions, we advise you to temporarily remove third-party antivirus software. If your Windows PC is installed with additional antivirus tools like McAfee, Avast, Norton security, then uninstall the third-party antivirus programs to retain Windows Defender’s initialization. Here’s what you need to do:
Open Windows Settings> Apps. Scroll through the list of apps, tap on the antivirus tool, and hit the “Uninstall” button to remove it from your device.
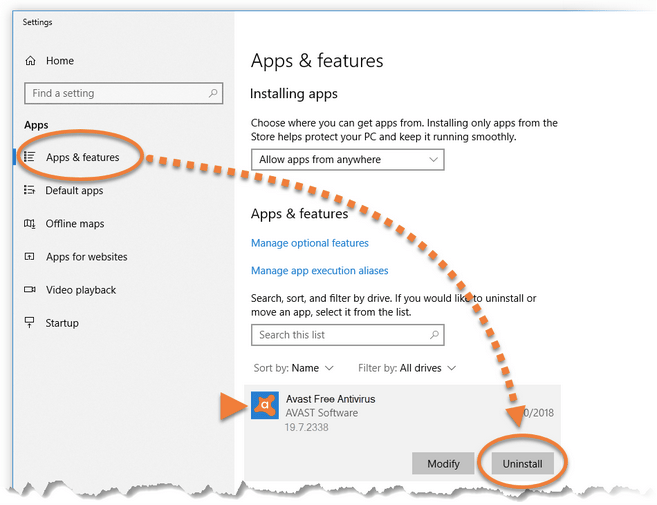
Reboot your PC and then try running Windows Defender again to see if it fixed the issue. Once the Windows Defender services are enabled on your machine, you can again install the antivirus program from the manufacturer’s website.
2. Turn OFF Windows Defender
The next solution to fix the “Windows Defender failed to initialize” issue highlights turning OFF the Windows Defender services on your system. Follow these quick steps to disable Windows Defender on Windows 10 devices:
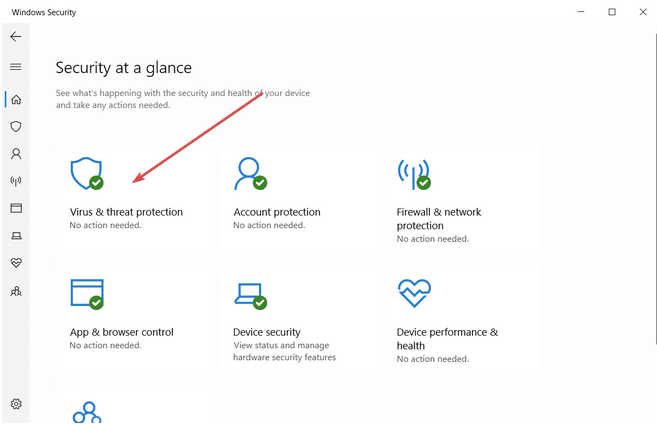
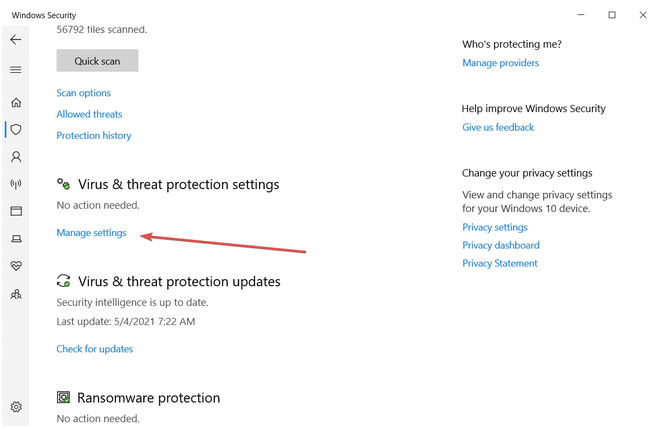
- Launch the Start menu search box, type “Windows Defender” and hit Enter. In the Windows Defender app, tap on the “Virus and threat protection” option.
- Tap on “Manage Settings”.
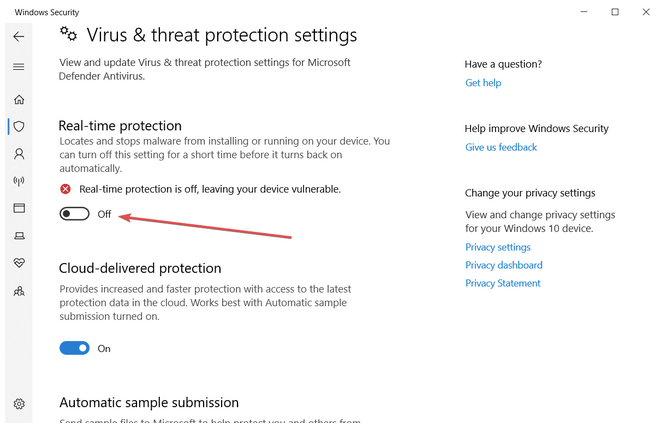
- Now, here you need to toggle OFF the switch for “Real-time protection” to disable Windows Defender services. Also, disable the “Cloud-delivered protection” option.
Once you’ve made the above-mentioned changes, reboot your device to check if you’re still encountering error code 0x800106ba on your PC.
Also read: 3 Ways: How to Set Maximum CPU Usage for Windows Defender Scan
3. Check the Start Configuration of Windows Defender Service
To make sure that the Windows Defender app is configured as active at the time of Startup, follow these steps:
- Fire up the Start menu search box, type “Services” and hit Enter.
- In the Windows services box, look for “Microsoft Defender Antivirus Service” on the right menu pane. Once you find it, double-tap on it to open “Properties”.
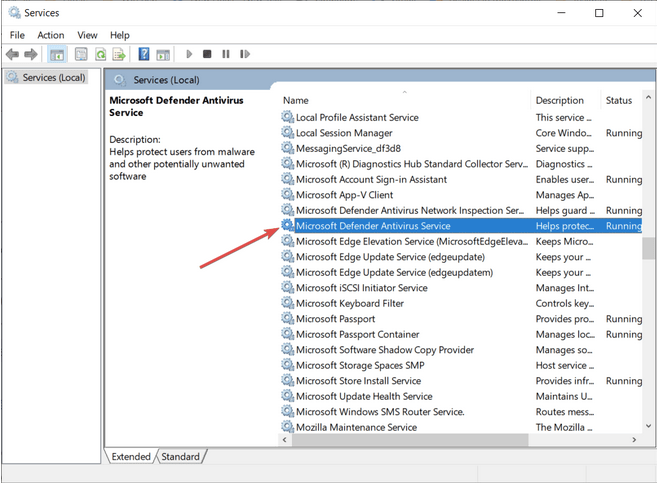
- In the Startup type value, either select the “Automatic” or “Automatic (Delayed)” option.
- Hit the OK and APPLY button to save the recent changes.
Also read: Why & How To Disable Microsoft Services On Windows 10
4. Register the DLL Files of Windows Defender App
To re-register the DLL files of the Windows Defender app, here’s what you need to do.
In the Start menu search box, type “Command Prompt, right-click on it, and select “Run as Administrator”.
In the Command Prompt terminal, type the following commands one by one and hit Enter after each command to execute it.
regsvr32 wuaueng.dll

regsvr32 wucltui.dll

regsvr32 softpub.dll

regsvr32 wintrust.dll

regsvr32 initpki.dll

regsvr32 wups.dll

regsvr32 wuweb.dll

regsvr32 atl.dll

regsvr32 mssip32.dll
After executing all these commands, exit all windows, reboot your device to check if it fixed the “Windows Defender failed to Initialize” issue.
Also read: 10 Best DLL Fixer Software For Windows 10, 8, 7 PC: Free/Paid
5. Run the SFC Scan
SFC (System File Checker) is an in-built Windows utility that scans and fixes hardware errors and discrepancies. To run the SFC command on Windows 10, follow these steps:
Fire up the Start menu search box, type “Command Prompt”, right-click on its title, and select “Run as Administrator”.
In the Command Prompt window, type the following command and hit Enter.
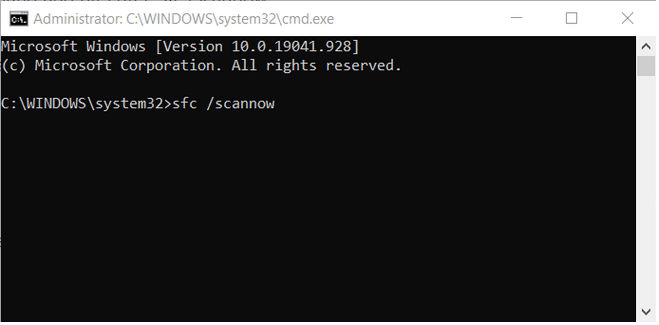
sfc/scannow
Once the scan is completed, reboot your device to check if you’re still experiencing the “Windows Defender application failed to initialize” error.
Also read: SFC Scan Stops Working on Windows 10? Here’s the Fix!
Conclusion
Here were a few solutions to fix the “Windows Defender failed to initialize” issue and to get rid of the error code 0x800106ba message. Ignoring this error can leave your device exposed to threats and errors. Hence, we recommend you use any of the above-mentioned solutions to resume the functionality of Windows Defender services on your device.
Was our post helpful? Feel free to share your thoughts in the comments space!