
Blog Summary:
|
While Microsoft Defender is considered one of the best computer security software for Windows 11/10 PCs, you may discover certain situations where you may want to disable it temporarily or permanently.
Why You Need to Disable Windows Defender Antivirus on Windows 10/11?
For instance, while you’re working on a project, Windows Defender may flag one of your essential files as a threat, preventing you from accessing it. Additionally, it may cause compatibility issues with other software, causing programs to crash or malfunction. Oftentimes, Windows Defender’s continuous scanning and resource-heavy operations hog system resources and slow down everything you do. Perhaps, you have privacy concerns about the type of data that Windows Defender collects.
In each scenario, disabling or temporarily pausing the Microsoft Defender feature seems like a reasonable solution to maintain productivity without compromising on security. In this article, we will walk you through different methods to do so. So, let’s get started!
|
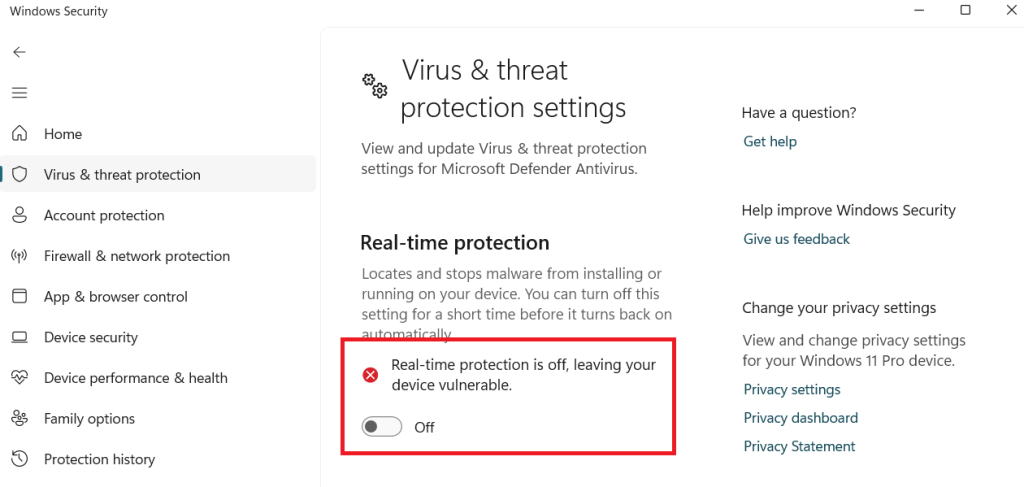
Quickest Way To Turn Off Microsoft Defender: Since Windows doesn’t come with a built-in option to uninstall Microsoft Defender, the most convenient way to disable it is through Windows Security App. Here’s what you need to do:
|
Top 3 Ways to Disable Windows Defender In Windows 11/10 PC
You can disable Windows Defender using these three methods:
Method 1: Using Group Policy Editor
If you have Windows 10 Pro and Enterprise, you can use Local Group Policy to disable Windows Defender. To do that, follow these steps:
Step 1: Press Windows and R to get a Run box and type gpedit.msc to launch Group Policy Editor.

Step 2: Navigate to Computer Configuration-> Administrative Templates-> Windows Components-> Windows Defender Antivirus
Step 3: Locate Turn off Windows Defender Antivirus.
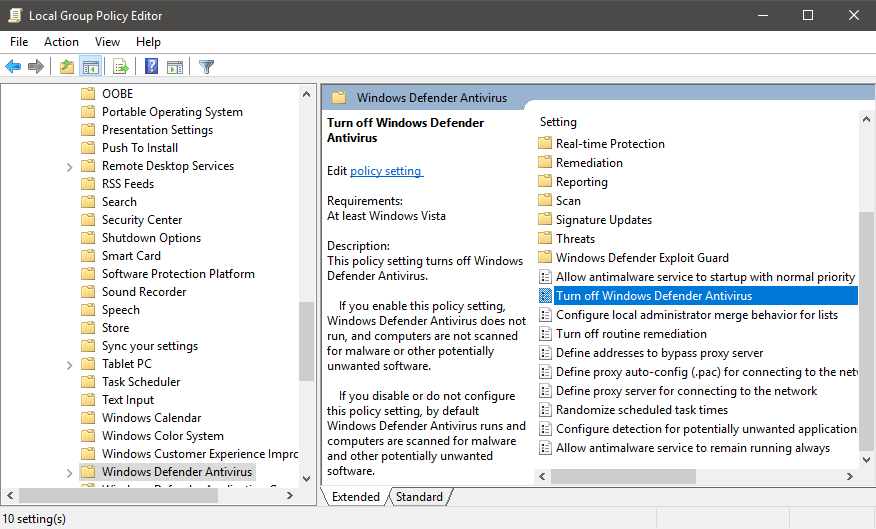
Step 4: From the new window, click on the radio button beside Enabled to get it done.

Step 5: Click Apply and OK.
This will permanently disable the feature unless you change it.
Method 2: Using Windows Registry
You can use Registry Editor to disable Windows Defender. Before going further make sure, you take a backup for Registry Editor as a wrong action could let your device malfunction.
Steps to take a backup of Windows Registry
Step 1: Press Windows and R and type regedit and press enter.

Step 2: On Registry Editor, go to File-> Export.

Step 3: A window will open to save the backup of registry files on your preferred location.

Now that you have taken a backup, you can follow the steps below to turn off Windows Defender with Registry Editor:
Step 1: Press Windows & R to Run window and type regedit.

Step 2: Go to HKEY_LOCAL_MACHINE->Software->Policies->Microsoft->Windows Defender.
Step 3: On the right side of the panel, locate Default.

Step 4: Right-click on the right side of the window and click New->DWORD(32-bit) value

Step 5: Name the key “DisableAntiSpyware” and press Enter.
Step 6: Once the file is created, double click it & set the value to 1
Step 7: Click OK to confirm and restart your computer.
In this way, you can disable Windows Defender on your desktop. This will disable the app, but it will not uninstall it as it is a native app of Windows.
Method 3: Using Third-Party Antivirus
If the sole reason to disable Windows Defender is because of false alarms, then switching to a better alternative is a clever choice. Installing third-party antivirus software will automatically turn off Windows Defender and ensure only the new security program runs on your system.
For the sake of demonstration, we are installing Systweak Antivirus. It’s a reliable security solution that protects your computer against existing and emerging viruses, malware, ransomware, spyware, adware, and other security threats. It offers real-time protection, exploit, and malware protection to safeguard your data and device comprehensively.
Here are the steps to install Systweak Antivirus and see Windows Defender getting disabled automatically:
STEP 1 – Download and install the latest version of Systweak Antivirus.


STEP 2 – Double-click on the downloadable file and follow the on-screen instructions to begin the installation process.
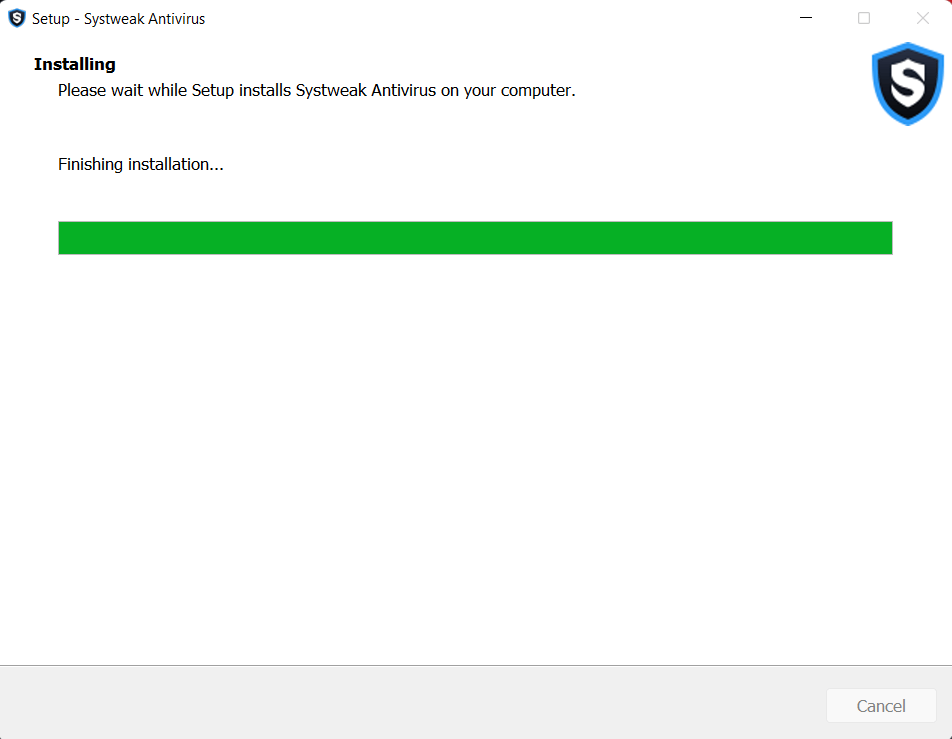
STEP 3 – Once the installation is complete, you can launch Systweak Antivirus to ensure 360-degree protection on your system.

Now, Windows Defender will automatically detect this new antivirus software and disable itself permanently. You will also see the pop-up asking you to turn on the Microsoft Defender again!
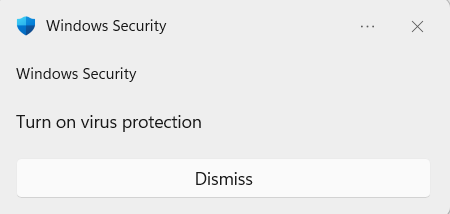
To continue using the Systweak Antivirus, do not enable it again!
You might be interested to know: 10 Best Windows Defender Alternatives For Windows 11 In 2024
Conclusion
So, these are the simple methods to disable Windows Defender on your Windows 11/10 PC. While the easiest method is to use the Windows Security app. One might want to permanently turn off Windows Defender with Registry Editor or Group Policy Editor. Additionally, it is not recommended to disable it permanently unless you have another security solution like Systweak Antivirus installed on your computer. Follow us on social media – Facebook, Instagram and YouTube.
To learn more about this software in detail, check out our previous guide: Systweak Antivirus Review, Pricing And Features