
Are you falling short of storage space on Mac? It’s time to manage disk space on Mac. Here we explain the easiest ways to check, manage, and free up storage space on Mac.
How to Manage Storage Space on Mac?
If your Mac is slowing down and you see the rainbow wheel often – it’s time for a little cleaning and storage space management on Mac. You can try to find the unnecessary files manually or use the best cleanup and Mac optimizer tools. Here we explain both manual and automatic ways to clean up Mac and check storage space.
 Additional Tip
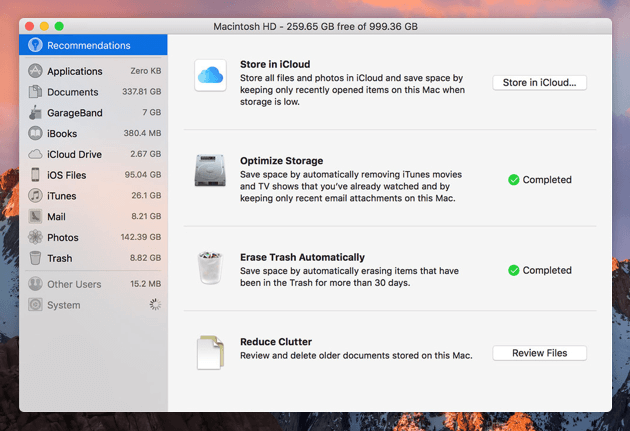
If you are running macOS (Sierra) or higher, you can use the in-built Optimized Storage option. This helps resolve, “Your disk is almost full” problem.

To use it, you need to click the Apple menu > About This Mac > Storage. Here you can easily find out how much storage you’re currently using. To upload data to the cloud, you can use the Store in the iCloud option. However, this won’t delete junk and useless files; this means you will eventually upload junk data and pay for iCloud storage to save junk.
To fix this problem and help eliminate junk files and other unwanted data, we suggest using Disk Clean Pro. This powerful Mac cleaning tool will deal with this problem efficiently without any hassle.
To download it, click here.

Now, with that said, let’s get started with how to manage storage on Mac.
10 Ways to Free Up Hard Disk Space on Mac and Speed up System Performance
1. Clear System Storage on Mac
System storage cleanup sounds like a lot of work and a bit technical. But if you pay attention, it simply means deleting old files. To do so, you just need to search for large files, old downloads. For this, you can press F3+Command to open the desktop and delete old screenshots. Additionally, you can open the Applications folder > sort apps by size and delete the largest ones.
Nonetheless, you can use Disk Clean Pro – the best Mac optimizer to get rid of system junk files, user cache, system cache, duplicates, and free up RAM by restarting Mac.
2. Cleanup Cache Files
Cache files help load a program faster and run it smoothly. You can consider them a template that allows your Mac to know how the app should run/look/load without slowing down the app. However, over time, these cache files consume unnecessary space, thereby freezing the system and decreasing system performance. Hence, to manage storage and cleanup, Mac periodically removing them is recommended. Don’t worry; this won’t harm your system or any app as Mac will create fresh ones when you use the app and the system.
To remove cache files, follow the steps below:
- Open Finder > Go > Go To Folder.
- Type ~/Library/Caches, and in the following folder, select old cache files or take unnecessary space.
- Again, head to Go To Folder, and this time, type /Library/Caches without ~. Also, select the folder to delete and move them to trash.
This will help get rid of cache files and speed up Mac performance. In addition to this, in Go To Folder type /System/Library/Caches, check the items and delete unwanted ones. However, if you are not sure about any file, do not remove them as this might harm your Mac.
Moreover, you can use a utility that does all this automatically; yes, you guessed it right; it is Disk Clean Pro. It helps clean system cache too without any problem.
Once you have performed all these actions, restart your Mac, and create new cache files.
3. Delete Duplicates
Even if you have a habit of organizing data, duplicates still make their way. It can be because you saved a file twice, downloaded a file multiple times, or any. Regardless of the reason, they exist on your system and take unnecessary space.
But finding and removing them is not easy. So, here’s what you can do to get rid of duplicate files.
- Launch Finder
- Click File menu > New Smart Folder > + button > choose the type of file you want to see
- Now sort them by the name of find and remove duplicates.
Note: This will find the files with similar names; to make certain they are duplicates, you need to check the creation date. Also, this method is just a temporary fix.
If you are looking for an accurate and best way to detect and delete duplicates, use Disk Clean Pro. This tool makes cleaning duplicates easy. To detect and remove duplicates, you just need to use the Duplicate Finder module.
4. Remove old iTunes Backup
Old backups tend to take up a lot of space. You can get rid of the unwanted ones by following the steps below:
- Launch Finder > Go > Go To Folder > type ~/Library/Application Support/MobileSync/Backup/
Select old backups and move them to trash. This will help free up space.
In addition to this, launch Disk Clean Pro > Misc Cleaning > Old iTunes backup > run the scan > clean unwanted ones.
5. Delete iOS software update
- Head to Finder > Go > Go to Folder type ~/Library/iTunes/iPad Software Updates (iPad)
Select the files and delete them. For iPhone type ~/Library/iTunes/iPhone Software Updates
Delete downloaded files you are not using and those that are too old. This will help manage storage, cleanup Mac, and free up storage space.
6. Remove unwanted installed software
This part is often overlooked, but removing old and unused applications is a great way to manage space on Mac. For this, head to the Applications folder > look for the unwanted programs. Select them > right-click > Move to Trash.
This will help remove unwanted apps and free up storage space to make room for important files.
7. Empty Trash
This might sound naïve or too obvious, but trust me, it’s often ignored because we think once we have deleted the file, the work is done. But let me tell you, when you delete something, it gets moved to Trash. Hence, if you want to make Mac’s space and stop wasting space, you need to empty Trash. For this, follow the steps below:
- Ctrl+ click the Trash in Dock > Empty Trash > confirm the action.
This is the easiest way. Nonetheless, here again, you can use Disk Clean Pro > Misc Cleaning > Empty Trash.
Coming soon

8. Reduce Login Items
If your Mac is booting slow or you are experiencing slow and sluggish Mac, there’s a possibility that too many apps launch at startup. To get rid of these unwanted apps, head to System Preferences > Users & Groups > select user account > Login Items > select item you don’t want and click -.
This will remove unwanted programs from startup.
9. Scan the system for infections
When compared with Windows, Mac is secure but not free from threats. It can be infected. Therefore, to keep it protected from infections, run the best antivirus software for Mac. We recommend using Systweak Anti-Malware – the best security tool for Mac.
You can download it by clicking here.

10. Run First Aid
Even if you think your Mac is perfectly optimized, there are chances that there are some errors on the storage disk. Therefore, we suggest using the First Aid feature in Disk Utility. This helps find and repair most disk issues.
Note: Running First Aid is a time-consuming task hence use it when your Mac is in an idle state.
To run First Aid, follow the steps below:
1. Open Finder > Go > Utilities > Disk Utility
2. Select your startup disk; if not renamed, it is called Macintosh HD
3. Choose the one that says Data

4. Click the First Aid option and run it.
If any errors are detected it will repair it. Afterward, restart Mac.
This is all! Using these simple steps, you can tune up Mac, manage disk space, recover storage space, and boost the performance. Moreover, they will help run a clean and optimized Mac. Either, give them a try or use Disk Clean Pro – an all-in-one Mac optimizer that will perform all these tasks in one click. Do share your thoughts about the post in the comments section. We’d love to hear from you.