
Simply putting out images on your blogs, presentations, or wherever it is that you use images, won’t gather the kind of traffic, the kind of response you want. You need to make your screen captures exceptional, you need to make your screen captures better every single time so that they become more attractive and more interactive. Because that’s how you make your screenshots stand out from your competition.
But, how on Earth are you supposed to do that? That’s what this post’s for. Here we are going to discuss some of the best tips to take better screen captures. At the outset, we’d like to mention that although the Windows Snipping Tool or the shift + Windows key + S combination is a great utility to have by your side, a dedicated third-party utility is always great to not just capture screen but even add annotations, effects, and other edits. For this blog, we’ll take an example of TweakShot Screen Capture at various instances.
Also Read: Want To Know TweakShot Screen Capture Better, Here’s An Inside-Out Post
Tips and Tricks For Better Screen Captures
1. Know How You Can Capture Screenshots
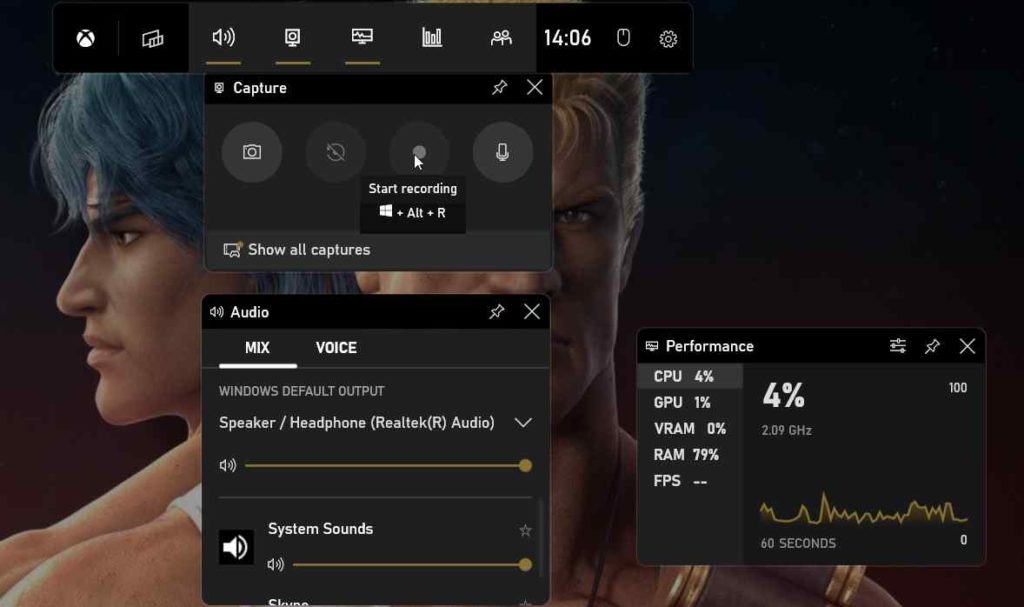
Why just count on one way to take screenshots. Sure you have the Snipping Tool, but you could also use Windows Xbox Game Bar to not just capture screenshots but even record your notable gaming moments. Just press Windows + G key combination and you could do a whole world of things.
2. Know What You Are Doing
Want to produce better screen captures? One of the first things is to iron out the details much before even touching the screenshot.
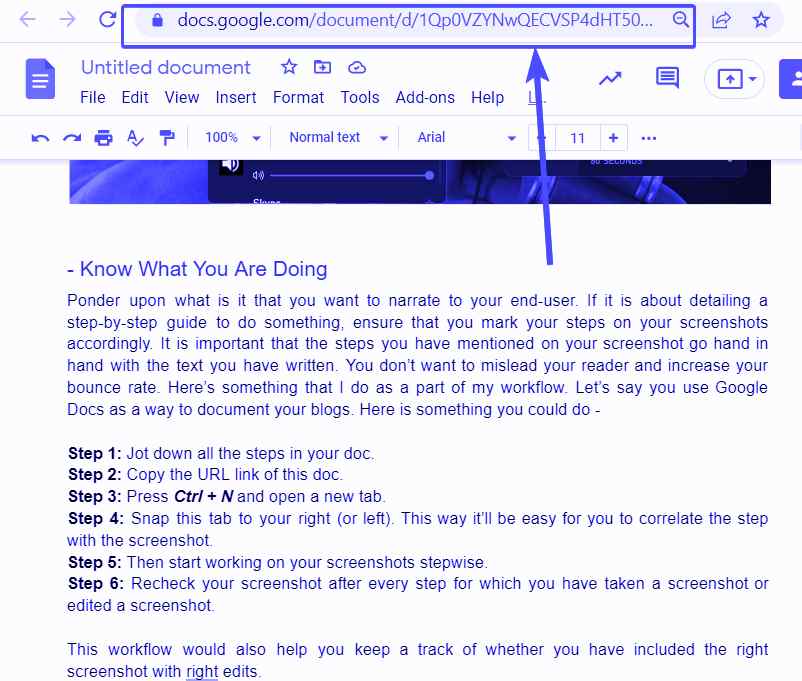
Ponder upon what is it that you want to narrate to your end-user. If it is about detailing a step-by-step guide to do something, ensure that you mark your steps on your screenshots accordingly. The steps you have mentioned on your screenshot must go hand in hand with the text you have written. You don’t want to mislead your reader and increase your bounce rate. Here’s something that I do as a part of my workflow. Let’s say you use Google Docs as a way to document your blogs. Here is something you could do –
Step 1: Jot down all the steps in your doc.
Step 2: Copy the URL link of this doc.
Step 3: Press Ctrl + N and open a new tab and paste the URL into this new tab.
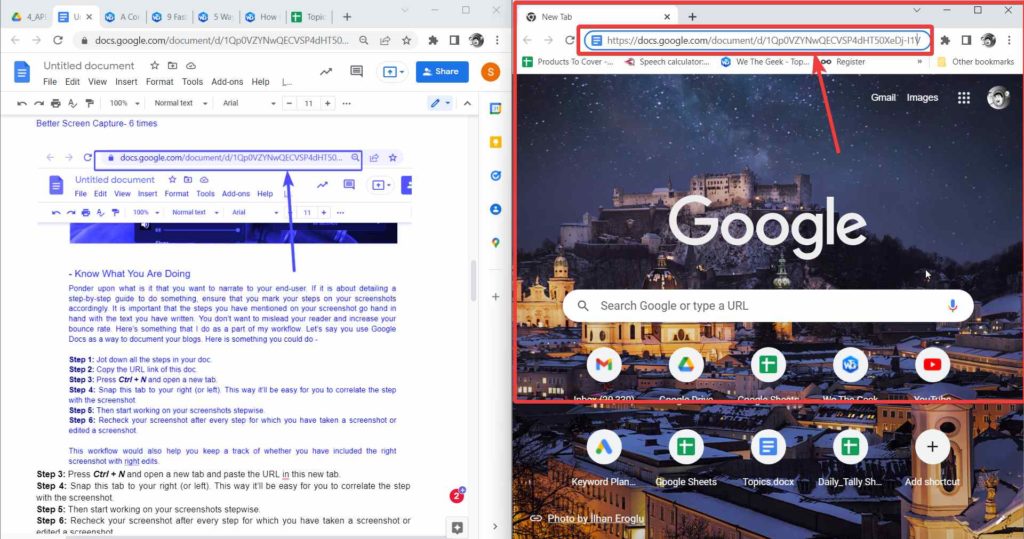
Step 4: Snap this tab to your right (or left). This way it’ll be easy for you to correlate the step with the screenshot.
Step 5: Then start working on your screenshots stepwise.
Step 6: Recheck your screenshot after every step for which you have taken a screenshot or edited a screenshot.
This workflow would also help you keep a track of whether you have included the right screenshot with the right edits.
3. Take Your Time To Capture The Right Screenshot
Take some time (if not your own sweet time) to drag and capture the areas that you want your audience to focus upon in your screenshots. And, if possible review your screenshot at least once.
This is a very basic step but many of us fumble here and here’s how – Regardless of what you are using – a screenshot utility or your Windows’ snipping tool, while dragging that + i.e. the sign that you drag to capture the desired area, we sometimes neglect the actual area that we want to focus on, only later to repent the mistake we have done. For example, quite recently while working on a Windows troubleshooting blog, I mistakenly forgot to take into account an important slider in one of the Windows Settings that I intended my audience to turn on. Thankfully, I later reviewed the screenshot before pushing it off for edit and corrected it timely.


In such an event, even a screen capturing utility like TweakShot Screen Capture offers a variety of ways to capture screenshots. I like using the Capture Region mode and that’s because it allows you to capture a screenshot pixel by pixel, thereby eliminating the chances of any mistakes.
![]()
4. Annotate – It Will Make Your Screenshots Standout
How interactive and beautiful it would look if you would mark the steps in your screenshot? Moreover, if you mark the areas of focus in your screenshot and use elements like arrows and texts, it would just take your screenshot to a whole new level.
Just because you have placed an image in your blog, doesn’t mean that the reader will be able to grab the context of what you intend to say. The reader would probably relate your text with the screenshot and trust us, if they can do that faster, they’d more likely trust your posts or presentations. So, a part of making better screen captures is to be creative and add annotations that go hand in hand with your content.
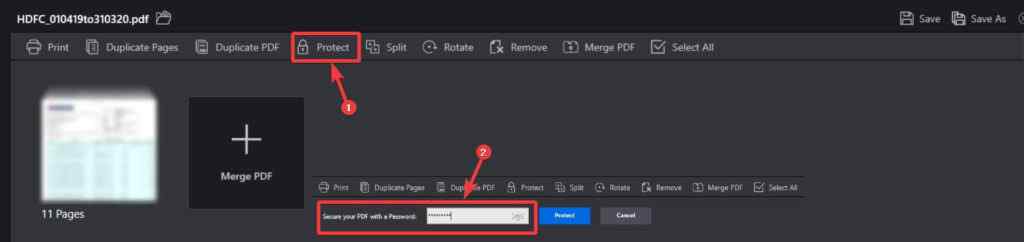
For example, I was recently working on a review where I wanted to show how you can password protect your PDF using a PDF management tool. Here’s what I did with my screenshot –
By the way, if this interests you, you can check out a comprehensive review of Advanced PDF Manager here.
You will find yet another example of how TweakShot Screen Capture can help you annotate screenshots with utmost ease in the point mentioned just below.
5. Do Not Reveal Personal Information
You took a screenshot, pasted it on your blog and it got published. What’s the big deal? We’ll your screenshot had details like your email address, your phone number, passwords, and stuff like that. Act beforehand, hide that information or at least blur it.
Before you put yourself in a situation where you repent for having accidentally given out personal information and start sweating later, might as well blur it out now. And, TweakShot Screen Capture makes this task a cakewalk. Refer to the screenshot below –
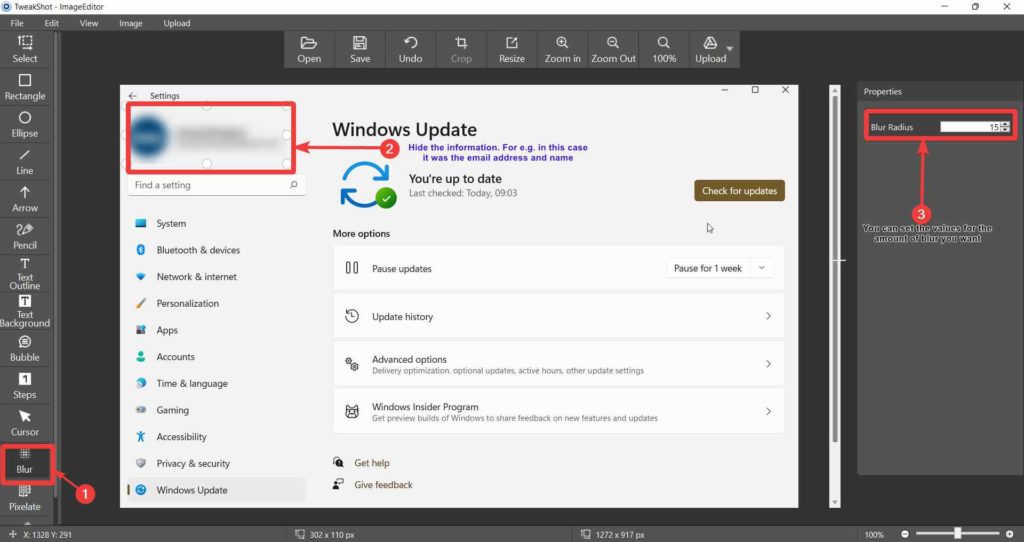
To blur any information refer to the steps numbered 1, 2, and 3 in the screenshot just above –
1. Click on the Blur option from the left-hand pane
2. Drag the area that you want to blur
3. Control the Blur Radius by either manually entering the values using the up arrow and down arrow button to increase or decrease the Blur Radius
Wrapping Up
This is not a hard and fast guide but something that’ll ensure that your efforts of creating better screen capture give good results. If you liked these tips, do hit us up with your comments, share them with your friends and colleagues who love to showcase their creativity and love to help readers out, just as we do. For more such content, keep reading WeTheGeek.
Frequently Asked Questions
Q1. How can I make my screen capture of better quality?
To deliver better screen captures that are of good quality, first be mindful of what you are capturing and if your screenshot covers everything that you intend to show to your reader. Ensure that you capture a screenshot in such a manner that it doesn’t look incomplete or contain details that you don’t want to show.
Q2. How do I make my screenshots clearer?
You can always take the help of a third-party screenshot capturing software like TweakShot Screen Capture that doesn’t just let you take screenshots in multiple ways but even lets you edit them like a pro.
Q3. Why are my screen captures blurry?
Review the image whose screenshot you want to take. Was the source itself blurry i.e. the image was blurry itself or had blurry elements right from the start? Also, did you convert your image to a lossy file format? If your answer is yes to any of these questions, you know why your screenshot is blurry.