
Is your Microsoft’s Surface Pen not working? Well, if yes, then don’t worry, it is easy to get your Pen working. The Surface Pen is a great device to use, but there are a lot of complaints when it comes to Surface Pen tip isn’t working. As we always say, there is a solution to every problem.

Surface Pen, on one side, can add a lot of functionality to your Surface while on the other hand, it can cause many issues. Many times your Surface Pen suddenly stops working, and for these reasons, we have come up with this article.
Here are some of the best fixes to ‘Surface Pen not working’ that will bring your Pen back on the track and make it write, draw and multitask on your Windows 10 computer.
How to Fix- Microsoft Surface Pen Not Working?
We are here considering Windows 10 as a base and will tell you the best hacks to fix Microsoft Surface Pen not working. Check them out; we have covered:
- Install Latest Windows 10 Update
- Check Battery of your Surface Pen
- Check Connection
- Update Drivers
1. Download the latest Windows 10 update
Windows update is one of the primary reasons why you face issues with Microsoft Surface pen. Ensure that any device you are using should have been updated with the latest Windows version, be it Surface Pro, Go, Book, or Laptop.
Downloading latest updates on your device will simultaneously update and fix the device drivers. Device drivers play a vital role and make Surface Go Pen like devices run properly.
Here’s how to install the latest Windows version:
- To check for Windows updates and new drivers’ version, go to PC Settings.
- Tap Update & Security and click on Check for updates. The updates will start automatically to check for available drivers and updates from Microsoft servers.
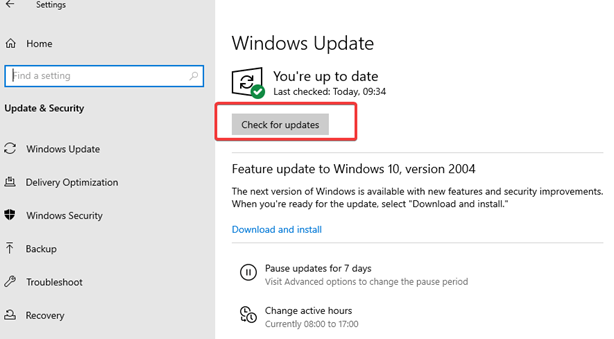
- Once done, Restart your device.
Sometimes, as soon as the update is downloaded, the PC restarts automatically. If not, initiate a manual restart to let the changes take place. For this, you need to go to the Windows icon at the bottom left, click on the Power button and click Restart.
2. Check Battery Of This Smart Digital Pen
Microsoft’s Surface Pen is powered by AAAA battery, and a flat battery can be one of the biggest reasons behind your Surface Pro or Surface Pen not working. To ensure the battery is up and running, check the battery by pressing and holding the eraser button for 5-7 seconds. It will turn on a small LED light. There are three instances, a red light for the battery is almost flat, green light for the battery has a charge, and no light means battery is already dead.
Check where your Surface Pro Pen stands. You can replace the battery of any of your Microsoft’s Surface Pen. To restore the battery, you need to twist the Pen and pull out the eraser end firmly. Once the stylus is open, you can swap the old battery for the new one.
If your Surface Pen is connected to your system, you can check for its battery level in the settings. For this, open Settings, go to Devices and click Bluetooth & other devices. You will find the name of your Pen in the list of connected devices.
3. Connect Surface Pen Correctly
If your Surface Pen is not working, you need to try connecting it back. The Surface pen uses Bluetooth as a medium to connect. You can always check whether it is connected or not using the following steps:
- Open Windows
- Choose Devices from the list of options.
- Go to Bluetooth & Other Devices and ensure Bluetooth is turned on.
- If you see Surface Pro or Surface Go Pen is already paired, disconnect it and pair it back again.
That’s it. Close the Windows Settings page and check if this troubleshooting app helped you fix the Surface Pen not working issue. Also, you can check for Bluetooth driver updates to prevent any connection issues. If your Surface Pen is still not working, have patience, we have another fix for you.
4. Update Drivers Manually
If nothing has worked for you till now, you can adopt this technique to get back your Surface Pen in normal working condition. For this, you can update your system drivers both manually and automatically.
To manually update drivers, follow the steps below:
- Right-click on the Windows button at the bottom left of the Taskbar.
- Choose Device Manager from the list.
- Go to Human Interface Devices to expand the list within.
- Now, right-click on the driver you are looking for, and Update drivers.
- You will be asked, “How do you want to search the drivers?” Choose “Search automatically”. After this step, you’ll be able to update drivers manually. If you are still witnessing the issue, jump to the next fix.
Update Drivers Using Smart Driver Care
If manually updating drivers couldn’t help, you can always choose to solve this issue using an automatic method. For this, we recommend you to use Smart Driver Care- a smart utility tool for all your system driver needs. It identifies all outdated drivers on your system and updates them in no time. Here’s how to use this smart tool:
- Install and run Smart Driver Care.
- Click on Scan to scan for the outdated drivers and proceed to the next step.
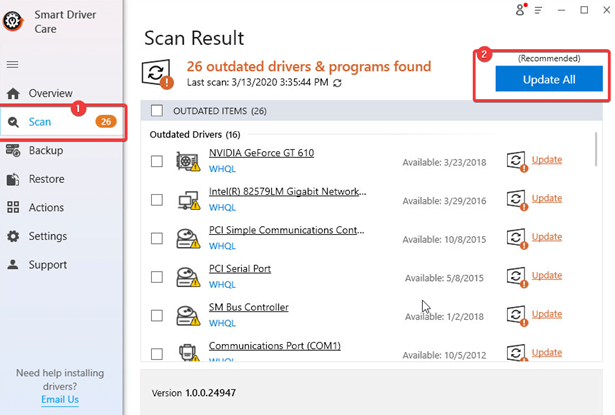
- You can update all the drivers at once, or you can consider updating one by one.
‘Surface Pen Not Working’- Resolved!
This is it, folks! Hope we were able to help you fix your ‘Surface Pen not working’ issue. These were some of the best tried and tested hacks to fix the problems with Microsoft’s Surface Go or Surface Pro Pen. If still, you are unable to fix the issue, the Pen may be damaged, and it’s time to change it.
Also Read: