
Finally, with macOS 11 Apple marks the end of OS X and the beginning of a new mac lineup. Indeed, this is a huge step. And with this Apple releases two public beta versions of macOS Big Sur. So, what does this merger of macOS and iOS/iPadOS consist of?
Does it make the older version less powerful or offers something new? macOS Big Sur does not undermine older versions, but it certainly adds some important features.
Here in this article, we explain its features, compatible devices and how to install it.
So, let’s look at the new things about Big Sur.
 Additional Tip
Make Some Room For The All-New macOS Update!
To install macOS Big Sur, you need approx. 12.3 GB free space. This means you need to delete some data. But what should we remove? All the files & folders we have are important. Right?
Not completely!
Over time, your Mac gets cluttered with unwanted data like Caches, Junk Files, Temp Files, Logs, Old/Large Files,- and more. Therefore, whenever you fall short of storage space, the first thing you should do is get rid of those redundant data that takes unnecessary space on your Mac.
But how will I know where these needless files are stored?
Well, to declutter your Mac and regain valuable storage space, we recommend using Cleanup My System. It’s a powerful Mac optimizer application that knows exactly what files fall under redundant data & what is safe to clear to restore speed & performance. Not only this, but it also scans your Mac for managing launch agents and eliminating privacy-exposing traces.
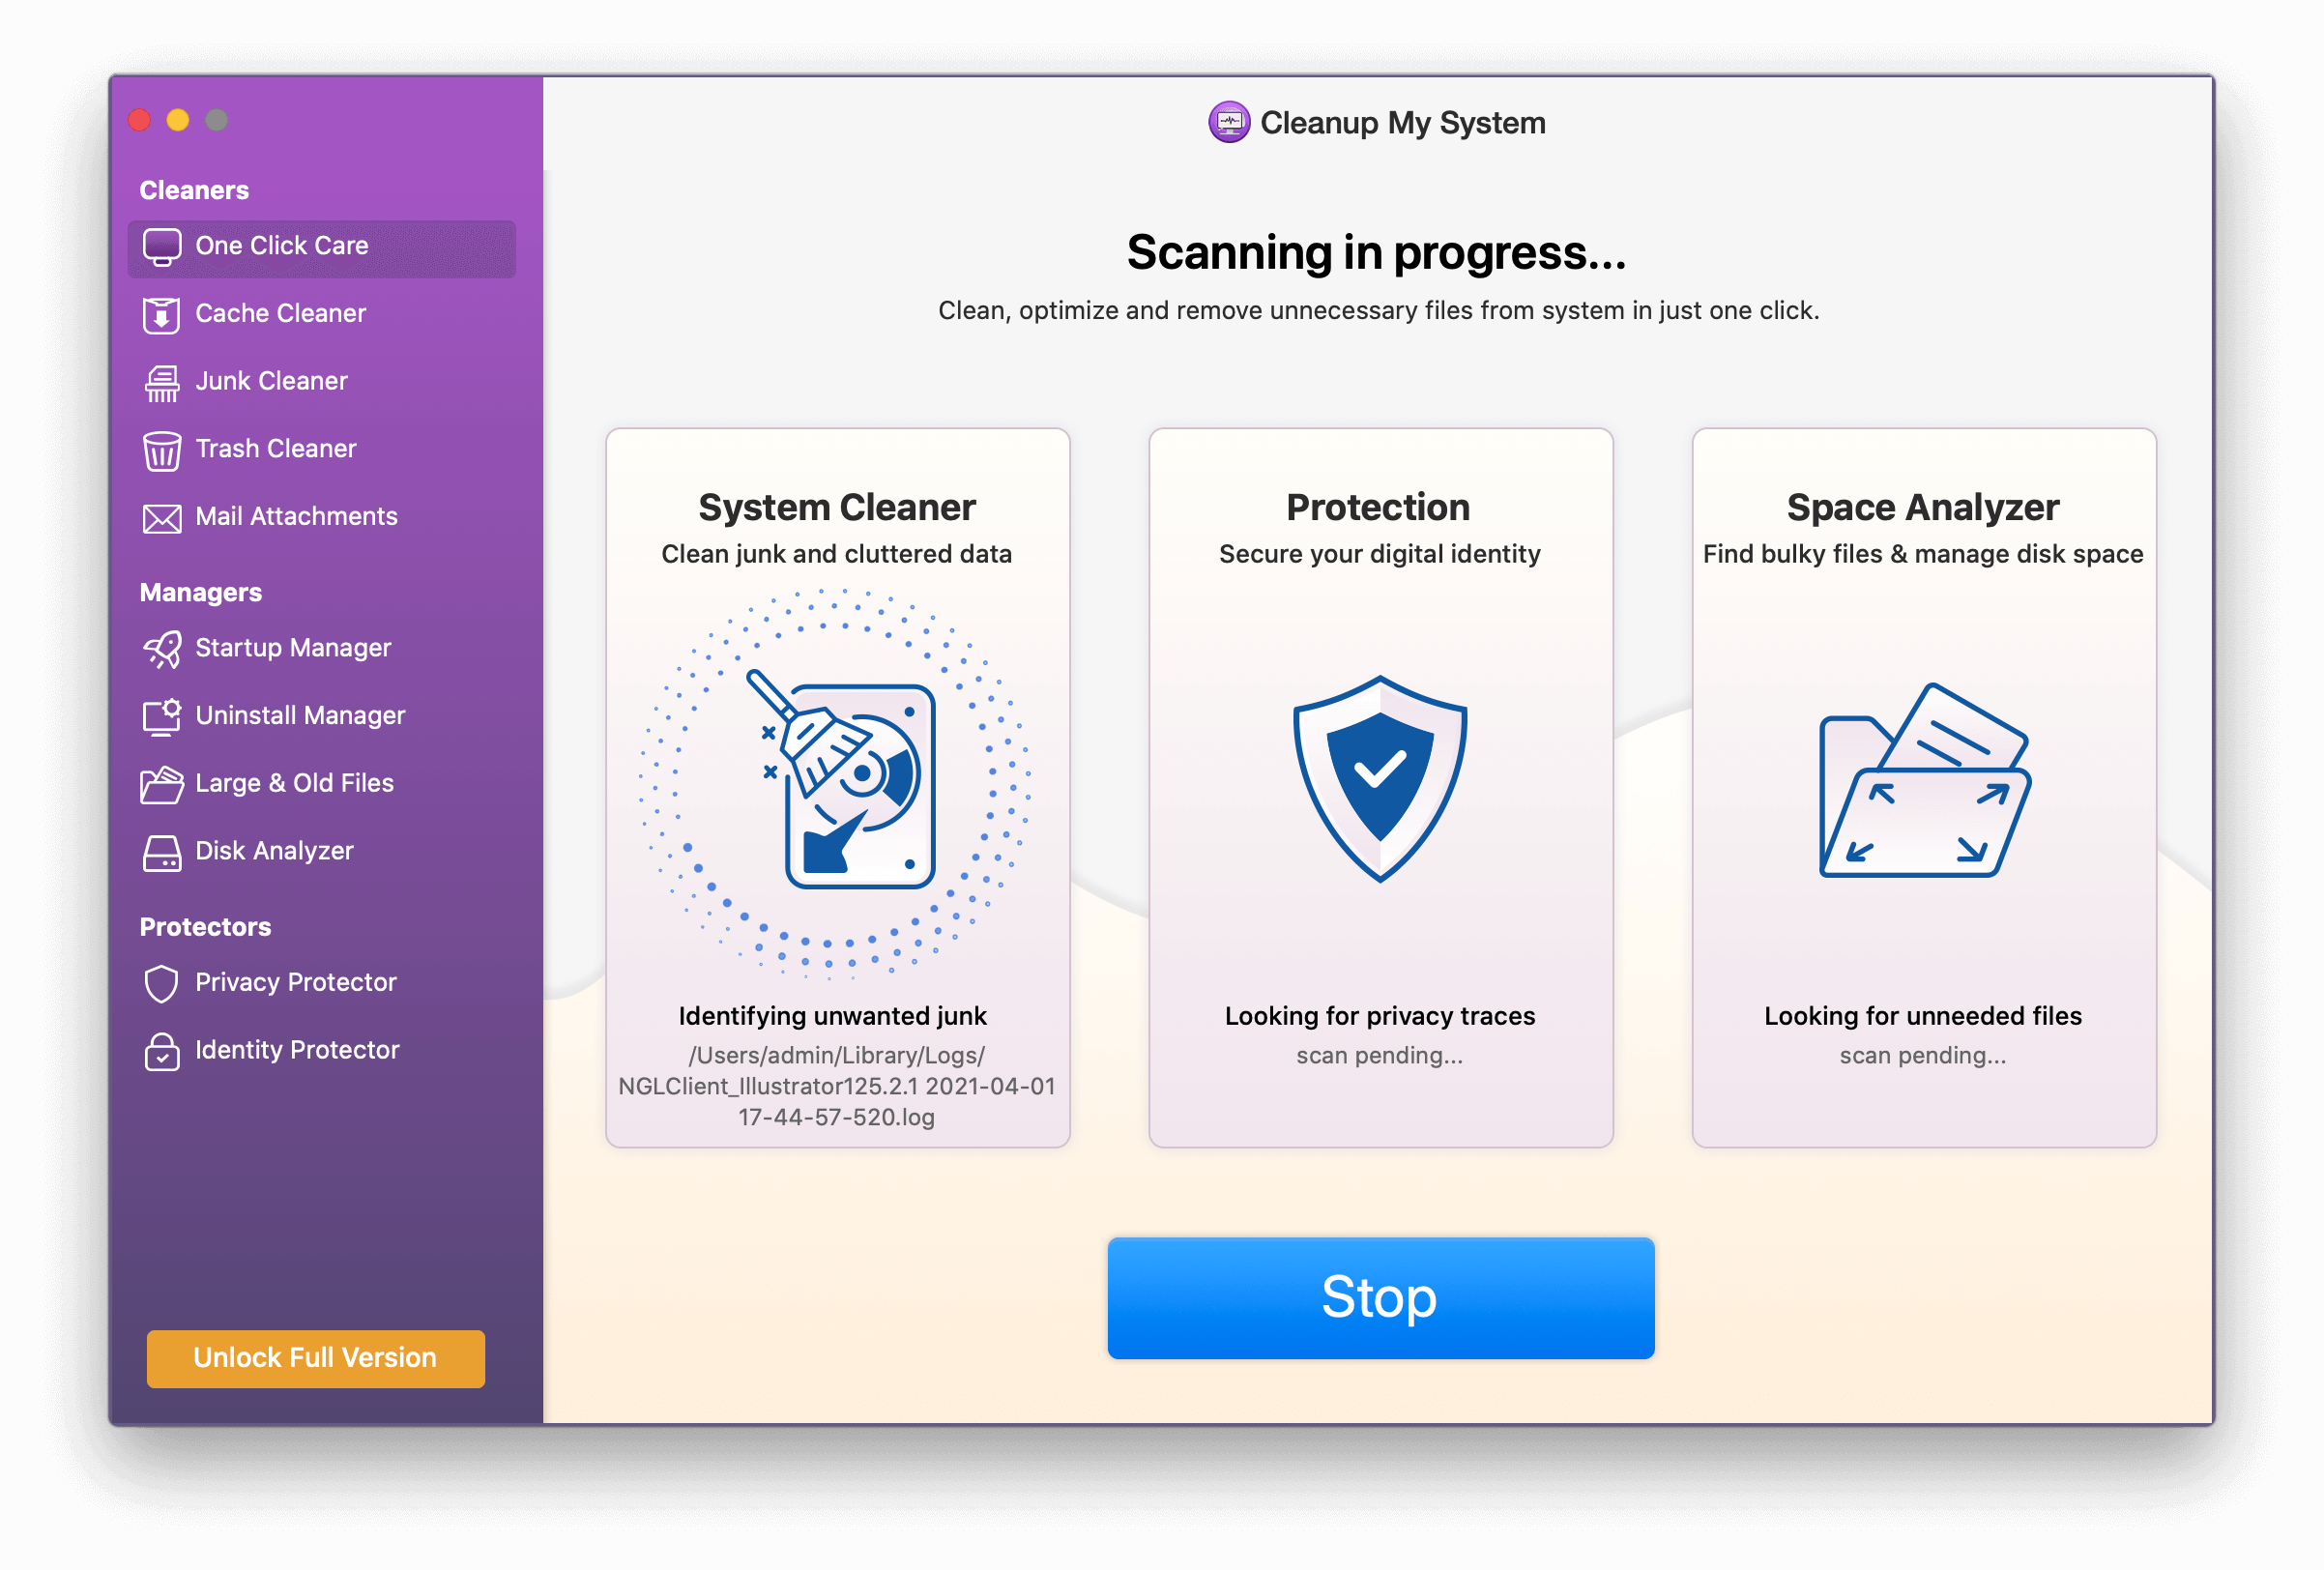
All these excellent modules, make Cleanup My System, one of the best Mac cleaners and optimizers to use in 2021. Using it, you can not only recover a huge amount of storage space but also boost your Mac performance to the next level.

What’s new with macOS 11 Big Sur?
Prominent Features
- Control Center
- Refreshed Design
- Built-in Safari translator
- Renewed Maps
- Improved Safari browser
- Transformed Messages app
Design changes
Since macOS X there has never been such an overhaul in design change. But with Big Sur, everything is changing. You get curved window corners, color platelets, and a changed dock icon.
To give you the edge to edge experience, a taller and translucent menu is added. Alongside Full-height app sidebars that are easy to use and work with are also there. Also, system sounds are pleasing and easy to work around with. Alongside, you will see a lot more refinement in the design.
- Dock icons are made consistent with icons across the Apple ecosystem.
- Buttons and controls appear when needed else, they remain hidden.
- You can now customize the menu bar, including the all-new Control Center that gives quick access to the controls from the desktop. Using it, you can easily find Wi-Fi and Bluetooth controls, enable/disable Dark Mode option, play music. You can also add your favorites.
- New & re-designed Notification Centerwith widgets to and a lot of more exciting features. Notifications will now be grouped by app.
Noteworthy App changes
Safari: macOS Big Sur adds some notable changes to Apple’s default web browser Safari. You can now get a summary of all the sites blocked by the tracker in the last 30 days.
In addition to this, there are other features this include:
Privacy Features
- Privacy report for each site and password monitoring
- Tracking prevention to stop trackers from knowing what you do online
Both the features help keep security intact, and they make sure no one gets their hands on your data to misuse it.
Extensions
Big Sur allows Mac users to decide the duration and behavior of the extension. This means you can choose when to enable a website to use the extension and for how long. Extensions are beneficial as they simplify tasks.
In addition to this, users can now customize Safari’s Homepage, add shortcuts, reading lists, and more. They can also use built-in language translators which is a fantastic feature. Not only this Apple also promises to boost Safari speed to 50% faster than Chrome.
Messages on the Mac: After Safari, Message is the most popular app. Most features added to it come from iOS/iPad. Using them, you can pin conversations, find tap backs, typing indicators, etc. Moreover, they can also reply directly to certain messages. This creates a new thread under the original reply.
Big Sur also includes group photos, GIFs, group chats, Memoji, effects, etc. To stay organized, you can now use an easy search option, highlight matching terms, and manage results into links.
Spotlight
One of the most functional and widely used mac features is Spotlight. With macOS 11 it is now more streamlined and faster.
This update makes Spotlight support Quick Look, a full-sized preview of files without launching the app.
Apple Maps: You’ll now find detailed indoor maps of airports, shopping centers on Mac. Also, you can use all-new guides to create your maps. Whether you want to go on a cycle trip or use an electric vehicle, you can use Apple Maps on Mac for the route and share it on your iPhone. Isn’t this great?
Personally, being a solo traveler, I find this feature helpful.
Mac App Store now gets new security and privacy tools in macOS Big Sur. For each app, you see on the App Store; you get a summary of the developer’s privacy practices. Likewise, you get to know what sort of data will the app collect and use to track your activities across devices and websites.
Nonetheless, macOS Big Sur also includes:
- AirPod device switching– you can have your music collection on all active devices whenever you want.
- The Photos app offers new and advanced editing tools that are powered by machine learning.
- Listen Now– a new home for Apple Music. Here you can find new releases, interviews of artists, personalized playlist, etc.
- Cameras compatible with HomeKit Secure Video– this means you can now use facial recognition easily.
- A smarter Siriwith more web knowledge.
List of Compatible Devices to Install BigSur
The latest Mac operating system will run on the following devices:
- MacBook (2015 or newer)
- MacBook Air (2013 or newer)
- MacBook Pro (Late 2013 or newer)
- Mac mini (2014 or newer)
- iMac (2014 or newer)
- iMac Pro (2017 or newer)
- Mac Pro (2013 or newer)
Now, we know what Big Sur has to offer and what devices are compatible with it. It’s time to learn how to install macOS Big Sur.
Steps To Install The macOS Big Sur Beta On Your Main Partition.
- Visit Apple’s beta software portal.
- If you are installing a public beta for the first time, you will need to sign up using your Apple ID. However, if you have already done it, click “Enroll Your Devices” at the top-right corner of the webpage.
- Click “macOS.”
- Scroll down and look for the button “Download the macOS Public Beta Access Utility.” However, if you miss enrolling your Mac in Beta Program, click it and download a.DMG file, this will register your computer. If already done, skip the step.
- Boot the installer: If no Time Machine backup is detected, you’ll now be prompted to take backup.
Note: Before you install the Beta version of an operating system, taking system backup is recommended.
- Finally, click “Software Update” from the System Preferences.
Note: Since it is a 12.3GB file, it might take a while to download. Once done, before hitting install if you have changed your mind and would want to install it on some other partition, follow the steps explained below.

Steps To Install The Beta On A Separate Partition
- Type Disk Utility in the Spotlight search bar.
- This will open the Disk Utility window where you can see hard drive partitions listed under Internal. There’s a possibility you see only one disk.
- Suppose you’re running macOS High Sierra or higher click the primary partition. Here you can see “APFS Volume.” If that’s right, click the plus button above “Volume.” This will help create a new volume that you can use to install macOS Big Sur.
Note: If the hard drive is formatted to Mac OS Extended instead click “Partition” button instead of plus. Name the partition > assign storage space. We recommend 30 GB as the previous public beta was over 10GB.
- Name the volume for each identification and hit Add.
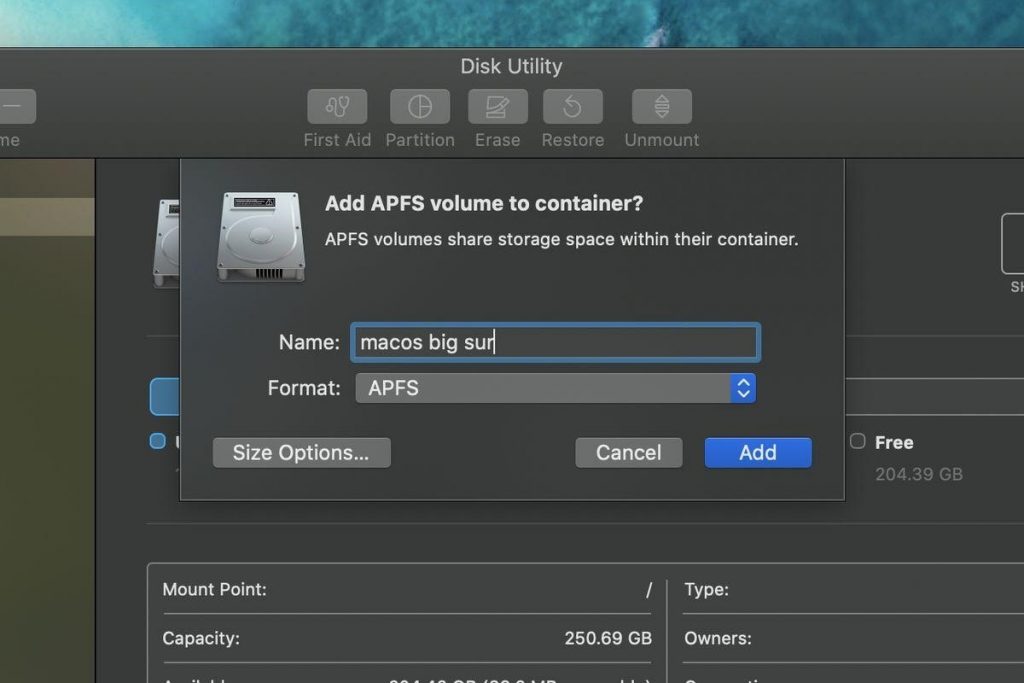
Note: Storage formatted to APFS is shared across volumes. This means you don’t have to worry about assigning separate space to the new volume.
- Now that you have another volume (or partition), you can install the beta on whatever drive you want. It can be the main drive, volume, or partition.
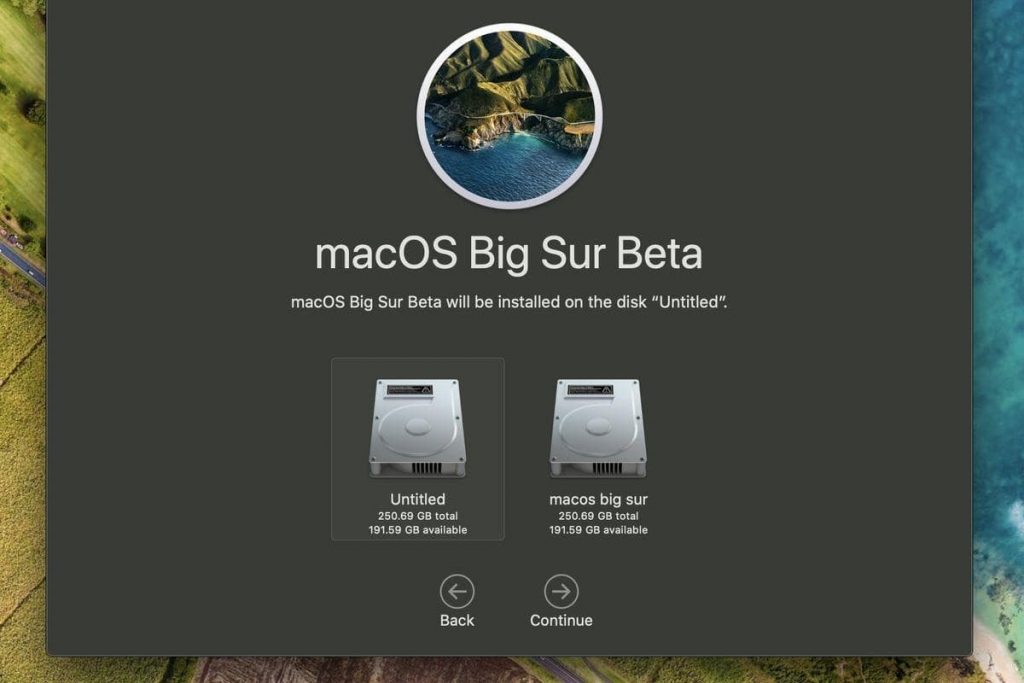
Note: To switch between volumes or partitions, restarting the machine and holding the Option key during startup is required.
That’s it! You now have Big Sur installed on your device. Also, if you end up buying Apple’s new Mac powered with Apple silicon chips, you will be able to run iPhone and iPad apps natively. To use it, head to Mac App Store and install the new apps. You’ll now be able to run macOS and iOS apps side by side!
Moreover, now that you are registered for the Beta version, you can get the second public Beta of macOS Big Sur.
Before doing any of this, remember to optimize your Mac because only then you will be able to enjoy it to the fullest. For this, you can use Cleanup My System, a fantastic Mac optimizer and cleaner.
We hope you enjoyed reading the post. Do share your feedback, suggestions in the section below. Follow us on social media – Facebook, Instagram and YouTube.
Paridhi Dhamani
Hello preeti, do you know about which macs are compatible with Big Sur????