
Zip Function allows you to compress a file to a smaller size with all its associated configurations compressed in one single file. This way, such compressed Zip files can be easily shared with others over emails, or other file-sharing mediums.
To perform Zip function, users normally use RAR software like WinRAR and 7-zip. But did you know, you can also use the built-in Windows Powershell to Zip/Unzip files? Let’s get down to the process –
Read More: How to Compress File in Windows and Mac
How to Zip Files Using Windows Powershell?
Let’s begin with compressing a file. Go through the process below to compress or Zip a file using Windows Powershell:
Step 1: Open Powershell by searching for it in the Windows Start Menu.
Step 2: Now you need to type a command using the following syntax –
Here’s what the command line means:
Compress-Archive -LiteralPath <PathToFiles> -DestinationPath <PathToDestination>
- PathToFiles: The path to the source file which you want to compress.
- PathToDestination: The destination where you want the zipped file to go.
Step 3: For example, the command here, after replacing the above to parameters with a relevant file path, will be –
Compress-Archive -LiteralPath ‘C:\Users\AbhishekSharma\Downloads/tweakshotsetupg_tweaking-default.exe’,’‘C:\Users\AbhishekSharma\Downloads/adrsetup_systweak-default.exe’ -DestinationPath ‘G:\Systweak\Apps.zip’
If you notice, the paths to the two files that I wish to compress are separated by a comma (,). You can add as many paths by separating them with a comma. Both these file paths are to be put in quotation marks (‘’).
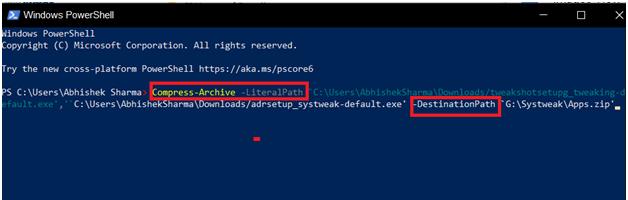
Plus, at the end of the destination path, I’ve added Apps.zip, which is the name of the compressed file I have personally assigned. If you do not give a name to the resultant compressed file, it’ll be saved as .zip in the destination path.
How to Zip Folders Using Windows Powershell?
Step 1: Open Powershell by searching for it in the Windows Start Menu.
Step 2: The syntax and the command will now slightly change since you want an entire folder and everything inside it to be compressed into one Zip file. Now you need to type a command using the following syntax –
Compress-Archive -LiteralPath <PathToFolder> -DestinationPath <PathToDestination>
PathToFolder here represents the path to the folder whose contents you wish to compress into one single zip file.
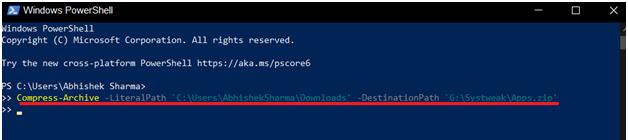
Step 3: If you retake the above command, and decide to compress the entire Downloads folder instead of the two setup files in there, the command will be like –
Compress-Archive -LiteralPath ‘C:\Users\AbhishekSharma\Downloads’ -DestinationPath ‘G:\Systweak\Apps.zip’
How to Unzip Files Using Windows Powershell?
The process to unzip a compressed file and expand its contents is much easier. All you need is the path to the Zip folder/file and a destination path. Here’s how you can do it:
Step 1: Open Powershell by searching for it in the Windows Start Menu.
Step 2: The syntax here will change from Compressed-Archive to Expand Archive followed by the paths –
Expand-Archive -LiteralPath <PathToZipFile> -DestinationPath <PathToDestination>
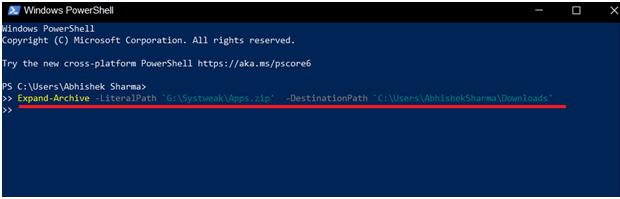
Step 3: If we reverse the previous Zip command and use the same folder paths, the command to unzip files using Powershell will be –
Expand-Archive -LiteralPath ‘G:\Systweak\Apps.zip’ -DestinationPath ‘C:\Users\AbhishekSharma\Downloads’
The contents from Apps Zip File will be then expanded into the Downloads folder. In case you designate a non-existing folder in place of the destination path, Powershell will create the folder of the specified name before unzipping.
Also, if you run the command without specifying a destination path, Powershell will create an Archive folder in the Users folder of your C-Drive, the path to which is –
‘C:\Users\AbhishekSharma.’
In case there is already an Archive folder, Powershell will return an error in the execution of the command. However, you can command Powershell to overwrite the data of the previous Archive folder and populate it with the contents expanded from the Zip file. However, once overwritten, the older files will be permanently deleted.
You May Also Like
Who Needs A PC? Learn How To Zip/Unzip Files On Your Android