
Windows 7 was one of the most successful OS from Microsoft and had a really long run despite the later upgrade to Windows 8. Both consumers and corporate clients have hailed Windows 7 as the flagship OS, and its use was continued even after Microsoft decided to end support for this OS version in 2015. However, it is high time you upgrade from Windows 7 to Windows 10 without delay, and there are plenty of reasons to do that.

Currently, Windows 7 is in its final months of continuous service. Microsoft ended the sale of Windows 7 in 2014 and ended the mainstream support in January 2015. Since then, there have been zero updates. The ending of support means that Microsoft would not be responsible for errors and issues associated with Windows 7 from thereon. The extended support is to end soon next year, which would remove the additional security patches. This should get you motivated for upgrading Windows 7 to Windows 10.
Upgrading to Windows 7 is pretty straightforward, and if you’ve been using an authentic version of Windows 7, you can do it using your Windows key.
Retrieve Windows 7 Key
To proceed for Windows 10 upgrade using this path, you need to have your Windows product key you must’ve received with your purchase of Windows 7. Now, how do you find that key? If you have Windows 7 pre-installed on your then-new PC, there’d be a Certificate of Authenticity in the computer with the Windows key mentioned on it. In case you purchased Windows 7 from an authorized retailer, you can find the key printed on the card inside the box.
If none of this works for you, you can always take help from Microsoft Support here and learn how you can retrieve your undocumented Windows product key.
Check for Windows 7 Activation

Once you’ve retrieved your Windows key, check whether you’ve activated Windows 7 on your PC. First, go to Computer Properties and then scroll down to the bottom of the window. In the section called Windows Activation, see if the message says Windows Activated. If not, you’ll see a message Activate Windows Now (see image). Click on that and follow the processes to activate Windows 7 by entering the retrieved key on your system.
Now, follow these steps and proceed for Windows 10 upgrade on your system:
Step 1: Download Windows 10

The page offers you to download Windows 10 Media Creation Tool from the official site of Microsoft. There are options for you to either download the tool to upgrade Windows 7 to Windows 10 on the same PC or to just create the installation media for another PC. For your system, go with option number 1.
Step 2: Run the Media Creation Tool and Begin Windows 10 Upgrade
When you run the tool, there may or may not be a window pop-up that would ask you to enter a product key. Here’s how that window would look like:

Remember how we first checked for Windows 7 activation before upgrading it to Windows 10? Here’s when that comes into play. If you have already activated Windows 7 using Windows key, this window won’t pop-up. This window requires a new Windows 10 key and the old key won’t work here. So in case, this window is showing up, use your Windows 7 key and activate it before you upgrade Windows 7 to Windows 10.
Since we checked for activation beforehand, we’ll be straight away redirected to next step.
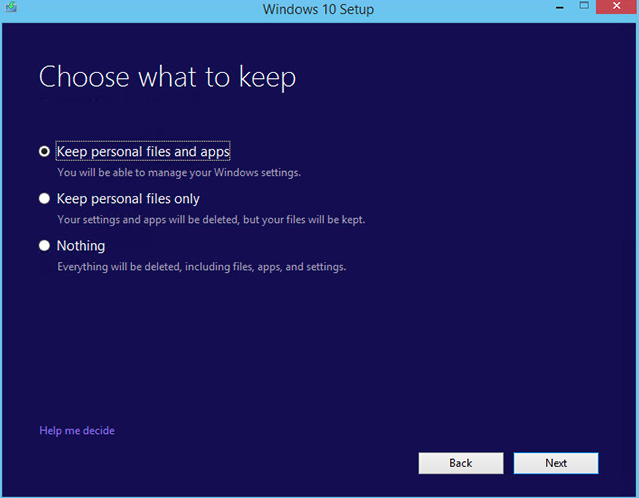
Step 3: Choose what files to keep
Though it’s better to create a backup of all necessary files before proceeding to upgrade Windows 7 to Windows 10; however, you do get an opportunity to make a final call before final command. During the installation, when the screen displays Ready to Install, see for an option called Change What to Keep.

Choose between the three options, that are, Keep Personal Files; Keep Personal Files and Apps; Nothing (see image below). Decide what files you wish to keep before upgrading Windows 7 to Windows 10. In case you have a prior backup. In case you already have created a separate backup for files of your use, click directly on install and move ahead in the process.
This is the final step in the installation of the Windows 10 upgrade. The next step is getting your system ready for the best functioning of Windows 10 OS and ensure that the computer does not cause app crashes and halts during your use.
Make Windows 10 Ready by Updating Drivers
Windows 10 is being updated continuously along with the drivers to prevent any bug from interfering with system privacy and from improving OS performance. But if you don’t update these drivers regularly, you’re likely to experience system slow-downs. And updating them, again and again, would cost you time and make it really hectic for you to boot your system regularly to accommodate those updates.
Advanced Driver Updater is one of the best Windows utility tools which automates the process of updating driver. It saves you all the hassle of going through all drivers to check for updates. The tool, once installed on the system, can update your drivers in three simple steps:

- Step 1: Scan for Driver Updates by scanning for the same.

- Step 2: Let the scan be completed. All the updates available would be listed out in front of you. In case all the drivers are up-to-date, the tool would show the same.
- Step 3: Update drivers and sit back as the process would be completed automatically. Reboot the system to accommodate the new updates.
Advanced Driver Updater would create a backup of all the previous driver updates so as to provide you with the option for rolling back to the earlier version. This feature comes in handy in case of unwanted crashes caused by a driver update.
Upgrading Windows 7 to Windows 10 is one thing, but keeping that update intact and functioning is another task. It’s essential that you update every aspect of your system software and drivers to ensure the best system performance. Drivers are crucial for accommodating better performances in terms of video/audio output, wireless device communication, and network connections. With Advanced Driver Updater, you can rest assured that your system would never fall prey to unnecessary system crashes; and that your system accessories and apps would run without hassles. This, in turn, would provide for favorable user experience.