It once happened with me when I wrote the spelling of Messenger as ‘Messanger’ in the whole article, but before I could realize the mess, I had already finished the piece. Now I knew how to find the specific word in the entire article, but I didn’t know how to change them all in one go. Of course, the word was used more than 15 times, and it was simply hectic for me to change every word. Well, this was the day when I learned how to use find and replace in Word on a Mac, and I thought if you might need the same.
We are letting you know two cool methods by which you can easily find and replace in Word on Mac.
Method 1 On How To Find And Replace In Word On Mac
Step 1: Open the Microsoft Word document, where you need to make changes.
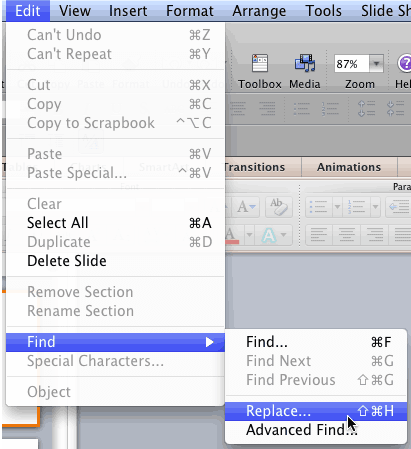
Step 2: Reach to the ‘Edit’ tab in the toolbar or top of the window.
Step 3: Locate ‘Find’ from the menu.
Step 4: Click ‘Replace’. Or you can even take a short cut over here. Hold ‘Command + Shift + H’ on the keyboard.
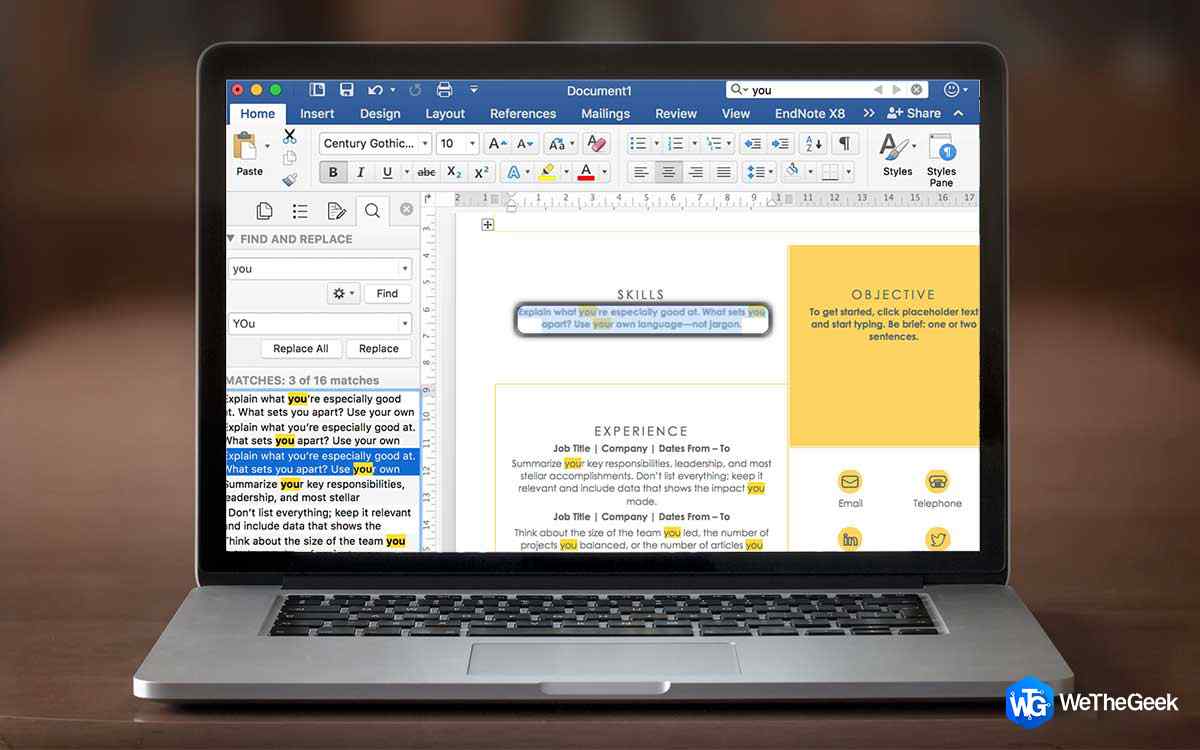
Step 5: The steps above will open a new panel on the left side of the screen with two separate boxes. On the first box, type the word you want to search and on the second box, type the word you want to replace with. For example, ‘Messangar’ will be typed in the first box, whereas ‘Messenger’ will be written in the second one.
Step 6: ‘Find’ button will locate the answers you required whereas the ‘Replace’ button will replace the individual words. Select ‘Replace All,’ and all the required words will be replaced at once. (Specific text will be highlighted if you choose ‘Find Next’)

Once the process is done, you will get a message stating “All done. We made ‘ ‘ replacements.”
Method 2 On How To Find And Replace In Word On Mac (In Format)
Step 1: Open the Microsoft Word document, where you need to make changes.
Step 2: Reach to the ‘Edit’ tab in the toolbar or top of the window.
Step 3: Locate ‘Find’ from the menu
Step 4: Instead of finding Replace, locate and click ‘Advanced File And Replace’
Step 5: Now, here, various options will appear on the screen.

Step 6: Choose ‘Format’ here and select ‘Font’ from the drop-down menu.
Step 7: Here, you are free to choose any format in terms of size, color, and other styles. Click ‘OK’ and the selected word will transform itself into a new stylized font. You can choose to Replace all, replace or find next (specific text will be highlighted).
And this way, you can find and replace the specific word easily and even you get to change the shape and font of the word using this method.
Conclusion
The above methods are right described for finding and replacing in word on Mac, and one can free themselves from the situation of ‘Messangar’ to ‘Messenger’ without a glitch. Also, check:
- How to remove password from Word document?
- 63 Best MS word shortcut keys for productivity
- Easiest way to check your spelling in Google docs
We would like to know your recommendations and queries in the comment section below. Also, if you wish to ask us anything or any technical glitch you are facing, feel free to write to us!