
People who own Android smartphone might have got disappointed when Android Oreo was introduced as it lacked features like Automatic Wi-Fi and Night Light. Though the feature was introduced for Google Pixel and Pixel XL, but it never gets to other smartphones. As other Android devices OEMs haven’t chosen to enable the feature.
So, take a look on how “Turn On Wi-Fi Automatically” on Android works!
Do you know what the feature actually does?
With Automatic Wi-Fi turned on, your smartphone will turn on your Wi-Fi whenever it gets to a high quality, secured and saved network.
Now the feature will available with new Android version, Android Pie for all the devices. However, the feature might not be enabled from the start. A user will get an option to disable or enable it.
WHAT ARE THE CHANGES SEEN IN AOSP?
This feature being added was noticed for the devices when Android Pie was released and also the code drops on AOSP. The screenshot below shows that the first commit enables the feature on all Android devices. The changes are seen in config_Wi-Fi_wakeup_available in AOSP framework, the value is changed from 0 to 1.
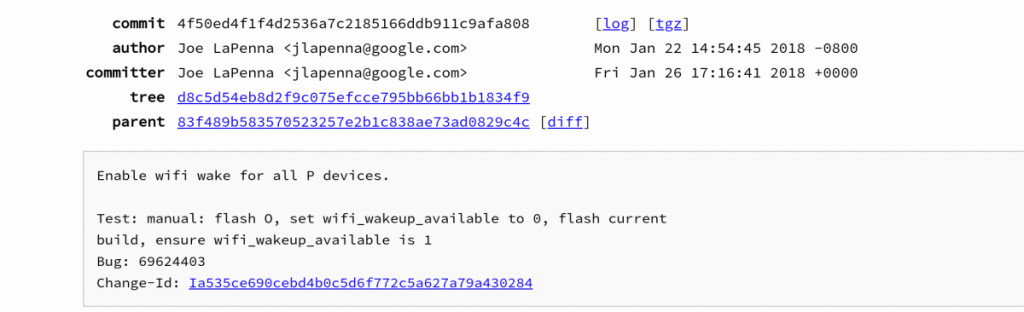
Commit 1
Now in the new commit, the flag is completely removed as the feature is now turned on by default in Android Pie
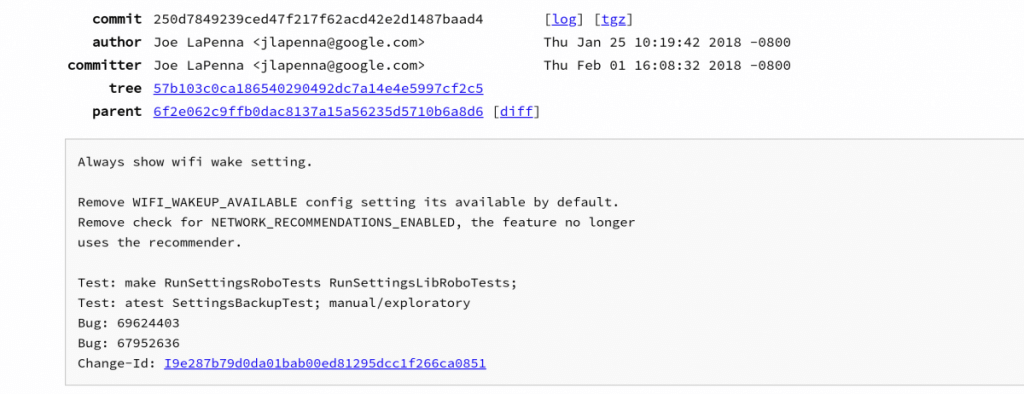
Commit 2
Let’s compare config.xml in Android base for Android Oreo and Android Pie, you will notice that “Turn on Wi-Fi Automatically” is not to be seen.
HOW IT WORKED EARLIER?
Earlier, the feature in Android Oreo, used Wi-Fi scanning feature in Location Services to search for Wi-Fi networks in the background. It scans the Wi-Fi network according to recommendation service of Google. Once the recommendation service decides Wi-Fi network (saved) can be trusted on the basis of network speed and connection quality and other things. Once it is determined, Android device connects to Wi-Fi automatically. The advantage of this feature, it saves the battery of your Android device if you are surrounded by a place with numerous WI-FI access, as it will save your phone from connecting and disconnecting Wi-Fi of low quality.
However, it is not to be known how the feature introduced in Android Pie works, but one thing is clear the recommendation service is not used for the same.
How to enable the feature in Android Oreo if available?
Step 1: You need to track down Settings from the home screen.
Step 2: Under Settings screen, tap on Network & Internet.
Step 3: Go to Wi-Fi.
Step 4: Under Wi-Fi, tap on Wi-Fi Preferences.
Step 5: Click Turn on Wi-Fi Automatically to enable it
Note: You need to enable “Wi-Fi Scanning” For that, go to Settings, then Location. Under Location, tap on Scanning to enable. As the feature “Turn on Wi-Fi Automatically” works with Wi-Fi Scanning to detect and connect with high quality trusted Wi-Fi networks on its own.
HOW TO DISABLE THE FEATURE?
Every feature has its advantages and disadvantages. As the settings help to keep the Wi-Fi disable while you out in day time and enable it back when you are home. Well, the downside of it, it will get you connected any of the saved Wi-Fi network, even though the signal strength is not that great. If you are having issues with your Wi-Fi in Android Pie, then it must be due to Turn On Wi-Fi Automatically feature. As it doesn’t let you connect to Wi-Fi that you want. So, you need to disable Turn On Wi-Fi Automatically feature.
To turn it off, follow these steps:
Step 1: Go to Settings App.
Step 2: Under Settings, look for Network & Internet
Step 3: Navigate to Wi-Fi and then “Wi-Fi Preferences”
Step 4: Now disable “Turn on Wi-Fi automatically”
In this way, you can disable and enable “Turn on Wi-Fi automatically” on Android. So, if you want to control how your Wi-Fi connection behave you can turn if off or you want to take your Android charge, keep it enabled with Android Pie.