
Do you have multiple Wi-Fi passwords saved on your computer? You might have noticed that sometimes your system does not get connected to the one with maximum signal strength.
Sometimes, a Wi-Fi device which is not nearby may not be providing good speed, but your system automatically gets connected to the slow connection. To fix this issue you need to set priority for wireless networks manually.
In this article, we will discuss how to change priority of wireless networks for Windows 8, Windows 8.1, Windows 10 and Windows 7.
Resolution: For Windows 8, Windows 8.1, Windows 10
- First of all, to see a list of Wireless Networks we have joined and their priority we will go to command prompt with administrative rights and for this type CMD in the search box of start menu. You will see command prompt icon, right click on it and choose run as administrator.

- Now type following command in command prompt window.

netsh wlan show profiles

- To change priorities of your wireless connection, you can use this command. But before proceeding further, please copy name of network profiles from the list of wireless networks which is currently visible on your command prompt. Now type following command.
netsh wlan set profileorder name=”w1r3l3$$” interface=”Wi-Fi” priority=1
Just replace w1r3l3$$ with the name of the network you want to set on first priority and Wi-Fi with the name of profiles on interface.

- Now you can check the priority of network connections again using previous command. You will find that priority of network connections has been changed.

Resolution: For Windows 7 and Vista
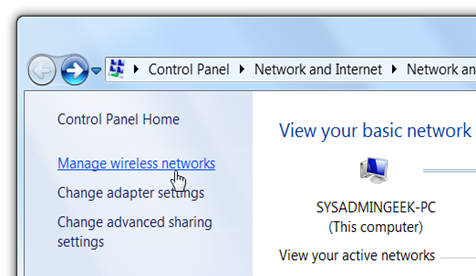
- Go to network and sharing center by clicking on connected network button in bottom right on the task bar.

- This will open network sharing center. Click on manage wireless networks on left hand side.
- Now we can see the list of networks that we’ve connected to, and we can remove, rename, or move them up or down.

- To illustrate this example, we have moved YDQ48 down below lhdevnet in the list.

This will help you in setting priorities for your wireless network connections and you will enjoy better internet on your computer.
Next Read: How to Set Up a Home Wi-Fi Network