You have come to the right place; here, we will discuss effective ways to compress photo, flip a picture and rotate images on Mac.
Everyone likes taking pictures and getting photos clicked, right? If you are like me, you probably would have tons of images in your system or smartphone, taking up a huge amount of storage space. I know you can relate to me. Most importantly, when I say we don’t like deleting pictures just to make space, you will agree.
But if you encounter Disk Almost Full message and are looking for a way to free up storage space without deleting photos.
We’ve got you covered.
In this post, we will discuss effective ways to recover disk space without deleting JPEG files.
How to free up space on Mac without deleting images?
Simple, by reducing JPEG file size and compressing images, you can restore hard disk space. Once you do so, you’ll be surprised to see how a JPEG file can be shrunk to half; still, it looks the same.
Interested?
Then, what are you waiting for? Let’s learn how to compress JPEG files, flip image, shrink pictures and rotate images on Mac.
Reducing Image Size – What You Should Know
Before we learn how to compress an image, you should know there are two types of compressions:
- Lossless – Where image quality will not be compromised, e.g., PNG
- Lossy – You will lose some image information, quality, e.g., JPEG
To know more about these file formats and the best format for web photos, click here.
Often, to reduce photo size, people use online image optimizer without knowing if the quality will be retained or not. Therefore, we recommend using the best image compressor tools to avoid this problem.
Now, that you know what to keep in mind before shrinking photo size on Mac, let’s learn how to reduce JPEG file size, edit , rotate and flip pictures without losing image quality.
 Additional Tip
Fastest Way to Free Up Space on Mac
If you are reducing image size just to recover storage space, we suggest you try cleaning junk files, duplicates, failed downloads, etc. This will not only help restore hard disk space but will also optimize Mac, thus boosting performance.
To do so quickly, and effectively we suggest using Disk Clean Pro– an efficient Mac cleanup and optimization tool. Using it, you can optimize Mac, clean malware infections, and do a lot more in no time.
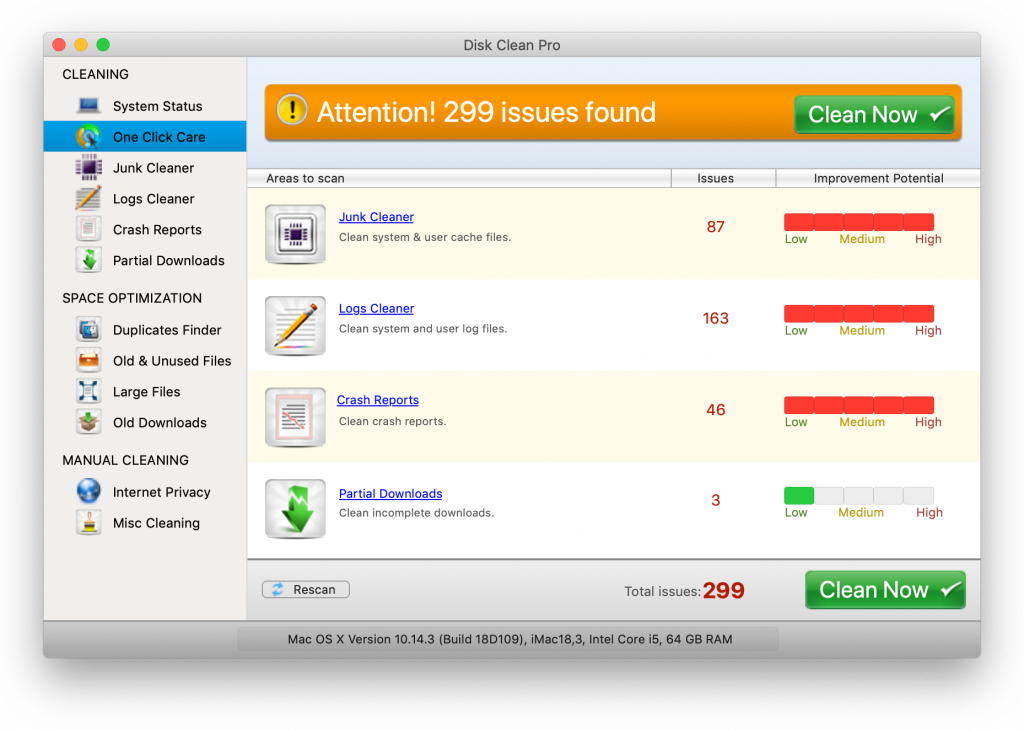
To give this tool a try, click here.

We hope you will use this best Mac cleaning tool. Once you do so, please leave us your feedback in the comments section.
5 Ways to Reduce JPEG Photos Size on Mac
Table of Content
Method 2: Reduce JPEG File Size by Adding it to Zip Folder
Method 3: Compressing Album via iPhoto/Photos
Method 4: Compress Photos in a Document
Method 5: Quickest Way to Compress Multiple Photos on Mac
Attention: Although mentioned as a last resort to reduce JPEG image file size on Mac, if you want to follow this method and save yourself from the trouble of doing all it manually, click here.
Using Image Resizer, the third-party bulk image size reducer, you can not only save time and recover precious space, but can also flip image, rotate it and change output format.
To know more about it, watch the video.
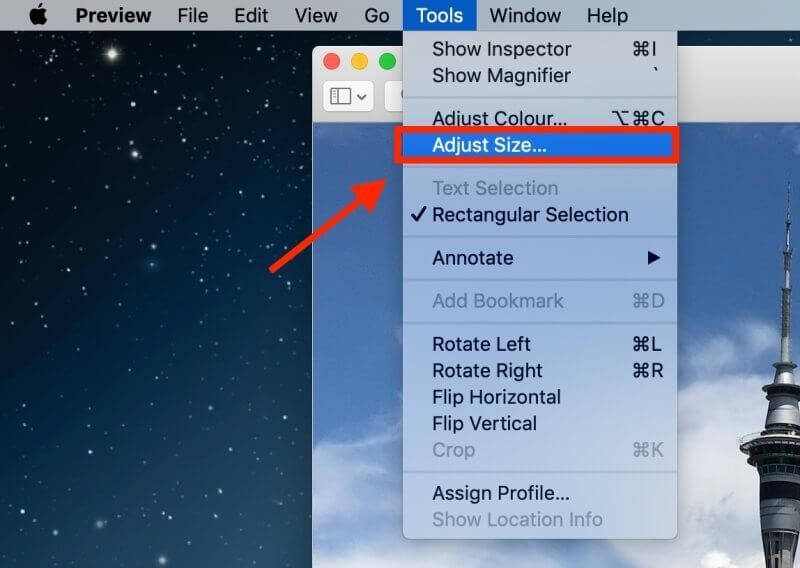
Method 1: Using Preview
Preview Mac’s in-built application. Using it, you can reduce the file size of almost every photo. This means whatever the image format be, Preview will help compress the image size. Also, you can flip an image and rotate images.
To use it, follow the steps below:
Step 1: Open the picture in the Preview app.
Step 2: Now click Tools menu > Adjust Size.
Step 3: In the pop-window that opens, set Resolution, Height, Width of the image, and the pixel size. Select the Resample Image option.

You will now be able to reduce the size and amount of disk space recovered.
Step 4: Click OK and save reduced JPEG File size.
Method 2: Reduce JPEG File Size by Adding it to Zip Folder
We all name the folders based on events or dates; this helps find the pictures easily. However, if you don’t do that, you will have to start doing that for this step as you need to collect photos that you wish to compress. Once you have all the images consolidated, follow the steps to compress JPEG file size.
Step 1: Right-click the folder you want to compress.
Step 2: Select Compress <name of the folder>.
Step 3: Once the action is performed, you will see a new folder with the same file name and a .zip extension. This is the folder that has all the photos with reduced size without affecting the quality.
Note: To access photos saved in this zip folder, you will have to unzip it.
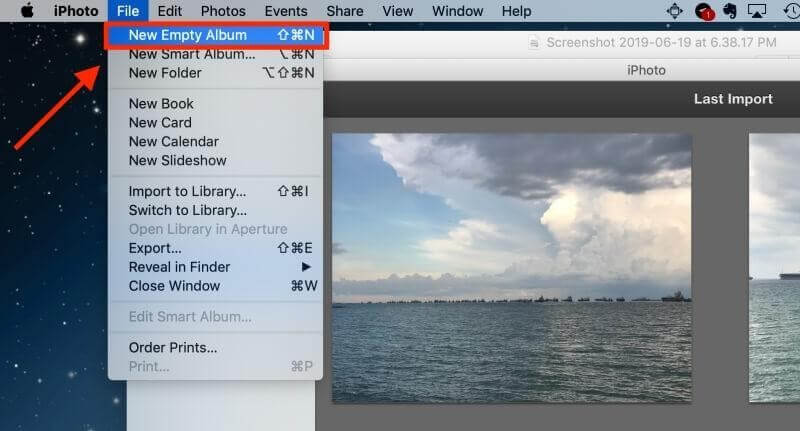
Method 3: Compressing Album via iPhoto/Photos
Another in-built app provided by Mac is iPhoto (in newer Mac’s it is called Photos); using it, you can reduce image size.
To use them and compress photo size, follow the steps below:
Note: Before you start following the steps to resize photos without losing quality, make sure the album’s file size is adjusted. For this, you need to organize the images that you want to edit in an album. Once that’s done, follow the steps below:
Step 1: Open iPhoto/Photos. Create a new album by clicking File > New Empty Album
Step 2: Select the images you want to add to the Album and click Copy.
Step 3: Click the new album. Right-click > Paste. This will add the copied image to the selected album.
Now that the album is created, let’s learn how to reduce album size and single photos using the iPhoto/Photos app.
Step 4: Again, hit File.

Step 5: Select Export.
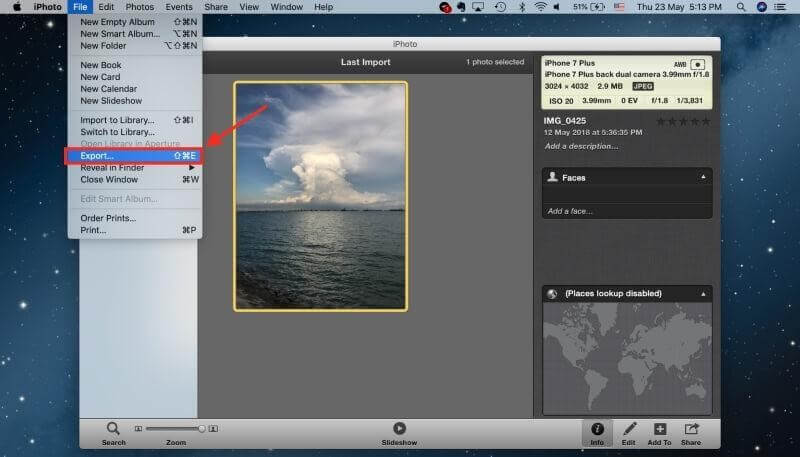
Step 6: This will open a new window; here, click the File Export tab

Step 7: Next, click the arrow in the Size window and select the file size

Step 8: Afterwards, click JPEG Quality and select the minimum file size > Small.

Note: If you reduce the size of an Album, you need to select Event Name under Subfolder Format before you click Export.

However, if it is a single photo, click Export, name the image, and save it at your preferred location.

Method 4: Compress Photos in a Document
If you use Microsoft Word on your Mac, you can use it to reduce image file size.
Note: Ensure you have the photos uploaded.
To do so, follow the steps below:
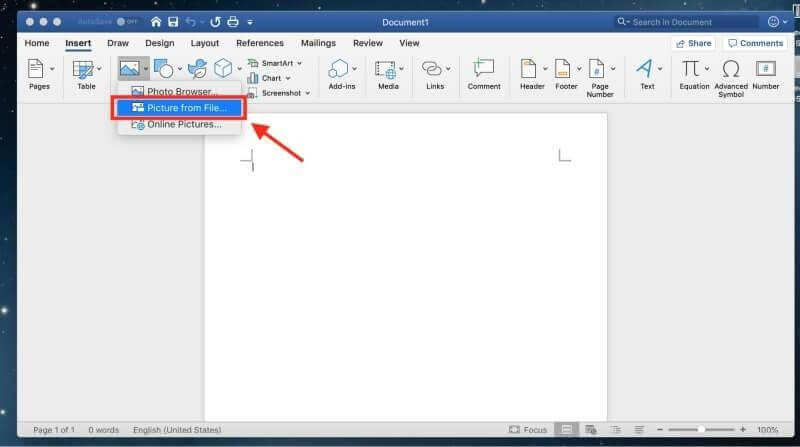
Step 1: Open Word and then open a blank document.
Step 2: Click Insert > Pictures > Picture from File.
Step 3: Once added, select the image > right-click > Wrap Text > Square.
Note: Skipping this step will not let you compress multiple pictures.

Step 4: To select multiple photos, hold the Command key.
Step 5: Now, click the Picture Format tab

Step 6: Click the compressed icon, as shown in the image below:
![]()
You will now see a new window that will make changes to compress Mac’s JPEG image.
To compress multiple images, select the option All pictures in this file. However, if you want to compress selected images, hit Selected pictures only.

You can also choose a suitable picture quality according to your needs.

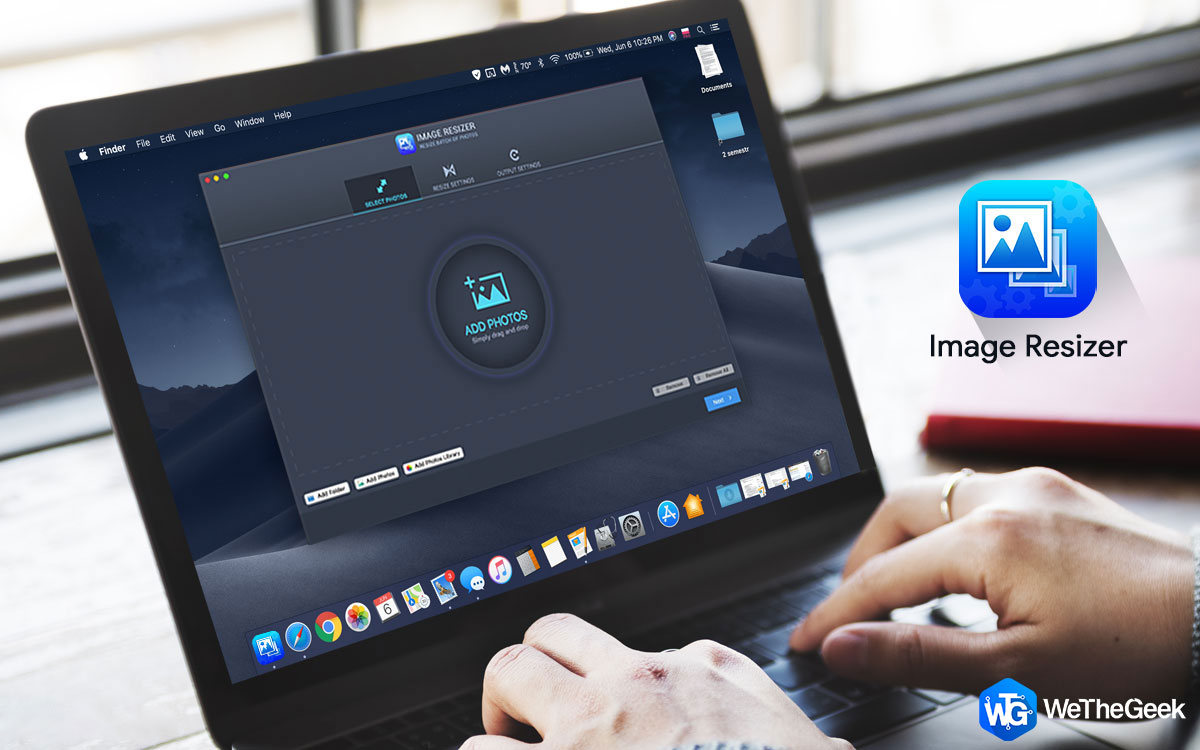
Method 5: Use Image Resizer to Reduce Size of Multiple Images
If the above methods are too much work for you or don’t feel comfortable doing things manually. Don’t worry, use Image Resizer – Batch JPEG file size reduced to compress pictures. Using this tool flip an image, and rotate image on Mac.
Moreover, Image Resizer allows renaming batch files, changing file format, edit photos, and do a lot more. It is an all in one image compressor tool that shrinks photo size without losing quality.
To use it, follow the steps below:
1. Download, install, and run Image Resizer.

2. Add Photos by picking either of the options. Add Folder, Add Photos.

3. Once added, select from the list of predefined sizes or can specify the height or width by clicking Custom Width X Height or Percentage Width X Height
4. You can also rotate and flip the images.

5. After making the changes click Next and select Output Format
6. Select the location to save the compressed image and click Process

7. That’s it; the selected images are now reduced without compromising the quality.
This is all; using the ways explained above, you can easily compress images without affecting image quality. Moreover, you can flip and rotate images on Mac.
We hope you will give them a try. Do let us know which steps you picked and why in the comments section. Additionally, if you are a Windows user, there’s good news you can also use Image Resizer as it is available for both Mac and Windows.
If you like Image Resizer and are willing to buy, let us know, we will share a discounted link for the same.
FAQ
How to compress multiple photos on a Mac?
To quickly resize multiple photos, you can use Preview Mac’s in-built app. Alternatively, you can also use Image Resizer, a third-party app that allows image editing and photo size reduction on both Mac and Windows.
What does compress photo mean on Mac?
Compressing photos means reducing the size of the image. It can by retaining the image quality or losing it. When the image quality is not compromised, it is Lossless, while when the quality is affected, it is a lossy compression.
How to reduce the size of JPEG on Mac?
To reduce the size of JPEG on Mac, you can use the following ways:
- Use the Preview app
- Zip photos folder
- Use iPhotos/Photos app
- Lastly, use Image Resizer – the best bulk image resizer.
How to reduce the size of JPEG without losing quality?
This can be done via the Preview app, Word document, or can use Image Resizer to edit and reduce JPEG’s size.
Mansi Vijay
Seems like an excellent software to resize images without compromising quality. Is it available for Windows too?Mridula Nimawat
Image Resizer is a great tool to resize images.Paridhi Dhamani
Many of the resizer tool losing the quality of images. I will try this software