To combat phishing attacks, Google has a strong security strategy in place called Google Advanced Protection Program. In this blog, we shall delve deeper into what this program is all about and how you can activate it on your Android or iOS device.
What Is Google’s Advanced Protection?
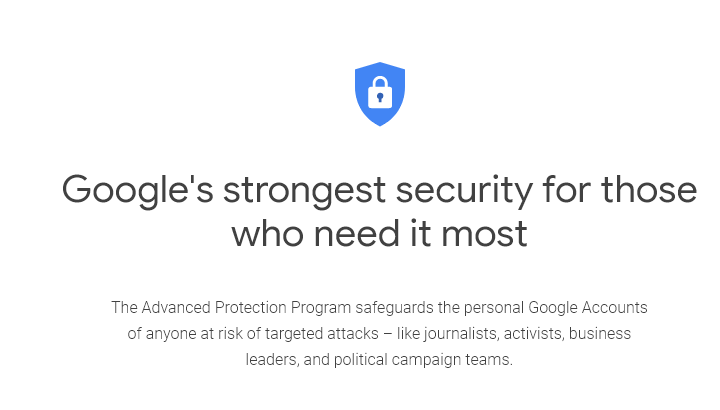
Source: google.com/advancedprotection
Google Advanced Protection goes beyond the traditional 2-Step verification to protect users from phishing attacks. If you wish to access your Google account, you would require a physical security key apart from a password. Now, if you have a device running Android 7.0 and above, the security will already be present in your phone or if you have an iOS device running 10.0 and above you can get it with Google Smart Lock app for no added cost. Else, you will have to purchase the main and a backup key.
Before, we go any further let’s just have a look at a few basics first.
| What Is Phishing?
Phishing is when an attacker tries to steal your online identity. The major sources used are fraudulent websites, apps and emails which try to steal your personal and crucial details such as username, password, 2 step verification code, credit/ debit card details and other crucial information. |
How To Activate Google Advanced Protection On Various Devices
In case, you have to purchase the main key and backup key for enrolling into the Google Advanced Protection program, here are the steps you have to follow –
Purchase The Keys –

- On your computer log into your Google account
- Visit google.com/advancedprotection and click on Get Started
- Click on Next
- Log into your Google Account and click on Enroll
Here you will know whether or not you have an inbuilt key in your Android device or not. You can purchase from a set of recommended keys. It is always advisable to purchase two keys – (i) one that can be connected to your computer via USB and (ii) one that can be connected wirelessly to all mobile devices.
Now, here comes the step where you will be registering both of your purchased keys –
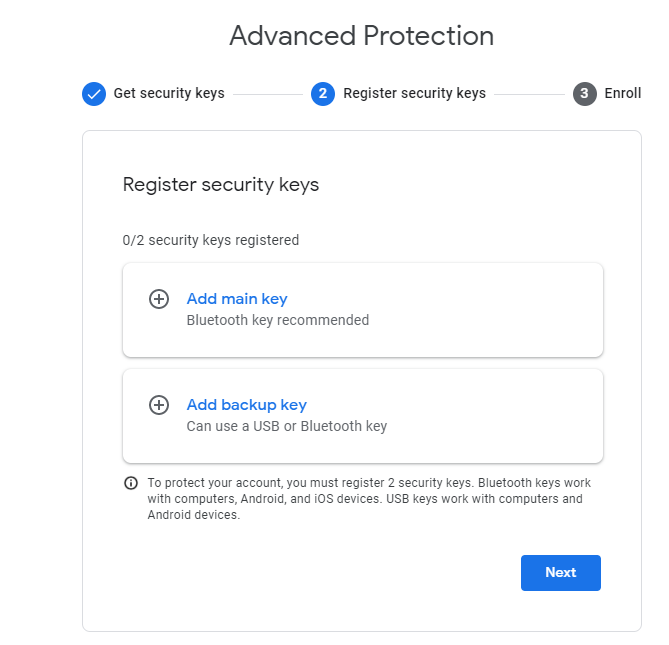
- Get back to google.com/advancedprotection and click on Get Started
- You will see options that will prompt you to register both the keys. Preferably, when you click on the first option you will be registering the wireless key. All you have to do connected the wireless key to your computer and tap on the button to confirm that connection has been established
- Give a name to your key, and hit Done to confirm
- Repeat the same for the USB key or the second key and tap the button to activate
Every time you log out or sign in using a new device, you will be asked to use the security key which would be an infrequent process.
To Use The Built-In Security Key Of Your Device That Runs On Android 7.0+
- On your Android device visit myaccount.google.com/security
- You might be required to sign in
- Once you have signed in, locate the 2-Step Verification option and click onthe ‘>’ . Here you might again need to sign-in
- On the 2-Step Verification page, locate the Security Key option and tap on Add Security Key . Again tap on ‘>’
To Use Device’s Built-In Key To Sign In to New Devices
- Check that the Bluetooth is turned on for devices that you want to use your key in
- If it’s a Windows PC or Chromebook, sign-in to your Google Account using a Google supported browser. In case, you have an iPad or MAc sign in to your Google Account using your Smart lock App
- You will now receive a notification on your Android phone. Double-tap on Are you trying to sign in
- Follow the instructions which will confirm that it is you who is wanting to sign-in
How Does Google Advanced Protection Protect You Against Phishing?
In the event of a phishing attack, an unauthorized user might still be able to have access to your username and password, but they won’t be able to barge into your account until they have one of the security keys.
What’s You key To Security
What do you choose to have 2-factor authentication or an added layer of security key? Do let us know in the comments section below. For more tech-related content stay tuned to Systweak blogs. And, if you found this information useful, share it with everyone you care for.