
It’s no secret that we all keep secrets. Whether it’s an embarrassing incident or Internet history or some kind of phobia or private media files. We all look for something that can protect our secrets. Although, keeping something hidden is one hell of a difficult job to do. Especially when you use a common computer in a family.
Luckily, with Windows 10 you can tuck all your secret files in a folder and set up a password protection. And the best of all you can do so, without spending a single penny on a software or tool.
Best Ways to Password-Protect Folders in Windows 10
Though there is no official function to set a password for a folder, here are few simple tweaks that can help you to lock, hide and encrypt your folders.
METHOD 1 – Folder Encryption Feature in Windows
This is the quickest way to protect your files & folders. If you’re using Windows 10 Home version, you will not get the benefit of this inbuilt feature. Sorry!
To encrypt files or folders:
Step 1- Head towards the file or folder you wish to encrypt. Right-click and select “Properties” option.
Step 2– In the Properties window, go under General tab and tap “Advanced” button.

Step 3- A small pop-up box will appear > Check the option “Encrypt contents to secure data”.

Step 4- Tap “OK” and then click on Apply > OK.

All your files and folders are encrypted and be only accessible by your account. This method would not allow other accounts on Windows to open your files or folder!
METHOD 2 – Using Command Prompt
Alternatively, you can also use Command Prompt function in order to hide your files and folders. To do so:
Step 1- Go to the Start menu and search for “Command Prompt”.
Step 2- Launch the CMD window and execute the following command:
cd C:\Users\admin\Desktop\Files
(Replace “C:\Users\admin\Desktop\Files” with the path where your files & folder are located)

Step 3- Hit Enter button.
Step 4- Now execute the next command:
Attrib +h “Secret Files”
(Replace “Secret Files” with the name of the folder you wish to hide)
That’s it all the items will be hidden successfully!
In case you want to see all your hidden files again- repeat the same procedure, just replace Attrib +h “Secret Files” command with Attrib -h “Secret Files”.

METHOD 3 – Text-Based Folder Locking
Folder locking was much in demand since the release of Windows. Although Windows 10 doesn’t provide default functionality to set up password protection to folders, however, every issue has tweaks. Here our trick is running batch scripts to lock folder & set a password to it.
Follow the steps below to begin locking your confidential data from a spoofing colleague:
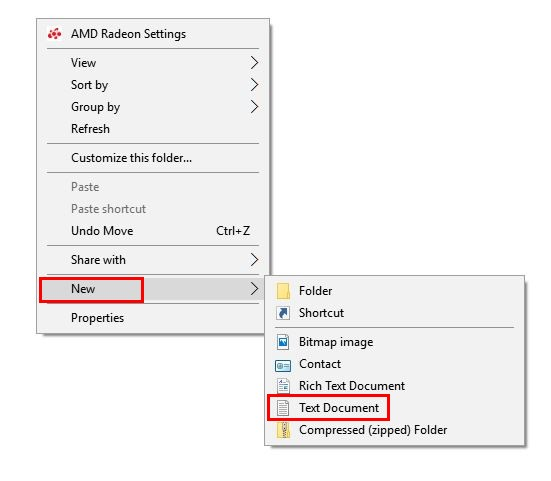
Step 1- Go to the folder where your secret files & folders are located > right-click on an empty space there and click on New option > Tap on Text Document.
Step 2- New text file has been created, don’t give it a name at the moment. Open it and type the following script mentioned below:
Cls
@ECHO OFF
title Folder Private
if EXIST “HTG Locker” goto UNLOCK
if NOT EXIST Private goto MDLOCKER
:CONFIRM
echo Are you sure you want to lock the folder(Y/N)
set/p “cho=>”
if %cho%==Y goto LOCK
if %cho%==y goto LOCK
if %cho%==n goto END
if %cho%==N goto END
echo Invalid choice.
goto CONFIRM
:LOCK
ren Private “HTG Locker”
attrib +h +s “HTG Locker”
echo Folder locked
goto End
:UNLOCK
echo Enter password to unlock folder
set/p “pass=>”
if NOT %pass%== PASSWORD_GOES_HERE goto FAIL
attrib -h -s “HTG Locker”
ren “HTG Locker” Private
echo Folder Unlocked successfully
goto End
:FAIL
echo Invalid password
goto end
:MDLOCKER
md Private
echo Private created successfully
goto End
:End
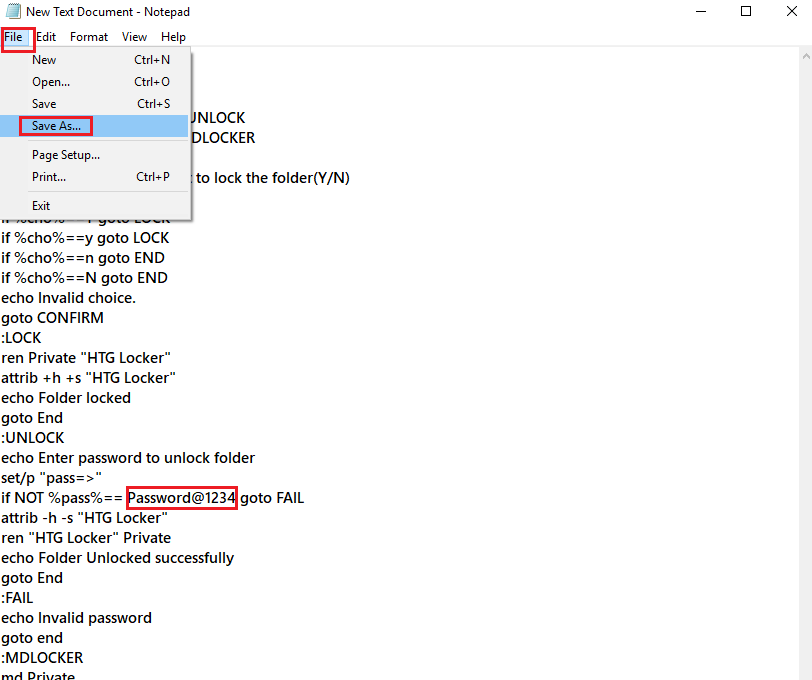
Step 3- Now find the line where it says, “PASSWORD_GOES_HERE” and replace it with the password you want to set.

For example:
goto End
:UNLOCK
echo Enter password to unlock folder
set/p “pass=>”
if NOT %pass%== Password@1234 goto FAIL
Step 4- Now the save the text document by taping on File option and choose to Save as > Click on Save as type section and choose ‘All Files’ > now name the files as “FolderLocker.bat”.
Step 5- Hit the Save button, your Locker Folder has been generated. Now start adding the items such as documents, photos, files and entire folders you want to protect.

Step 6- Once all your confidential data is filled, open ‘FolderLocker’ file to hide. This time it will ask you to lock the folder in Command prompt window.
Step 7- Type “Y” and hit “Enter” key. CMD window will be closed and your locker folder will be hidden. Only “FolderLocker.bat” & “FolderLocker.txt” files will be displayed.

 How To Turn Off Fast Startup in Windows...Fast Startup or Fast Boot feature was initially introduced with Windows 8. While it is quite useful, they have been...
Steps To Unhide/Unlock The Folder?
To unlock or unhide your folder again, follow the steps carefully:
Step 1– Double-click the “FolderLocker.bat” file, run it and you will be redirected to command prompt window.
Step 2- Enter the correct password and your hidden folder will be unlocked.
Step 3- In case you can’t remember the password you have set, you can recall it, by right-clicking on “FolderLocker.bat” file and click on Edit.
Step 4- You will able to see your set password in the batch script.
Want to Set up New Password for Your Folder?
In case you want to replace your password, proceed with the below steps:
Step 1- To edit the new password, right-click on “FolderLocker.bat” file and click on “Edit”.
Step 2- Now locate your previous password, in our case we have used “Password@1234”.
Step 3- Replace “Password@1234” with your new desired password.
Save the file again and enjoy the password-protected folder!
Bottom Line
It would be better to understand the fact that there’s no such thing called 100% protection. The world is full of software, tools, and utilities that are expert in breaking encryption. Despite that, these protection methods will protect your files & folder from majority of users. However, we suggest using a trusted product that can actually secure and protect your files and data from prying eyes.
 9 Best Encryption Software For WindowsDon’t let the stress of privacy theft take-over you and secure it with these tested and verified 9 best encryption...