
Searching for old files from system is like, trying to look for a black cat in a coal cellar. Like, where did I save those last year’s photos from vacationing in South America? or What did I name the report that I wrote in 2018?
While Windows 10 comes with a powerful search inbuilt, especially with Cortana that allows you to search smartly with the help of filters such as Images, Music, PDF and so on. One of the most neglected features, Windows Tags makes perfect sense to search & organize files in an efficient way.
What Are Windows Tags & Why You Should Be Using One?
Tags are one of the most underrated & underutilized features of Windows 10. They work as a metadata that can be associated to files for easy searching.
Adding tags becomes your best bet, when you want to find & discover important files and other information on your system. If properly applied to a file with relevant keywords, they can immensely be helpful in improving search speed.
How To Tag Files In Windows 10?
Suppose you’ve downloaded a bunch of images from the Internet, but you don’t have time to categorize it. That’s where Windows Tags help to quickly organize your files with specific keywords that can easily be accessible later if you’ve forgotten the original file name.
So, without further ado, let’s learn how to add tags to files:
Step 1- Choose a file you wish to add a tag on > Right-Click to choose Properties.

Step 2- Go to ‘Details’ Tab > Find ‘Tags’.
Step 3- Select the empty text box place right beside it.
Step 4- Start adding tags to the particular file. Suppose your creating tags for you’re spreadsheets, so you can use tags like ‘Invoice’, ‘Budget’ or ‘Schedule’ for better categorization.
Step 5- You can give multiple tags to one file as well. Just use semicolon after each tag. For instance, Invoice; Budget; Schedule.
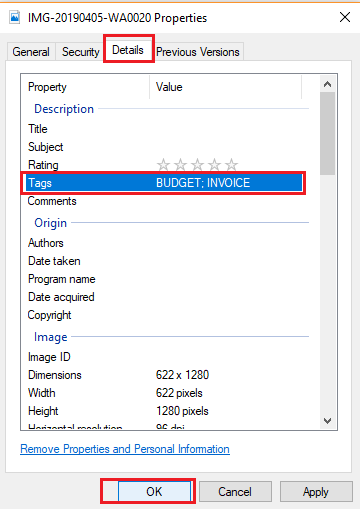 Once you’re done tagging, Click Enter & press OK!
Add Tags To Multiple Files At Once:
If you wish to add same tags to multiple files in one go to briefly categorize your files.
Step 1- Press CTRL Key to select different files from same location > Right-Click to choose ‘Properties’.
Step 2- In Details tab > Add single or multiple tags similarly as done above & hit Enter > Click OK!
All the tags would be applied to multiple files in a single-go!
Add Tags in Windows 7:
If you’re still using Windows 7, the process to add tags in much simpler.
Step 1- Details pane is enabled by default when you select a file/folder in Windows 7.
Step 2- Select file you wish to add tags on & a ‘Details’ pane will automatically be activated at the bottom of the screen.
Step 3- Locate ‘Tags’ option and start adding relevant keywords in ‘Add a tag’ field > Click Enter to Save!
Once all your important files are tagged the next step is:
How To Search Files With Tags?
Searching tagged files is way easier than adding tags. All you need to do is to go to the File Explorer > Type your relevant tags in the Search Box in the format below:
“Tag: Budget”
Replace ‘Budget’ with the tags used by you!
Finding Your Important Files Was Never This Easier, Right?
The only limitation arrives with Tags is that, they are confined to work with only a few formats. Such as Images, Office Documents etc. So, if you feel like adding a tag to PDFs or Text files, you will not find an option to add Tags!
Richard John Cooper
Great advice and online tutoring from SystweakAshvin C Patel
Keep up the good work -Ashvin Patel USA