
Changing the visibility of the user’s files and folders to make it invisible might be because of personal or security reasons. However, doing the same for the macOS requires some technical expertise. Usually, macOS comes with features that help to hide files on Mac devices just like any other operating system. But accessing those options is quite a tricky job in macOS when compared to Windows and Linux.
How To Hide Files And Folders Via Terminal
If you want to know how to hide files in macOS, you need to set the “hidden” attribute for it so that the finder and other Mac apps do not display the chosen file or folder by default. Instead of hiding an individual file, you can create a hidden folder. To initiate this, you can first open a terminal window- press Command+Space, then type ‘Terminal’ and at last press Enter.

Once you enter the terminal, type “chflags hidden” command and include a space at the end of it. After you are done with this, drag-and-drop the folder that you want to find from the Finder and put it into the terminal window. This would make the path of the file or folder visible in the terminal.

After you press enter, the file or folder will automatically vanish i.e., it would be hidden, and Finder would not show it by default.
 How to View Hidden Files and Folders On...Hide or show the hidden files and folders on your Mac with Terminal. Just type two commands and voila, you...
How To Hide Files From Spotlight Search
Although you can make files and folders invisible from Finder, spotlight search finds all files and folders on your Mac device. Therefore, to hide your files from the Spotlight Search, follow these steps: –
- Go to System Preferences
- Then go to Spotlight
- Select Privacy. Here, add the folder that you need to exclude from Spotlight Search.
- Now hide the folder, which includes your important files
Spotlight Search cannot show your hidden files anymore.
‘Secret Folder’ App- Easiest Way To Hide and View Hidden Files On Mac

If you don’t want to hide file and folder with Terminal and want to hide my mac in a straightforward fashion, then it’s better that you use a third-party app. With this, you would be able to hide the files from view and lock them up with the help of a password. Secret Folder app is one such app that can be used to hide all files and can be availed after paying a certain amount. You might find the app a bit pricey, but it provides a great protection for hidden files and folders. In addition to that, it also provides a password-protected vault, which makes use of AES 256-bit encryption that is extremely difficult to break into. The steps to download and use this secret folder mac app are as follows: –
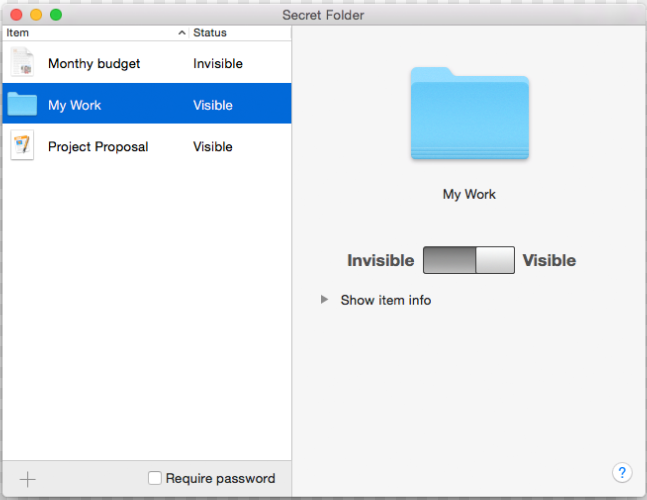
- Download the app and click next until you reach the screen that says create vault.
- Now create a password that you would be using for unlocking the vault and click on the “Create Vault” option.
- After this, you would see a drop-down menu that would appear after you click the button. Here, you can select the secret folder to hide all files.
- Once this is done you can drag and drop the folders and files that you wish to hide and close the app. The password lock would then automatically get activated after this step is taken.
- When you want to access the hidden folders, you can launch secret folder and enter the password to open it. After that, you can double click the file or folder and click on “Unhide All” present at the bottom of the vault to access the files.
Another way to hide files in macOS is that you can store them in the Library and assume it to be hidden. For this, you can hold down the Option key, go to the Library folder, create a new folder in that and just drag all the files and folders that you want to hide in them. Apart from this, another answer to your ‘how to hide folders on mac’ issue is by creating a new user in the System Preferences’ users or the group preference pane and putting the files and folders that need to be hidden in that account.
If you have the “Apple’s Developer Tools” installed in your Macbook, you can use it to hide all files and folder. To use this method, you can go to the Terminal and enter “setfile –a V“along with the name of the folder or file, and this would automatically change the visibility to invisible. In order to undo this option, repeat the same command but now with a lowercase “v.”
Now here are few steps to see hidden files on Mac: –
How To View Hidden Files
In case, you do not know how to see hidden files on mac, you can run the same command (chflags hidden). Just change “hidden” to “nohidden.” If you somehow remember the path of the folder or file, you can type that in the terminal and access it. If not, then you can type “chflags nohidden” to find the folder in Finder and then drag and drop that in the Terminal just like in the previous steps. Instead of this, if you want to go with the easy way for how to show hidden folders, you can also press the up arrow key present at the terminal to go to the previous commands, locate the right one that you want and access the hidden file or folder. You can even use the left arrow key to access the “hidden” part of the command and change it to “nohidden”. Then you can press Enter. Once you are done doing this, the file or the folder would automatically become unhidden and you would be able to browse through it.
If you want to know how to view hidden files in the library, then here are some keyboard shortcuts that you can apply to make it visible.
- Go to the menu and open Finder > Open the Macintosh HD folder by opening the devices option present in the left column. Now hold the Cmd + Shift +. (dot) keys, and you would see that the hidden files would now be visible. To undo this, you can use the same key combination and the files would be hidden.
- As an alternative option, you can open finder, hold down Alt key and choose Go option from the dropdown menu bar present on the top of the screen and you would see the library folder listed down in the Home folder.

- Apart from this, you can even use the following option: Go to the Finder, choose the Go from the menu bar or press Shift + Cmd + G. After this, you can type ~/Library into the text box and click on Go.
- You can also Open Terminal and type the following command at the prompt: defaults write com.apple.finder AppleShowAllFiles -boolean false ; killall Finder to initiate the action.
- When you are considering the Mavericks and Yosemite operating system and if there is a display bug that has hidden files in the Open or Save dialog box, then you need to understand that the keyboards shortcuts for accessing the same would not work in the Finder’s view mode. However, the other views such as cover flow, list, and icon would just work fine if you want to display the hidden files.
- For El Capitan and macOS Sierra, the keyboard shortcuts that are used for showing the hidden files in the Open and Save dialog boxes just work quite well but you need to take care of a little detail along with them as well. There are even times when some of these dialog boxes do not display all the icons for the finder view and hence you need to keep a check on them for accessing the files.
- In case, you want to change a different Finder View, you can do so by clicking the Sidebar icon present in the toolbar on the left. Doing so would enable all the views on the Finder view and you would be able to access all the icons at once.
The role of the command line during the entire process can be divided into two parts: At first, it helps in changing the file settings to show files and secondly, it helps in restarting the finder to show hidden files immediately.
 How to Get Airdrop on Your MacOS Dock?Airdrop is a very frequent for Apple users. For those who are not familiar with how to use Airdrop and...
For most of the time, the macOS hidden files and folders are always kept out of view, but during certain times when the files need to stay hidden especially if there is a virus or malware attack which can cause issues in the system files and affect the folders which might no longer work and then you might need to fix them manually to ensure that you can access all the files back. As there can be plethora of hidden files and folders in your MacOS, you can browse through your files in the Finder Window and select the one that you want to access at the moment. Also, you need to take extra care when it comes to the configuration files and do not delete or modify them unless you are sure about their roles.
The overall task of accessing hidden file and folder might prove to be bit tedious as you can no longer view them directly in the Finder. However, if you want to show hidden folders on mac quickly, then you can do so by toggling the Finder’s ability to reveal the hidden files rather than making different files visible again. Another important thing that you should remember is that if you accidentally delete a hidden file, you can access back with the help of Disk Drill.