Windows Defender error code 0x8007139F occurs when Windows Defender’s definition update or Windows Update corrupts the Windows Defender files. It can also occur when Windows Defender conflicts with other security software installed on your computer.
The Windows Defender error code 0x8007139F is often further accompanied by the message “The group or resource is not in the correct state to perform the requested operation.”
In this post, we’ll look at the various ways in which you can fix the Windows Defender error code 0x8007139.
Words of Wisdom
While you fix the issue ensure that you keep another Antivirus handy so that you don’t put the security of your PC in jeopardy. Systweak Antivirus, for instance, is one of the best lightweight Antivirus for Windows PCs. It comes with features like –
- Real-time protection from malware.
- Multiple scan modes – Quick, Deep, and Custom.
- Exploit protection to help you steer clear of threats that may exploit vulnerabilities on your PC
- Web and Firewall protection.
- Systweak Antivirus updates its database of malicious threats so that not even the most recent malware can go unidentified.
Download Systweak Antivirus Now

We have discussed the various aspects of Systweak Antivirus – features, pricing, and various other aspects in this post.
See Systweak Antivirus In Action
Fix Windows Defender Error Code 0x8007139F
Solution No. 1 – Run SFC
Corrupt system files are often the root cause behind many Windows related issues. If you have encountered Windows Defender error 0x8007139F, chances are that corrupt files are present on your computer. The easiest way to identify and remove corrupt files is to run the SFC scan via administrative Command Prompt. Here are the steps for the same.
Step 1 – In the Windows search bar, type cmd, and from the right-hand side, click on Run as administrator.
Step 2 – When the Command Prompt window opens, type SFC /Scannow and press Enter.
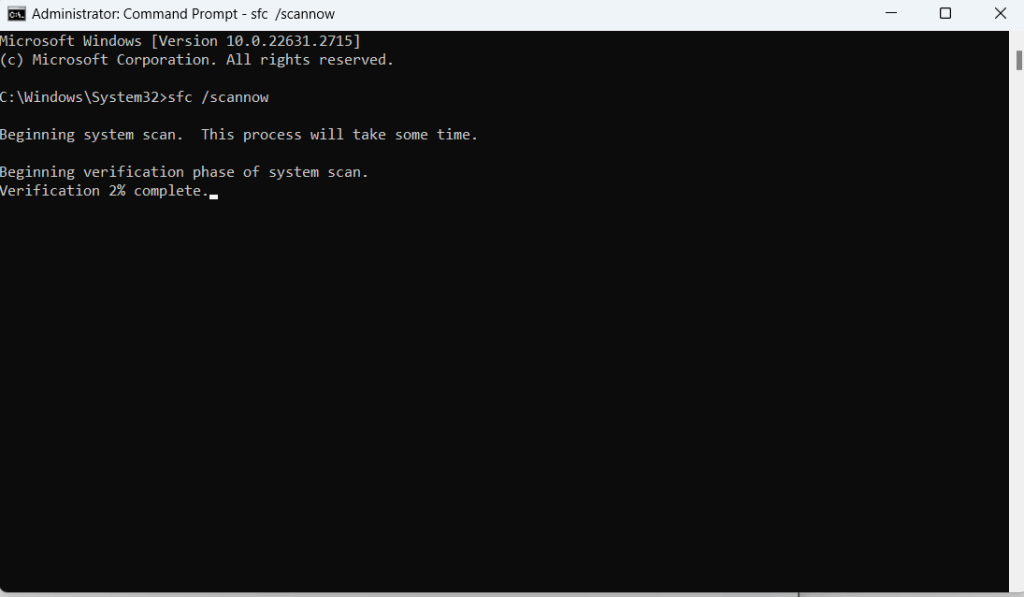
Step 3 – Once the scan is over, check if the issue is resolved or not.
Solution No. 2 – Turn the Firewall On and Set Windows Defender To Automatic
In case you have a third-party Antivirus, you would want to first disable its firewall. Next, ensure that the Windows firewall is enabled. To do that –
Step 1 – Open the Control Panel by typing Control in the Windows search bar and then clicking on Open.
Step 2 – Click on View by dropdown and click on Large icons.
Step 3 – Click on Windows Defender Firewall.
Step 4 – From the left, click on Turn Windows Defender Firewall on or off.
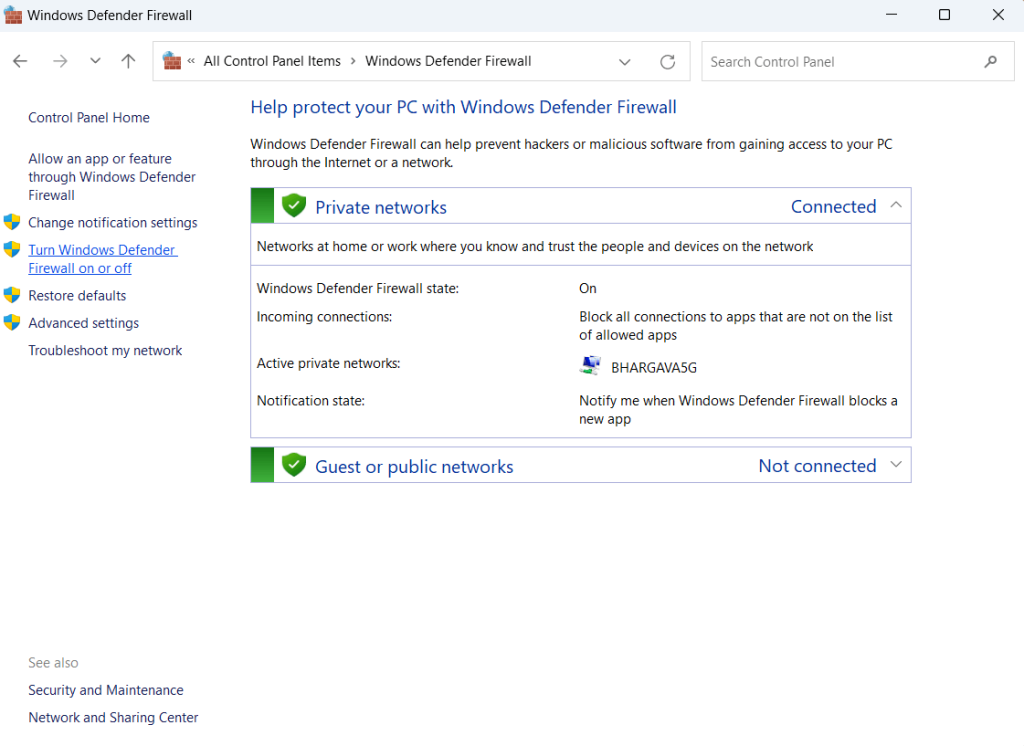
Step 5 – Ensure that the Turn on Windows Defender Firewall radio button is checked under both Private and Public network settings. If not, click on both these radio buttons and click on OK.
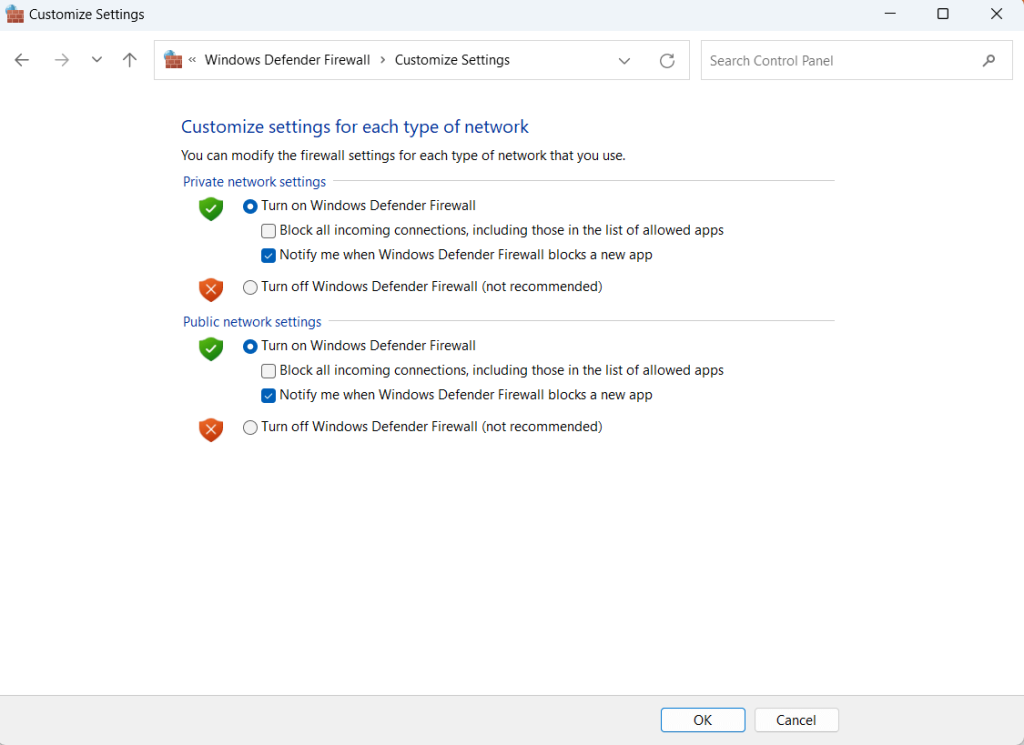
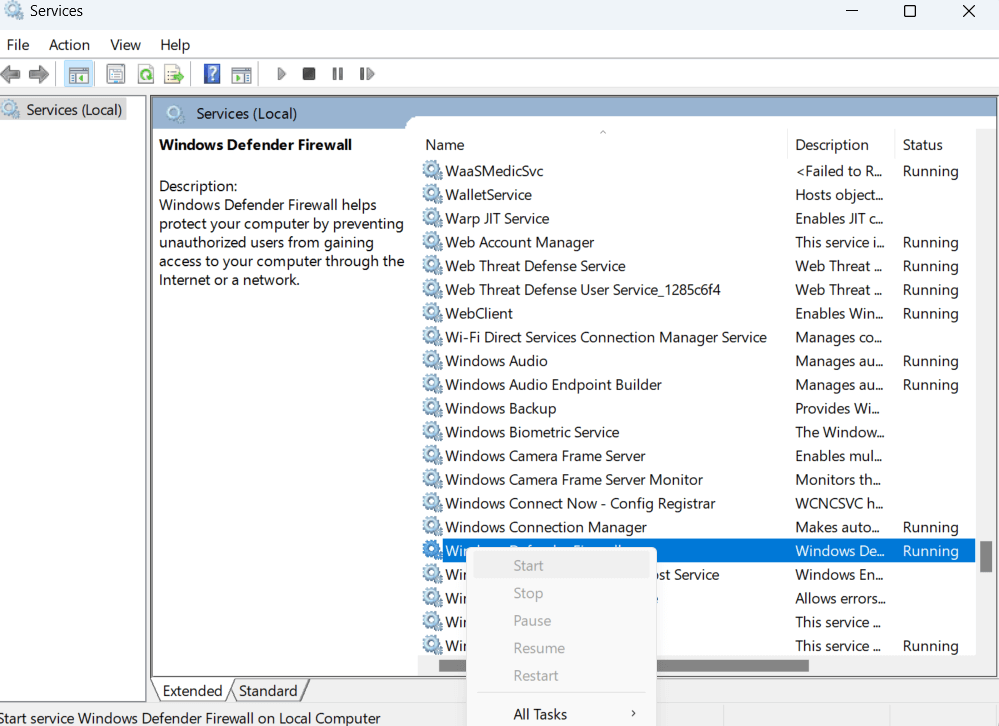
Step 6 – Next, press Windows + R. In the Run dialog box, type services.msc and press Enter.
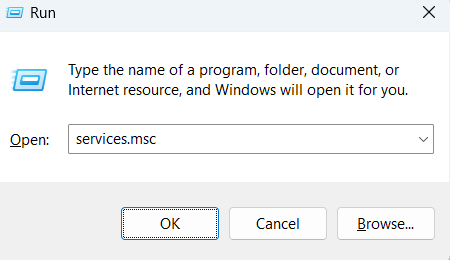
Step 7 – Locate Windows Defender Firewall, right-click on it, and click on Start.
Solution No. 3 – Reset Windows Security
One of the ways to fix the error code 0x8007139F is to reset the Windows Security app. This will help delete the data which is interfering with the functionality of the app. Here are the steps to reset Windows Security –
Step 1 – In the Windows search bar, type Windows Security. Right-click on it and click on App Settings.
Step 2 – Scroll down till you reach the Reset column.
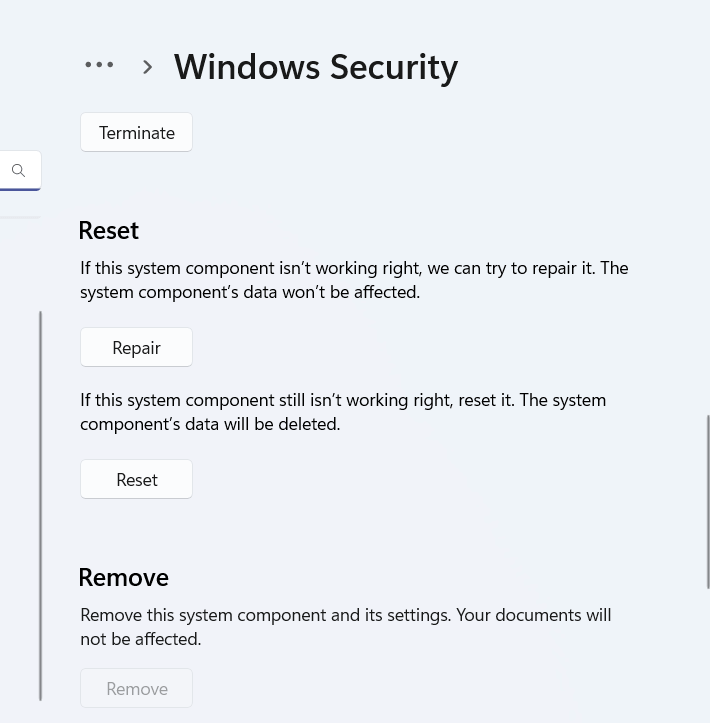
Step 3 – Here, click on the Reset button.
Solution No. 4 – Repair Windows Defender Registry
Last but not least, if up until now you are still getting the error code 0x8007139F, you can try fixing the Windows Defender Registry. We’d urge you to Backup registry before trying to repair Windows Defender Registry. Once you have done that, follow the steps mentioned below –
Step 1 – Open a Notepad and save it as .reg in a location on your computer.
Step 2 – Copy and paste the following lines of code in your notepad
Windows Registry Editor Version 5.00
“DisplayName”=”@%ProgramFiles%\\Windows Defender\\MsMpRes.dll,-103”
“ErrorControl”=dword:00000001
“Group”=”COM Infrastructure”
“ImagePath”=hex(2):25,00,53,00,79,00,73,00,74,00,65,00,6d,00,52,00,6f,00,6f,00,\
74,00,25,00,5c,00,53,00,79,00,73,00,74,00,65,00,6d,00,33,00,32,00,5c,00,73,\
00,76,00,63,00,68,00,6f,00,73,00,74,00,2e,00,65,00,78,00,65,00,20,00,2d,00,\
6b,00,20,00,73,00,65,00,63,00,73,00,76,00,63,00,73,00,00,00
“Start”=dword:00000002
“Type”=dword:00000020
“Description”=”@%ProgramFiles%\\Windows Defender\\MsMpRes.dll,-3068”
“DependOnService”=hex(7):52,00,70,00,63,00,53,00,73,00,00,00,00,00
“ObjectName”=”LocalSystem”
“ServiceSidType”=dword:00000001
“RequiredPrivileges”=hex(7):53,00,65,00,49,00,6d,00,70,00,65,00,72,00,73,00,6f,\
00,6e,00,61,00,74,00,65,00,50,00,72,00,69,00,76,00,69,00,6c,00,65,00,67,00,\
65,00,00,00,53,00,65,00,42,00,61,00,63,00,6b,00,75,00,70,00,50,00,72,00,69,\
00,76,00,69,00,6c,00,65,00,67,00,65,00,00,00,53,00,65,00,52,00,65,00,73,00,\
74,00,6f,00,72,00,65,00,50,00,72,00,69,00,76,00,69,00,6c,00,65,00,67,00,65,\
00,00,00,53,00,65,00,44,00,65,00,62,00,75,00,67,00,50,00,72,00,69,00,76,00,\
69,00,6c,00,65,00,67,00,65,00,00,00,53,00,65,00,43,00,68,00,61,00,6e,00,67,\
00,65,00,4e,00,6f,00,74,00,69,00,66,00,79,00,50,00,72,00,69,00,76,00,69,00,\
6c,00,65,00,67,00,65,00,00,00,53,00,65,00,53,00,65,00,63,00,75,00,72,00,69,\
00,74,00,79,00,50,00,72,00,69,00,76,00,69,00,6c,00,65,00,67,00,65,00,00,00,\
00,00
“FailureActions”=hex:80,51,01,00,00,00,00,00,00,00,00,00,03,00,00,00,14,00,00,\
00,01,00,00,00,60,ea,00,00,01,00,00,00,60,ea,00,00,00,00,00,00,00,00,00,00
“ServiceDllUnloadOnStop”=dword:00000001
“ServiceDll”=hex(2):25,00,50,00,72,00,6f,00,67,00,72,00,61,00,6d,00,46,00,69,\
00,6c,00,65,00,73,00,25,00,5c,00,57,00,69,00,6e,00,64,00,6f,00,77,00,73,00,\
20,00,44,00,65,00,66,00,65,00,6e,00,64,00,65,00,72,00,5c,00,6d,00,70,00,73,\
00,76,00,63,00,2e,00,64,00,6c,00,6c,00,00,00
“Security”=hex:01,00,14,80,04,01,00,00,10,01,00,00,14,00,00,00,30,00,00,00,02,\
00,1c,00,01,00,00,00,02,80,14,00,ff,01,0f,00,01,01,00,00,00,00,00,01,00,00,\
00,00,02,00,d4,00,07,00,00,00,00,00,28,00,ff,01,0f,00,01,06,00,00,00,00,00,\
05,50,00,00,00,b5,89,fb,38,19,84,c2,cb,5c,6c,23,6d,57,00,77,6e,c0,02,64,87,\
00,0b,28,00,00,00,00,10,01,06,00,00,00,00,00,05,50,00,00,00,b5,89,fb,38,19,\
84,c2,cb,5c,6c,23,6d,57,00,77,6e,c0,02,64,87,00,00,14,00,fd,01,02,00,01,01,\
00,00,00,00,00,05,12,00,00,00,00,00,18,00,ff,01,0f,00,01,02,00,00,00,00,00,\
05,20,00,00,00,20,02,00,00,00,00,14,00,9d,01,02,00,01,01,00,00,00,00,00,05,\
04,00,00,00,00,00,14,00,8d,01,02,00,01,01,00,00,00,00,00,05,06,00,00,00,00,\
00,28,00,15,00,00,00,01,06,00,00,00,00,00,05,50,00,00,00,49,59,9d,77,91,56,\
e5,55,dc,f4,e2,0e,a7,8b,eb,ca,7b,42,13,56,01,01,00,00,00,00,00,05,12,00,00,\
00,01,01,00,00,00,00,00,05,12,00,00,00
“0”=”Root\\LEGACY_WINDEFEND\\0000″
“Count”=dword:00000001
“NextInstance”=dword:00000001
Step 3 – Save the file again. Double-click on the file to execute it. Click on Yes when the prompt appears.
Step 4 – Reboot the PC and now try to run Windows Defender.
Wrapping Up
We hope that the steps above have been helpful for you in getting rid of the Windows Defender error 0x8007139F. If yes, do let us know which of the above solutions helped you out. For more such content, keep reading WeTheGeek.
You can reach out to us on Facebook, Instagram, Twitter, YouTube, and Pinterest.