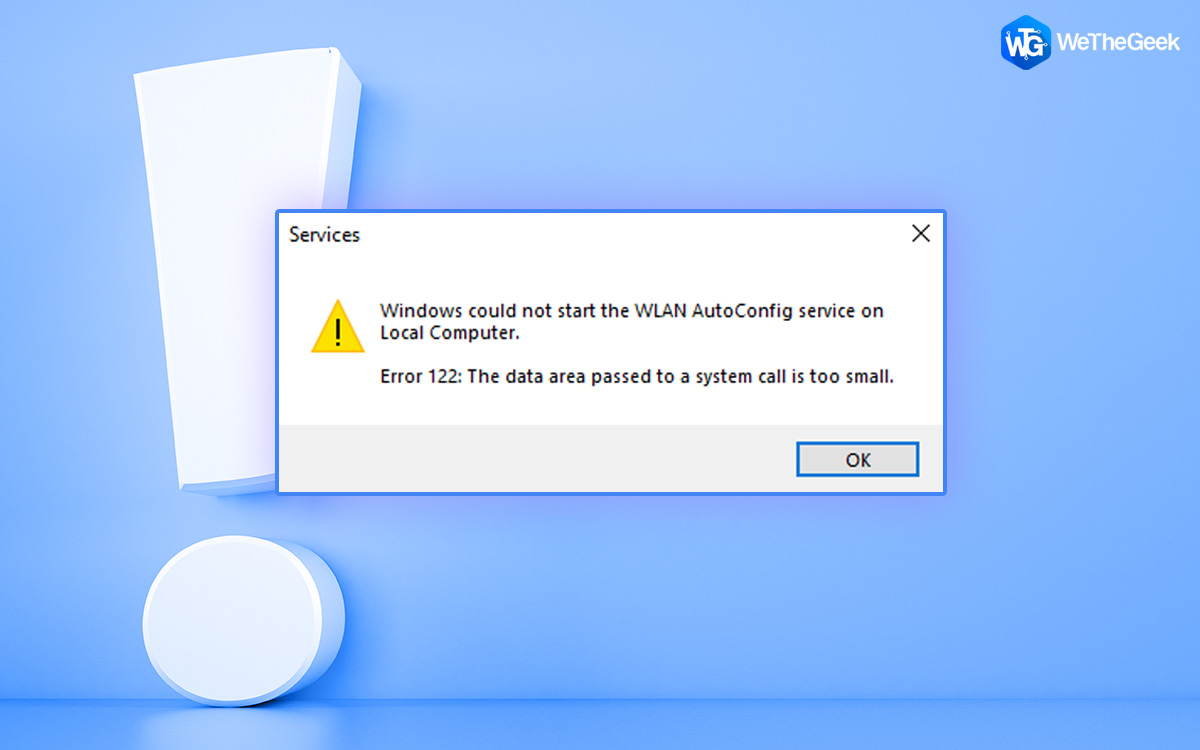
When consumers attempt to use their Windows computers to connect to the internet over a wireless connection, an error notice stating “Windows could not start the WLAN AutoConfig service” appears. There are numerous potential causes of this issue that include:
- You may experience problems similar to the one at hand if WLAN adapter drivers are incompatible because they are corrupt or obsolete.
- The error may be caused by improperly configured registry keys that are preventing the service from operating.
- Malware or File corruption could be causing your system’s components and services to malfunction.
Also Read: Wi-Fi Network Not Showing Up On Windows 11/10, What To Do
Expert-Recommended Method To Fix “Windows Could Not Start The WLAN AutoConfig” Service Error
Method 1: Activate The Network Troubleshooter
Windows built-in Network Troubleshooter can help identify problems with the WLAN AutoConfig service and resolve them. Here are the steps to do that:
Step 1: Press Win + I to launch the Settings app.
Step 2: Click on the System tab in the left-hand panel and then click on Troubleshoot on the right side.
Step 3: Next click on “Other troubleshooter“.
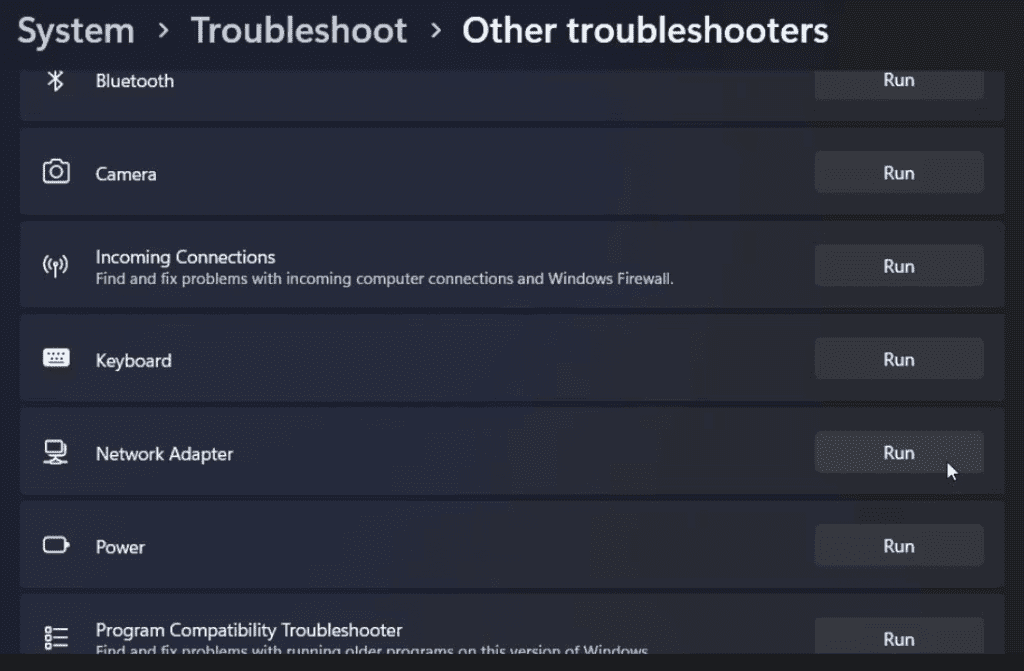
Step 4: Locate the Network adapter and select the Run option. The troubleshooter will now start looking for potential problems in the system.
Wait for the utility to finish scanning and show you the results. If a problem is found, the troubleshooter will either try to solve it on their own or will offer you suggestions.
Also Read: How To Fix Mobile Hotspot not Working on Windows 11
Method 2: Update The Network Adapter Driver
The problem could potentially be caused by out-of-date or damaged drivers that are necessary for the WLAN AutoConfig service to function. You might need to upgrade your computer’s network drivers if you’re experiencing issues. We suggest using Advanced Driver Updater to update all of your drivers at once. You can replace damaged and absent drivers with the aid of this application:
Step 1: Download and install Advanced Driver Updater using the download button below.
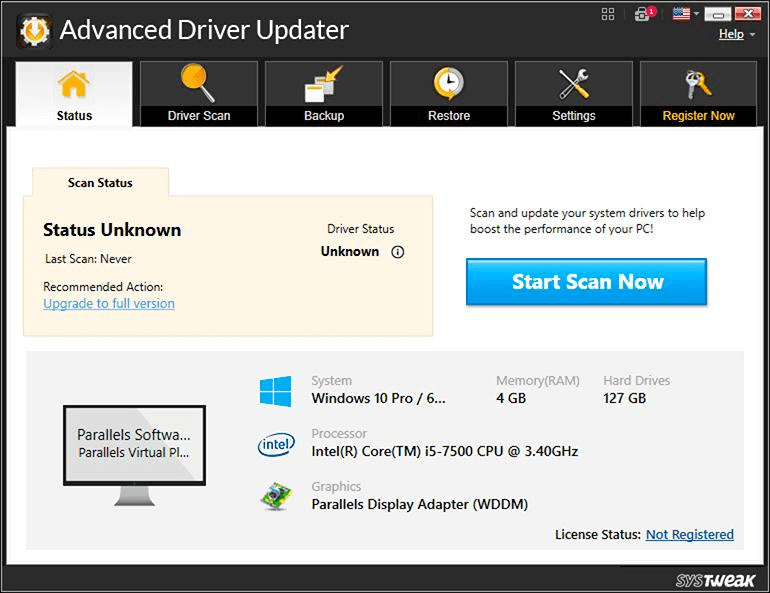

Step 2: Open the software after it has been installed and choose “Start Scan Now“.
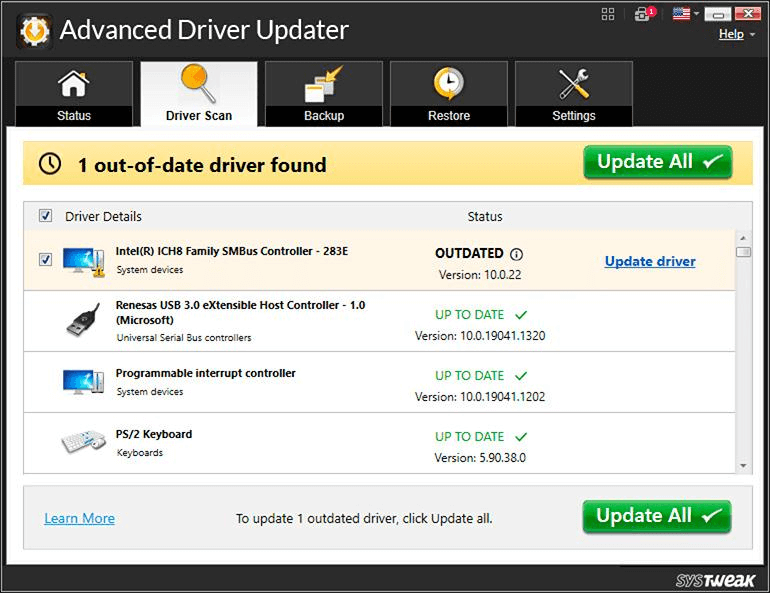
Step 3: Following the scan, a list of driver issues will appear on your screen.
Step 4: Locate the WLAN driver in the list and select Update next to it
Step 5: Restart the computer once the updates have been finished.
Also Read: How To Find Wi-Fi Password of Any Network
Method 3: Execute A Registry Fix
You may also be unable to connect to a wireless network because of an issue with the WLAN AutoConfig service in the Registry components. Once that is finished, proceed as follows:
Step 1: To launch Run, press the Win + R buttons simultaneously.
Step 2: In Run, enter “regedit” and press the Enter key.
Step 3: In the User Account Control window, select Yes.
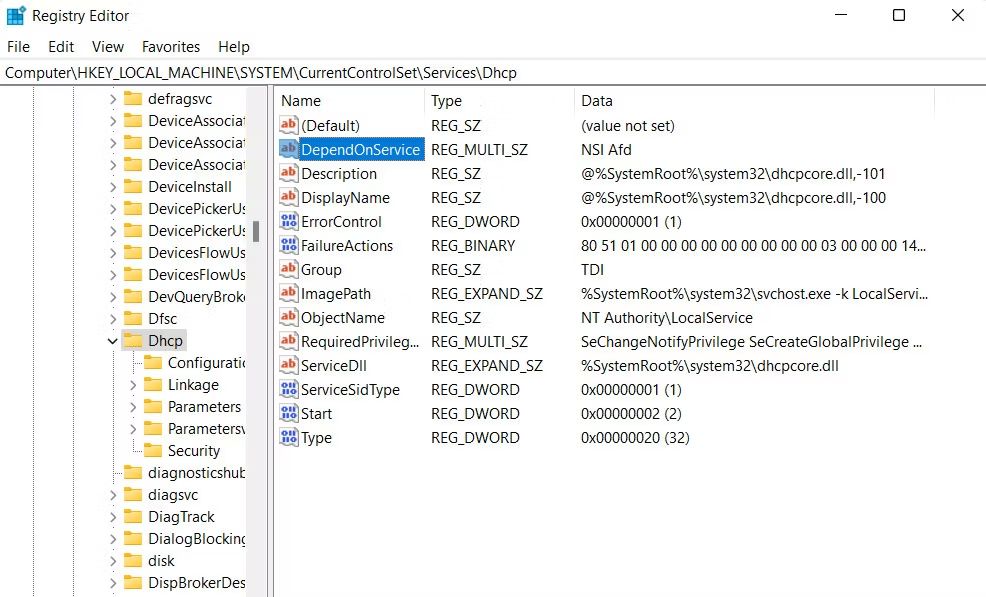
Step 4: Navigate to the path mentioned below or copy and paste this path into your Registry’s address bar and press Enter.
HKEY_LOCAL_MACHINE\SYSTEM\CurrentControlSet\Services\Dhcp
Step 5: Locate the DependOnService string in the right pane and double-click on it.
Step 6: Remove everything but Afd from the dialogue box.
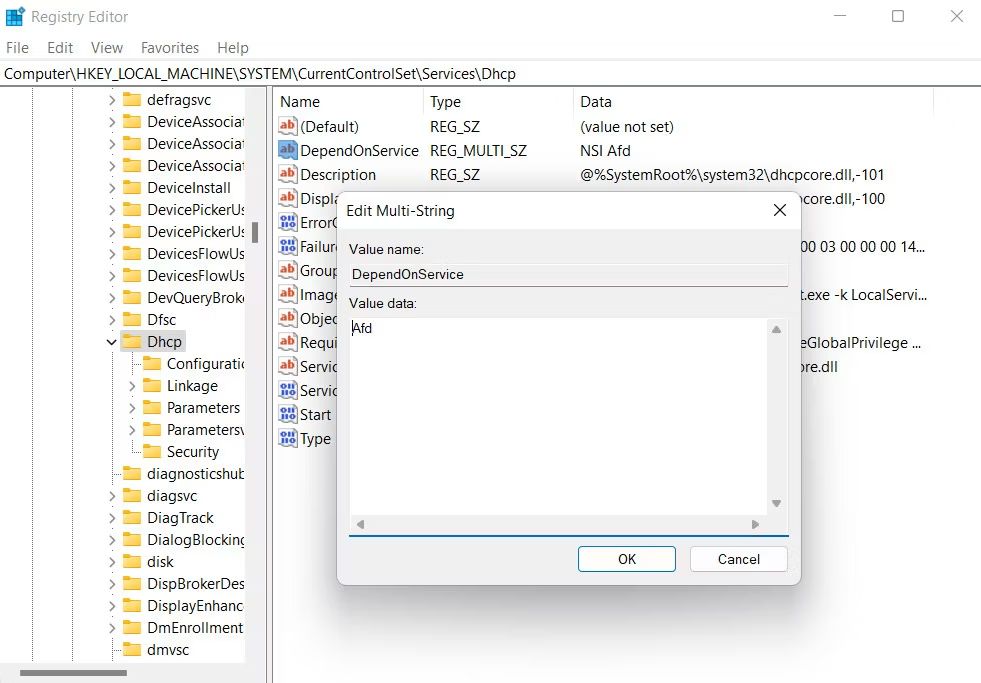
Step 7: To save the changes and shut off the Registry Editor, click OK.
Restart your computer to finish. Hopefully, the WLAN service problem will go away when you reboot.
Also Read: How to Quickly and Easily Find Wi-Fi Password on Windows 10
Method 4: Reboot The WLAN Service
You can restart the service using the Services tool to make sure there is no glitch or issue.
Step 1: To launch Run, press Win + R.
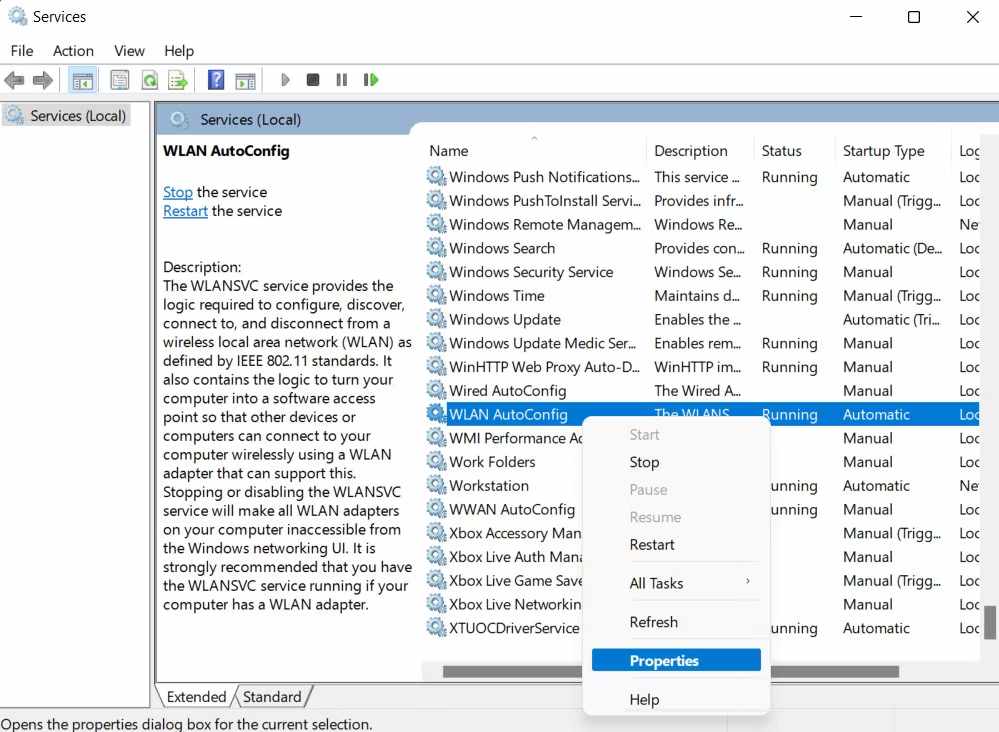
Step 2: In Run, enter “services.msc” and then press Enter.
Step 3: Locate the WLAN AutoConfig service by scrolling down and perform a right-click on it.
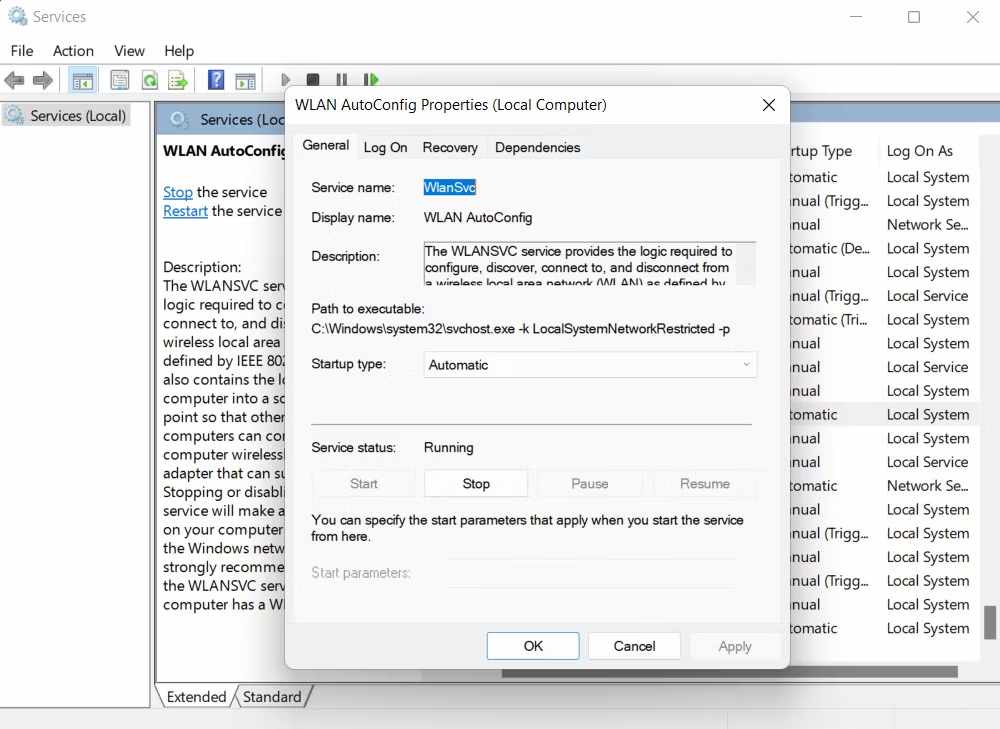
Step 4: From the context menu, select Properties.
Step 5: Click the Stop button now, then click Start after a brief delay.
Step 6: Click on Apply and then click on OK.
Use the same tool to carry out the same actions for the Remote Procedure Call (RPC) and DCOM Server Process Launcher services. These actions should resolve any issues that the service may have had if a bug or glitch was present.
The Final Word On How To Fix The “Windows Could Not Start The WLAN AutoConfig” Service Error
It might be annoying to have trouble getting your device to connect to a wireless network. We really hope that the options we provided above helped you permanently resolve the “Windows could not start the WLAN AutoConfig service” issue. Keep the required drivers and services up to date to prevent a similar problem.
Please let us know in the comments below if you have any questions or recommendations. We would be delighted to provide you with a resolution. We frequently publish advice, tricks, and solutions to common tech-related problems. You can also find us on Facebook, Twitter, YouTube, Instagram, Flipboard, and Pinterest.