
Want to use Linux Mint alongside Windows 10? Great decision! And you have landed on the right page.
This article will take you through easy steps to help you install Linux Mint along with Windows 10. Let’s get started.
Linux Mint is perfect for both beginners and advanced users. It is a powerful operating system, yet installing it is not a tough nut to crack.
4 Important Precautions Before Installation
- Backup Your Data
Though there is negligible risk of losing data while installation, it is always recommended to backup data before installation as a precautionary measure. You can also use a data backup software to secure your data.
- Create Boot Repair Disk Handy
It will be required if in case your installation goes astray. Hence create a repair disk using another USB or CD.
- Keep a Live Disk Of Your Current Windows Version Handy
Again, if installation crashes in between and you can’t even perform a boot repair, you can always reinstall Windows 10 by using a Live Disk.
- Disabling secure boot before installation is a good practice if your operating system is upgraded from Windows 8/8.1 to Windows 10.
The above mentioned cases are meant to enlighten you and not discourage you. Moreover, we’ve got you covered. Hence, we are going to install Linux Mint alongside Windows 10 (which is already installed).
Step 1: Create A Live Disk or USB
Visit the Linux Mint official site and download an ISO file. Click here to download the file.
After downloading ISO file, write the file into a USB drive. There are many tools available online that can help you write an ISO file to your USB.
Here is a screenshot of the process. The software used to write the ISO image file into a USB drive is Universal USB Installer.

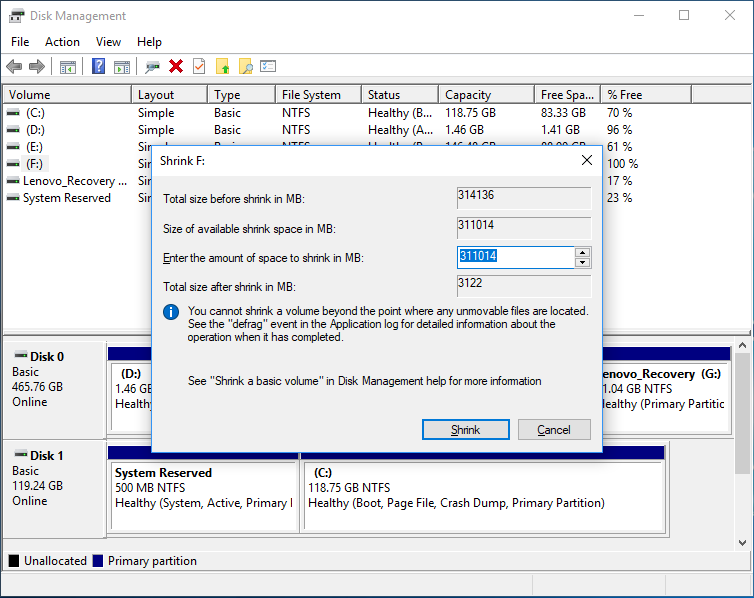
Step 2: Build a Partition For Mint
You have to be cautious while creating a partition. You can easily install Mint within 10GB but it’s recommended to use between 30 to 40 GB of memory space to install Linux Mint. It will allow you to store files while using Linux Mint.
How Do You Do It?
- Click on the Start menu in Windows 10.
- Type “disk management” in the search menu.
- You will see “create and format hard disk partitions”. Select the option and it will launch disk management utility.
- Right click on the desired partition that you want to divide and select “Shrink Volume”.

- Enter the amount of space you want to give to your Linux Mint partition.
- Click on “Shrink”. It will create a new partition for your upcoming Linux Mint operating system.

See Also: Best Disk Partition Software for Windows
Step 3: Insert USB Drive and Boot Your System
- Insert the USB drive that contains ISO file and restart your system. Start tapping F12 or F10 (differs from PC to PC) continuously to reach the Boot menu as soon as you see the brand logo.
- Choose USB/Removable Media.
Next Read: Best Free Antivirus For Linux
Step 4: Begin Installation
As soon as the image file is booted, you will see two options – “Try Linux Mint” and “Install Linux Mint”. Choosing Try Linux Mint will also take you to the option for installing Mint on your system.
After selecting “Install Linux Mint”, you will directed to screen where you can select your preferred language.

Image source: kkslinuxinfo.wordpress.com
Consequently, it will check available space, Internet connection and battery.

Image source: sites.google.com
Step 5: Arrange Space For Linux
This is an important step. You need to plan the partition for Linux Mint. We recommend you to keep Windows and Linux separately. In the installation window, select “Something else”.

Image source: community.linuxmint.com
Step 6: Create Root Partition
This is where the installation process begins, in which the first step involves creating partition for “Root”. Select “Free space” available in the list and afterwards click on “+”.

Image source:linuxbsdos.com
Provide the size of root partition (between 10GB to 20GB). Select ext4 as filesystem and “/” as mount point.

Image source: itsfoss.com
Step 7: Create Swap partition
Create a swap partition. It is recommended that the size of swap partition should be double the RAM size of your PC.

Image source: fosslinux.com
Step 8: Create Home Partition
Home partition will contain all of your downloaded files. Hence, allocate maximum size to this partition.

Image source: itsfoss.com
After creating these partitions, click “Install Now”.

Image source: cyberraiden.wordpress.com
Step 9: Follow Simple Instructions
Kudos! You have successfully completed the difficult section of the installation. Now, relax and enjoy the easy section. Follow the screenshots and we can successfully complete the process. They are really simple!

Image source: elinuxbook.com

Image source: tecmint.com

Image source: landoflinux.com

Image source:landoflinux.com
As soon as the installation is completed, you will see a screen which asks you to restart your system or continue exploring the new OS.

Image source: cyberraiden.wordpress.com
Once your system restarts, you will see a Linux Mint option on grub screen.
Linux Mint is a user-friendly linux build. We hope this article completely guides you through the installation process of Linux Mint on Windows 10.
Love Linux!