
Even after the arrival of various communication apps on your iPhone, scheduling a text message becomes the need of hour. It may be to remind your wife about dropping a cheque or reminding your employee to send an email on time. Whatever the reason could be, it is a matter of minutes to schedule a text on the iPhone.
Earlier, it was typical to send automated text messages through third-party apps. But right after the arrival of iOS 12, users no longer need to depend on third-party apps. How? ‘Get Shortcut’ is the key.
Method 1: Schedule text on iPhone Using Siri Shortcut
Step 1: Before beginning the process, you need to visit the App store on your iOS device and install ‘Shortcuts’.
Step 2: Once done, select ‘Get Shortcut’ and welcome yourself to a new page where you can see a tab of ‘Send Delayed text’.

Step 3: As you tap on the blue tab, you will be able to select the names whom you want to send a text message.
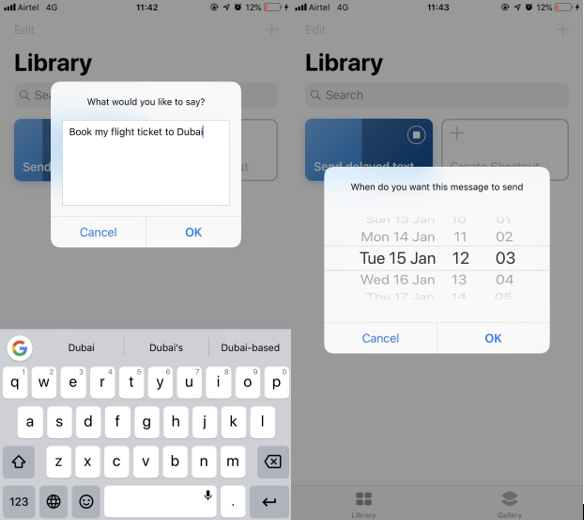
Step 4: After selecting the contacts of your choice, the screen pop-up will ask you ‘What would you like to say?’ Here, you can type your message.
Once you tap OK, the next pop up will ask you the date and time. Select the one that is appropriate and mark OK.
And that’s it! Your text message has been scheduled now.
Settings:
Yet it’s not done if you do not check the advanced settings as per your convenience. To change them, click the 3 dots on marked on right-hand side tab of ‘Send Delayed Text’.

Once you tap on it, you will be taken to a new screen page where further changes can be made.

Now you can select multiple contacts, add a shortcut to Siri or change the name. Whatever that suits you lie in your hand settings now.
Method 2: Schedule text on iPhone Using Scheduled App
Thankfully, you also have a third party app available on iTunes, where you can download the Scheduled app. A drawback that it may hold is that you need to upgrade it to the premium version for sending automated text messages.

Step 1: As you install the app, tap on Enable Notifications and enter in the app. Here, if you wish to upgrade the version now, you can. Or else, just click ‘Not Yet’.
Step 2: As you enable the terms and conditions along with verifying your phone number, the app gets ready for use.

Step 3: Tap the next page where the option to ‘Create Message’ is present.
Step 4: A new box will open up in which you can select the contacts, type the message, schedule the date and schedule it.
In the section of ‘Schedule’, you will find an option to set date as well as time.
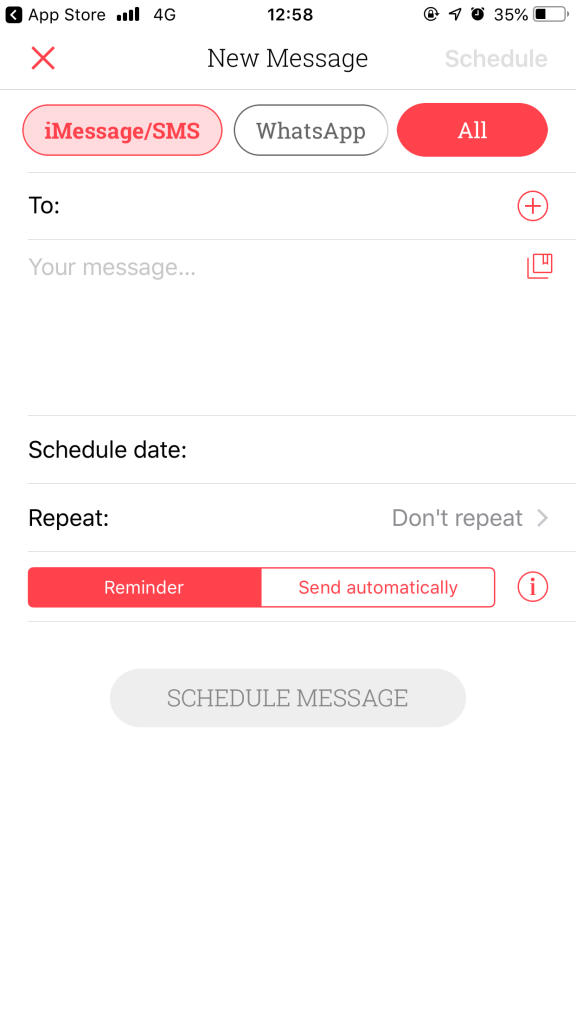
Step 5: If you want the text to be repeated frequently, say every day or every week, you can select it from tap Reminder. Or else click ‘Send Automatically’ for the scheduled time.
The option of sending SMS, Email or other modes also appear before sending it further. Pick as you like!
Keep a Note: If you are using Premium version of the Scheduled app, the scheduled text message will be sent on its own. However, if you have a free version, the app will remind you, so you can pick your phone, unlock it and send it on your own.
All set to send!
Hence, you will be able to schedule text messages on the iPhone very smoothly, be it any method. Yes, you may need to push a few efforts to do the same, but your timeline does get simpler with quick efforts. Happy scheduled messaging!