
Encountering the “Chrome not allowed to load local resource” error on Windows 11 can be extremely frustrating. This error can not only impede your browsing experience but also cause a significant setback to your productivity.

This error message typically occurs when you are trying to load a web page that is referencing local files from your computer. Chrome blocks this type of request by default due to security concerns. This is because loading local files can potentially allow malicious scripts to access your system, which can compromise your computer’s security. Therefore, Chrome restricts the loading of local files to protect your computer from potential harm.
This blog post outlines several workarounds that you can use to address this error by adjusting a few settings on your device.
Let’s get started.
How to Fix the “Chrome Not Allowed to Load Local Resource” Error?
Solution 1: Change DNS Settings
The “Not Allowed to Load Local Resource Chrome” error can be caused by issues with your computer’s DNS address, which is obtained dynamically from your ISP. In such cases, using Google’s DNS servers has proven to be an effective solution for resolving the error.
To do this, you can follow these steps:
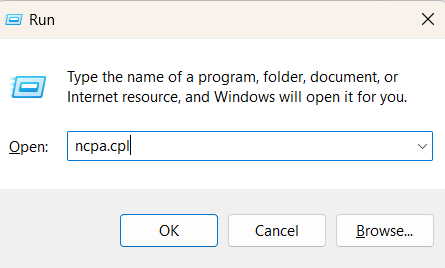
Step 1: Press the Win + R keys to open the Run dialog box and type “ncpa.cpl” and press Enter to open the Network Connections window.
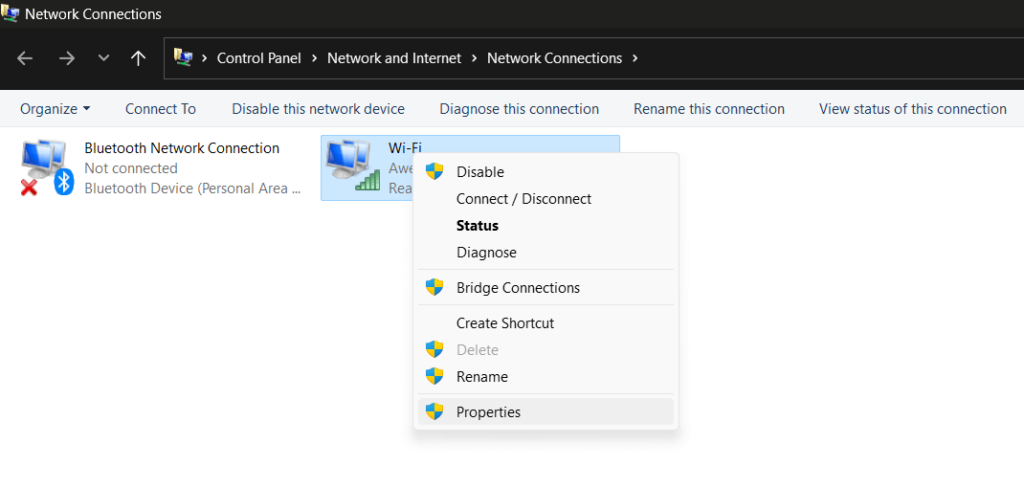
Step 2: Right-click on the network adapter you use most frequently and select “Properties.”
Step 3: In the Networking tab, select “Internet Protocol Version 4 (TCP/IPv4)” and click “Properties.”
Step 4: In the General tab, check the box next to “Use the following DNS server addresses” and set the Preferred DNS server to 8.8.8.8 and Alternate DNS server to 8.8.4.4.
Solution 2: Disable Chrome’s Security Settings
It’s possible that Chrome may block an image it considers malicious, causing the “Chrome not allowed to load local resource” error. Hence, you can try temporarily disabling Chrome’s advanced security settings and see if this hack works.
NOTE: It may be tempting to disable Chrome’s security settings to load the file. However, it is important to note that doing so can compromise your computer’s security and leave it vulnerable to malware attacks.
To disable Chrome’s security settings, follow these steps:
Step 1: Open the Chrome browser on your computer.
Step 2: Click on the three-dotted icon in the top right corner of the Chrome window, and select “Settings”.
Step 3: In the left-hand pane of the Settings page, click on “Privacy and Security” and then, select “Security”.
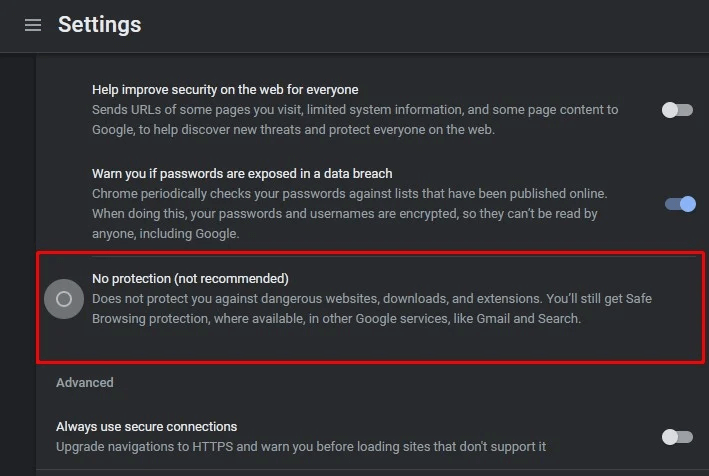
Step 4: Look for the “No protection (not recommended)” option and click on it.
Step 5: Finally, turn off the toggle switch for “No protection”.
Solution 3: Clear DNS Host Cache
To clear the DNS host cache in Windows 11, follow these steps:
Step 1: Open the Command Prompt as an administrator. You can do this by pressing the Windows key + X and selecting “Command Prompt (Admin)” from the menu.
Step 2: In the Command Prompt window, type the following command: ipconfig /flushdns and hit Enter.
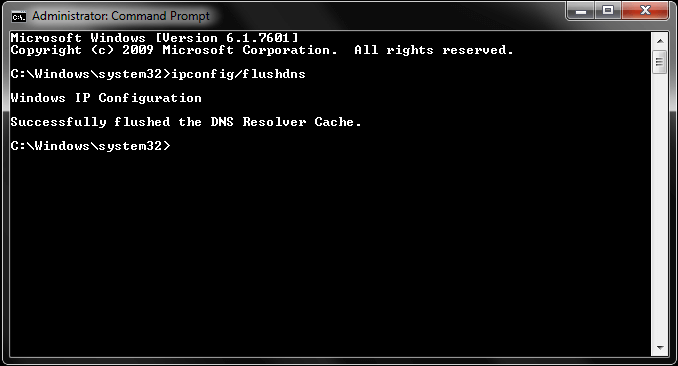
Step 3: You should see a message that says “Successfully flushed the DNS Resolver Cache.”
Close the Command Prompt window, reboot your device, and check if the issue was resolved.
Also read: How To Record Browser Window In Google Chrome
Solution 4: Install the Web Server Extension
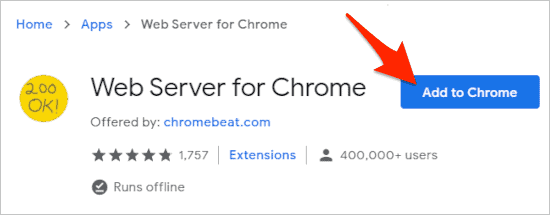
The Web Server for Chrome extension is a popular Chrome extension that allows users to easily set up a local web server on their machine, enabling them to serve web pages and files to other devices on their local network. This extension is free and can be easily downloaded from the Chrome Web Store.
You can install the Web Server for Chrome extension on your Chrome browser by following these steps:
Step 1: Open the Chrome Web Store by typing “chrome.google.com/webstore” into the address bar.
Step 2: In the search bar at the top of the page, type “Web Server for Chrome” and press Enter.
Step 3: In the search results, locate the “Web Server for Chrome” extension and click on it.
Step 4: On the extension page, click on the “Add to Chrome” button.
Step 5: A pop-up window will appear. Click on “Add Extension” to confirm the installation.
Step 6: Once the installation is complete, the Web Server for Chrome icon will appear in the top right corner of your browser window.
After adding this extension to your Chrome browser, you will be able to resolve the “Chrome not allowed to load local resource” error on Windows 11.
Also read: How To Use Memory Saver & Energy Saver in Google Chrome?
Solution 5: Clear Chrome’s Browsing Data and Cache
Here comes another simple solution to get rid of the error. You can clear Chrome’s browsing data and cache by following these steps:
Step 1: Open the Chrome browser on your computer and click on the three dots in the top right corner of the browser window to open the Chrome menu.
Step 2: Hover over the “More tools” option in the dropdown menu.

Step 3: Click on “Clear browsing data” in the sub-menu that appears.
Step 4: In the pop-up window, select the time range for which you want to clear the browsing data. You can choose to clear data from the past hour, day, week, month, or all time.
Step 5: Check the boxes next to the types of data you want to clear. This can include browsing history, cookies, cached images and files, and more.
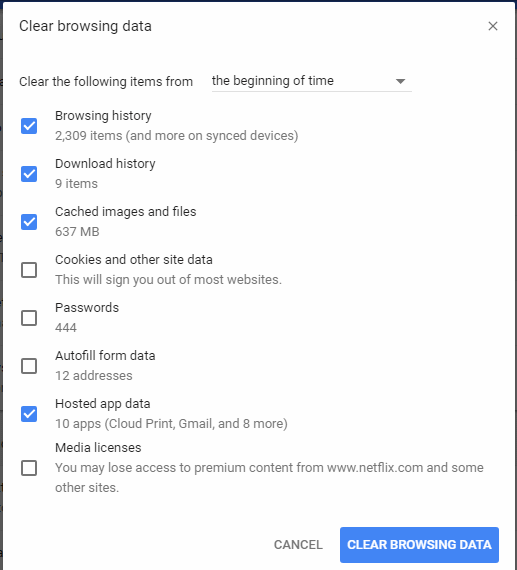
Step 6:Click on “Clear data” to confirm and initiate the clearing process.
The process may take a few moments, depending on the amount of data being cleared. Once the process is complete, the browsing data and cache will be cleared from your Chrome browser.
Also read: “A Profile Error Occurred” on Google Chrome? Try These Solutions
Conclusion
This wraps up our guide on how to fix the “Chrome not allowed to load local resource” error on Windows 11. From clearing your browser cache and data to adjusting your DNS settings, disabling security settings, or using the Web Server for Chrome extension, there are various options to try. By following the steps outlined in this blog, you should be able to fix the error and get back to browsing with ease. Remember to always exercise caution when making changes to your device’s settings and to seek help from a professional if needed.
Was this post helpful? Feel free to share your thoughts in the comments box!