
Have you ever opened the Task Manager in Windows and noticed that the disk usage is stuck at 100%? Or is your PC is using 100% disk space? This can be a frustrating issue as it can cause your computer to run slow and become unresponsive. Both Windows 10 and Windows 11 suffer from this issue. However, there are a few steps you can try to fix the problem.
So without further ado, let’s get started with the possible causes behind this problem.
What does “System using 100% disk” means in Windows PC/Laptops?
In Windows, disk usage refers to the amount of data being read or written to the hard drive. When the disk usage is at 100%, it means that all the available resources are being used to transfer data to or from the hard drive. This can cause the computer to run slowly and become unresponsive.
Read Also: Windows 11’s Task Manager is soon going to get a Search Bar feature
Possible reasons behind 100% disk usage on Windows 10/11 systems
There are several possible reasons why your disk usage might be stuck at 100% on Windows 10 which are as follows
- Running too many programs at the same time: If you have a lot of programs running in the background, it can cause your disk usage to go up.
- Disk errors: Disk errors can cause high disk usage and may need to be fixed using the “chkdsk” command.
- Heavy system workload: If your PC is under a heavy workload, it can cause disk usage to go up.
- Insufficient RAM: If you don’t have enough RAM, your computer will use the hard drive as virtual memory, which can cause high disk usage.
- Superfetch service: The Superfetch service can cause high disk usage if it is not functioning correctly.
- Third-party applications/browsers: Third-party applications, such as Google Drive or Dropbox, can cause high disk usage if they are constantly syncing files.
- Hardware problems: In some cases, high disk usage may be caused by hardware problems, such as a failing hard drive.
Now, that you know what disk usage is and the causes behind 100% disk usage in Task Manager, let’s check out the remedies for the same.
Read Also: How To Fix Windows 10 Task Manager Not Responding
How To Fix 100% Disk Usage In Windows
1. Restart Your PC/Laptop
Restarting your laptop/PC generally has amazing results. A clean start will clear the RAM on your computer, which will eliminate all the temporary processes and data from slowing it down. Performance can be enhanced, and memory leaks can be closed up. All your PC needs may be a reboot to reduce high disk usage.
To do so tap on the Windows icon > choose Power > click on Restart.
![]()
2. Scan Your Hard Disk
Your HDD’s problematic sectors could be the source of Windows’s 100%-disk utilization problem. However, this can be fixed by employing Windows’ built-in Scan drive utility. To perform this follow the steps below:
- From your desktop, double-click on This PC to open it.
- Now right-click on your disk and select Properties.

- Tap on the Tools option from the top of the dialog window.
- Here click on Check.
- Now choose Scan drive.


The system will scan the drive while you wait; a reboot may also be necessary for a complete disk repair. This should fix the problem.
3. Disable Windows Search
Your computer’s files can be quickly searched with Windows Search. You can entirely shut it off if you never use it. To halt this process follow these steps:
- Right-click on the Windows icon from the Taskbar and choose Windows Terminal (Admin).
- Now enter the following command and hit the Enter key:

net.exe stop “Windows Search”

See whether your computer’s performance and disk consumption improve. If the answer is Yes, follow the instructions below to permanently stop Windows Search.
- Press the Windows key with the key R to open the Run dialog box.
- Now type services.msc and hit the enter key.
- Scroll down and locate Windows Search and double-click on it to open it.
- In the Windows Search properties window tap on the arrow down icon in the font of Startup type and choose Disabled.
- Now click on Apply and tap on OK to save the changes.


4. Disable Superfetch (SysMain)
The superfetch service has also been recognized as a potential contributor to the 100% disk usage problem in Windows 10. The name of this has changed to “SysMain” after 2018’s October Windows 10 update. To disable it follow the steps below:
- Right-click on the Windows icon from the Taskbar and choose Windows Terminal (Admin).
- Now enter the following command and hit the Enter key:

net.exe stop “Sysmain”

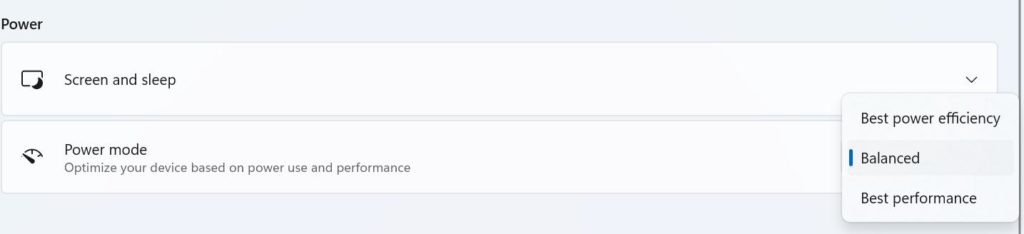
5. Change Energy Options
Shifting to high-performance mode frequently fixes the bug that causes Windows’ 100% disK consumption. Of course, this has the drawback of increasing your computer’s power consumption. Modern chip architecture should make this less of a problem. But even so,battery life can suffer on notebooks and laptops.
- Right-click on the Windows icon from the Taskbar and choose Power Options.
- Press the drop-down arrow icon in front of Power mode and then tap on the Best performance option. Restart your PC and check if the disk utilization is reduced.

 Restart your PC and check if the disk utilization is reduced.
6. Perform A Disk Check
If none of the aforementioned fixes work, you need to check your hard disk for unwanted files. Disk Analyzer Pro, is an amazing app that we recommend which will help to analyze all the files on your hard disk. Once the files are sorted into various categories, you can easily check them and delete the unwanted files.
- Download the Disk Analyzer Pro and install it on your laptop or PC.
- Then select the disk you want to scan and click Start Scan.
- Your files’ categorization into several categories will be shown in the program window once the inspection is finished.
- You can view any category by double-clicking it. A list of the files will show up in a new window.
- There will be a new window that shows file names as well as details like file type, size, and location.
- To delete or open a file, simply click on it.


Read Also: How To Fix Windows 10 Temporary Files Not Deleting?
To Wrap This Up
So, these were some fixes you can try if you are facing a disk stuck at 100% in Windows Task manager. You can check each one individually and I hope they’re useful.
And if you know any other methods to fix this then let us know in the comments below.
Have you got any queries or suggestions about this topic? Please feel free to discuss them in the section below. And for more such troubleshooting guides and tips & tricks related to Windows, Android, iOS, and macOS, follow us on Facebook, Instagram, and YouTube