
Each version of the Windows OS comes with an antivirus application from Microsoft. Since its debut in 2006, Microsoft Defender has been an essential component of all versions of the Windows operating system. Unexpectedly, it is effective in locating and containing malware on your system and providing real-time security.
But what if you wish to use another antivirus software from a third party? Even if you turn off real-time protection, it eventually comes back on. Not to worry! We’ll go over several techniques to permanently disable Microsoft Defender.
Also Read: Why Should You Stop Using Microsoft Defender?
| Turn Off Tamper Protection.
Before you attempt to permanently disable the Microsoft Defender, you need to disable the Tamper Protection option. This feature was put in place to prevent other apps from making any changes to the settings of Microsoft Defender. Here are the steps to disable it: Step 1: Press Win + S to open the search box and type Windows Security followed by Enter key. Step 2: Locate the Virus and threat protection option and click on it. Step 3: Next, click on the Manage settings. Step 4: Locate the Tamper Protection option and disable the toggle button under it. Step 5: Exit The Windows Security app. |
Also Read: How To Fix A Failed Microsoft Defender Update
How To Permanently Disable Microsoft Defender In Windows 11
Tamper Protection has already been deactivated, therefore, using GPE, Registry Editor, or any other third-party tool to disable Microsoft Defender won’t cause any issues. The following techniques for disabling Windows 11’s built-in security software are guaranteed to be effective:
Also Read: How To Fix Microsoft Defender Error 1297 On Windows 11/10
Method 1: Switch off Microsoft Defender Via Group Policy Editor
A great application for easily customizing Windows settings is Group Policy Editor. It is restricted to Windows Pro and Enterprise users exclusively, though. If you’re using Windows Home, look into how to get to the Group Policy Editor. To disable Microsoft Defender using Group Policy Editor, follow these steps:
Step 1: In order to open the Run command box, press Win + R. In the text input box, type gpedit.msc and hit Enter.
Step 2: That will open Group Policy Editor. On the home page, select the Computer Configuration option.
Step 3: Open Administrative Templates -> Windows Components.
Step 4: Locate and double-click on the Turn off Microsoft Defender Antivirus policy.
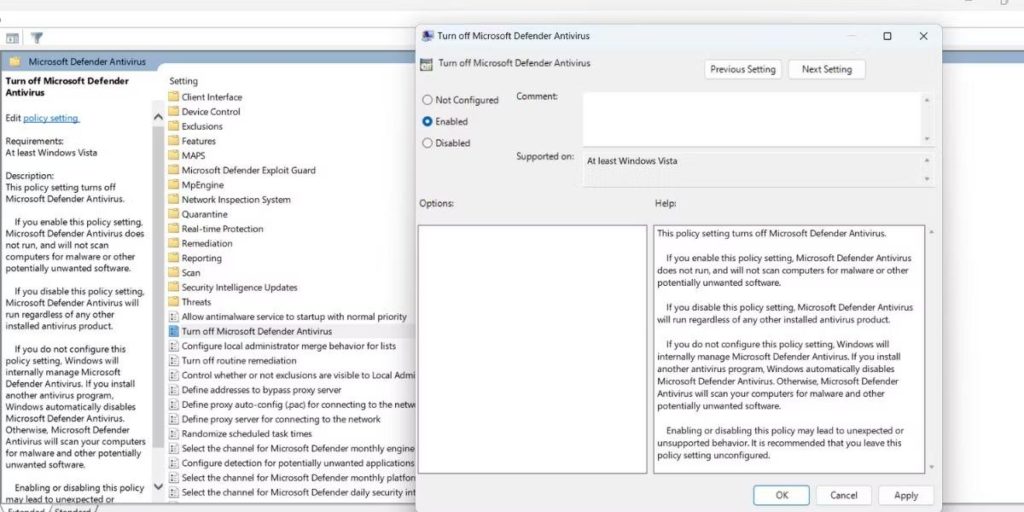
Step 5: Click on the Enabled radio button.
Step 6: Click the Apply button
Step 7: Finally, press OK to finish closing the Group Policy Editor.
Step 8: Reboot Your PC.
Also Read: How Do You Enable Microsoft Defender Application Guard
Method 2: Switch Off Microsoft Defender Via Registry Editor
Users of Windows 11 Home are unable to access the Group Policy Editor. But you can modify the registry to make Microsoft Defender inactive on your computer. Therefore, remember to create a registry backup and a system restore point before performing any modifications. In this manner, any registry modifications you make can always be undone.
Step 1: Press Win + R to open the RUN box and type Regedit.
Step 2: Click on the Yes button if you get a prompt window.
Step 3: Go to the address bar in the Registry Editor windows and paste the following path:
Computer\HKEY_LOCAL_MACHINE\SOFTWARE\Policies\Microsoft\Microsoft Defender
Step 4: Right-click, then choose New -> DWORD (32-bit) Value.
Step 5: Name the newly formed DWORD (32-bit) Value as DisableAntiSpyware.
Step 6: Now double-click on this key and change the Value data to 1.
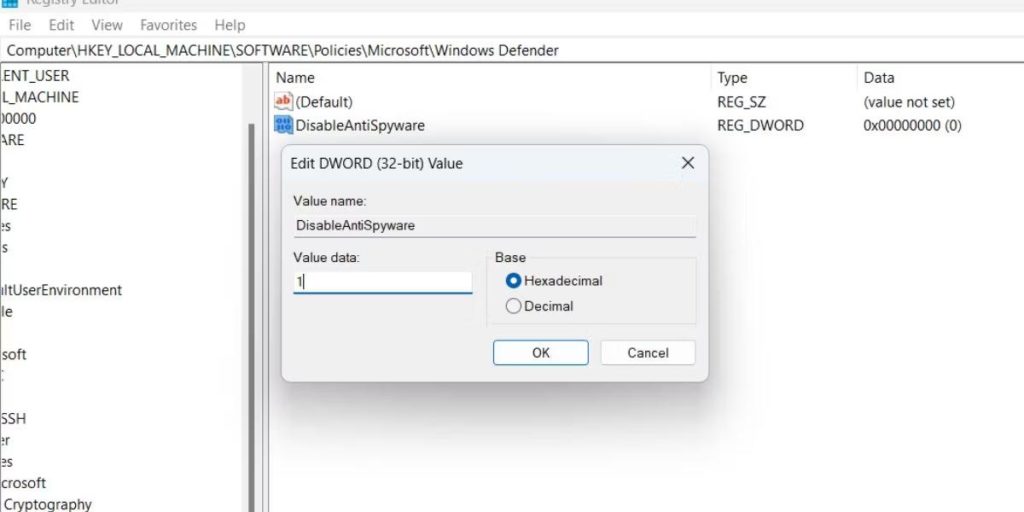
Step 7: Exit the Registry and Reboot your PC.
Step 8: To confirm that Microsoft Defender has been disabled, you will get a message “No active antivirus provider. Your device is vulnerable”.
Also Read: How To Enable Microsoft Defender’s Limited Periodic Scanning
Method 3: Switch off Microsoft Defender Via CMD
Even the Command Prompt app can be used to turn off Microsoft Defender. All you have to do to disable Microsoft’s built-in antivirus program is paste a registry change instruction. Here is how you do it:
Step 1: In order to open the Run command box, press Win + R.
Step 2: To open Command Prompt with administrator permissions, type cmd in the text input field and click Ctrl + Shift + Enter.
Step 3: Next, enter by typing the instruction that follows:
reg add "HKEY_LOCAL_MACHINE\SOFTWARE\Policies\Microsoft\Microsoft Defender" /v DisableAntiSpyware /t REG_DWORD /d 1 /f
Step 4: After the aforementioned command has been successfully executed, a notice stating “The operation completed successfully.” will appear.
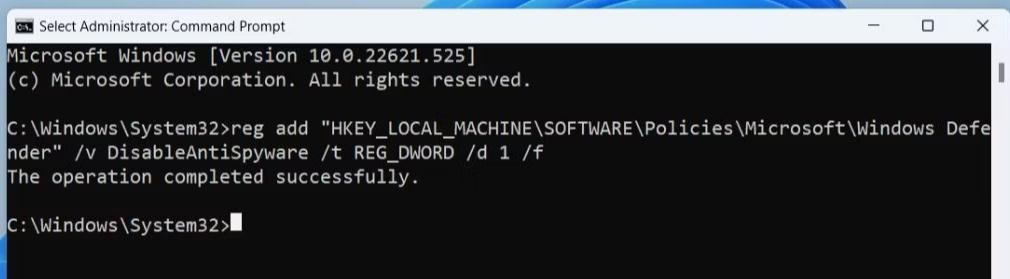
Step 5: To dismiss the Command Prompt window, type exit.
Step 6: Reboot Your PC.
Your Thoughts On How To Permanently Disable Microsoft Defender In Windows 11
Many fail-safe mechanisms that are integrated into Windows Security make it difficult to disable Microsoft Defender on your PC. So, turn off Tamper Protection before using a technique to turn off Microsoft Defender. However, if you don’t like Defender, use a different antivirus program to prevent malware from infecting your PC.
Please let us know in the comments below if you have any questions or recommendations. We would be delighted to provide you with a resolution. We frequently publish advice, tricks, and solutions to common tech-related problems. You can also find us on Facebook, Twitter, YouTube, Instagram, Flipboard, and Pinterest.
Related Topics-
- Is Windows Defender Missing On Windows 11? How To Get It Back!
- How to Remove Windows Defender Security Warning Scam
- How To Fix Windows Defender Offline Scan Not Working
- How To Clear The Windows Defender Protection History On PC
- How To Use Microsoft Safety Scanner To Scan For Malware?
- What To Do If Windows Defender Keeps Saying Threats Found
- How To Fix “You’ll need a new app to open this windowsdefender link” Error