
Remote assistance is a wonderful service which could help you manage your computer remotely. Remote Assistance enables anyone to access your computer with your login ID and password. If you are having issues with your system, want to provide access to technician to get it resolved. Also, you can provide access to a family member, in case needed. However, you are not using Remote Assistance service, it is recommended to disable the service as it could make your system vulnerable.
In this post, we have listed steps how to enable or disable remote assistance in Windows 10.
Step to Enable & Disable Remote Assistance in Windows 10
Follow the steps to enable & disable remote assistance in Windows 10.
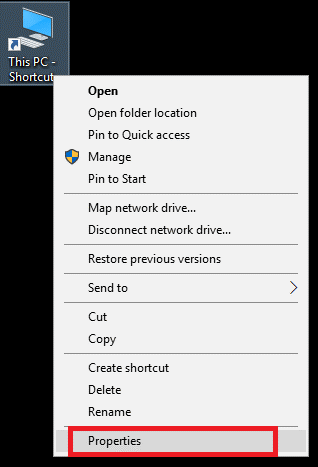
Step 1: Go to My PC and then right-click on My PC icon.
Step 2: Choose Properties.
Step 3: Now, you need to select the second option Remote settings which is located at the left pane of the window.
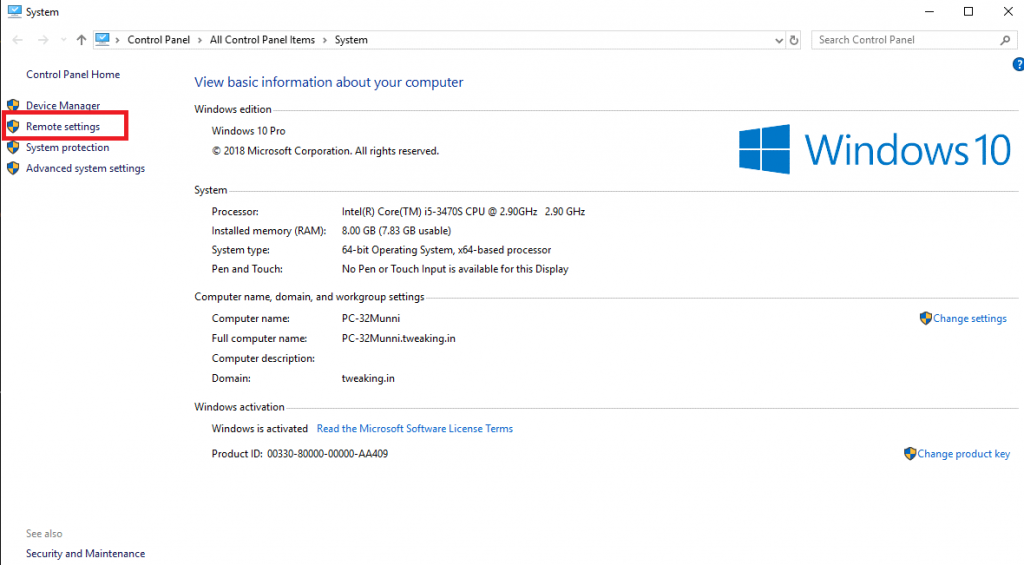
Note: You can go to Control Panel > System and Security > System and then Remote settings.
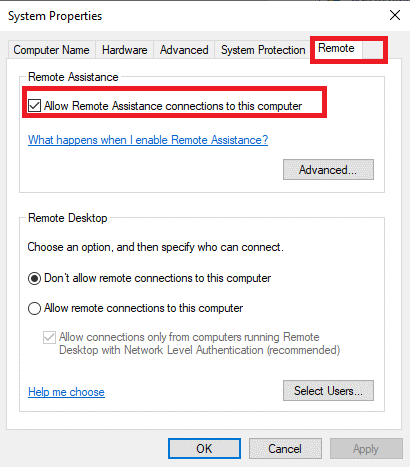
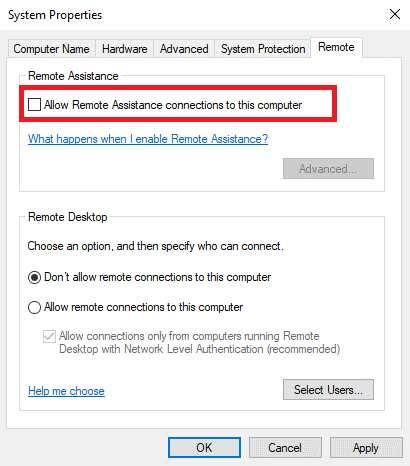
Step 4: In the System Properties, you need to select the Remote.
Step 5: Checkmark the box beside “Allow Remote Assistance connections to this computer”. Ignore if its already checked.
Step 6: Choose Advanced tab.
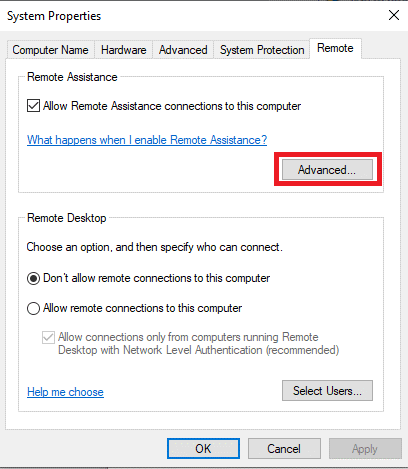
Step 7: if you will remove the checkmark from “Allow this computer to be controlled remotely” then the technician will be able to see your screen but not have the capability to control over the screen.
Step 8: Once you’re done, you need to hit Ok to save the new changes.
If you want to disable remote assistance in Windows 10, then all you need to do is, you need to uncheck the box beside “Allow Remote Assistance connections to this computer”.
Enable Remote Assistance with Registry Editor
It is possible to enable remote assistance using the registry editor. Moreover, it is the smoothest way to give the control of your computer to fix your computer using the help of remote support.
Step 1: Firstly, you need to access your Registry Editor and then you need to browse “HKEY_LOCAL_MACHINE\SYSTEM\CurrentControlSet\Control\Remote Assistance” registry key.
Step 2: Now, you need to double click the DWORD entry fAllowToGetHelp from the right side of the window.
Step 3: You need to modify the value data to 1.
In case, you want to disable Remote Assistance then you need to modify the value from 1 to zero. Please keep in mind when you want to allow the technician for assisting you then you need to give the complete control of your machine.
However, as soon as you are done, you can change the value to the previous and protect your data.
Step 4: Close the Registry Editor when you are done making the changes.
Use Firewall to enable Remote Assistance
In order to use the firewall to enable Remote Assistance, you need to follow the below steps:
Step 1: Type Command Prompt in the Search box which is available next to the Start button.
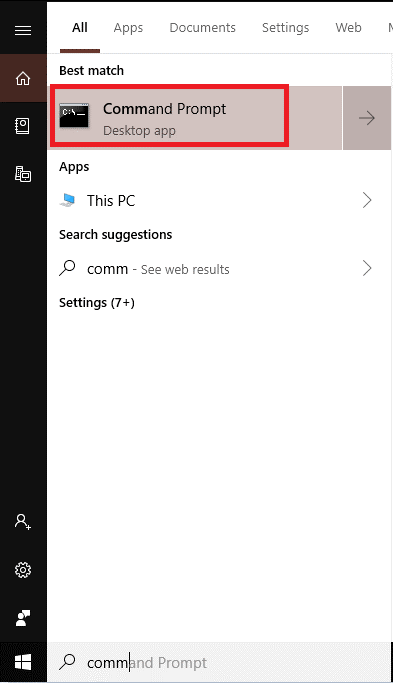
Step 2: Copy paste the “netsh advfirewall firewall set rule group=”remote assistance” new enable=Yes1”.
Step 3: That’s it you are done now.
So, you have learned the steps to enable & disable remote assistance in Windows 10. As precaution is better than cure, you can always change the setting according to your requirements and ensure the security of your computer. In case, you can get any issue while performing the above steps then let us know in the comment below.