
If you wish to record your PowerPoint presentation in a video clip along with audio, then you have come to the right place. This task can be achieved by using Advanced Screen Recorder, an amazing app to record your PC screen with voice. You can choose to record the original audio in the presentation or use a mic and record your voice while the presentation is being displayed and recorded on your PC. This helps many professionals to record PowerPoint presentations and send them to be viewed instead of personally visiting every place and delivering the presentation in person.
How To Record PowerPoint Presentations With Audio?
Disclaimer: Recording and/or sharing Streaming Video from any service may violate the terms of your agreement. Please refer to the Terms of Use before using this service.
Step 1: Click the button below to download and install the application.

Step 2: After the application has been installed, register it with the key that was emailed to you following your purchase.
Step 3: Once you’ve completed the registration process, your application will be available to use.
Step 4: Now that the App UI has loaded, there are a few things to do before you start recording.
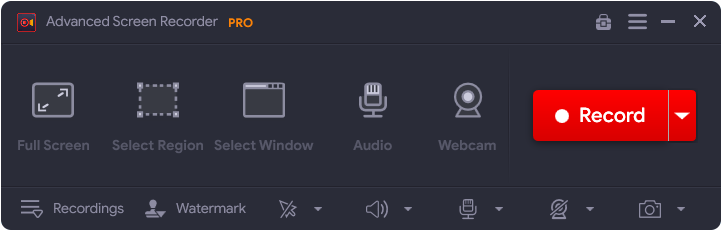
Step 5: Click the Watermark option to choose the type of watermark you want. You can use the Default Watermark, No Watermark, or generate a new one every time you record a video.
Step 6: The state of the Mouse Pointer during the recording is the procedure’s next step. Click the Arrow icon next to the Watermark area in the app’s lower half. You have the option of showing or hiding the mouse pointer and clicking.
Step 7: Click the Microphone Button to select the audio source. Choose Microphone if you want to make a lesson video; Default Recording Device if you want to record the audio on your computer.
Step 8: Finally, select one of the four-screen recording options.
Full Screen: This captures the complete screen of your computer.
Select Region: With this option, users can record only a region of their desktop screen, and only that portion will be recorded.
Select a window to record activity in: The user can select a single application or OS window to record activity in, and the activity will be recorded just in that window.
Webcam: You may use your webcam to record anything that is being streamed on your screen.
Step 9: To record your PowerPoint slide when presenting, select Full Screen Mode.
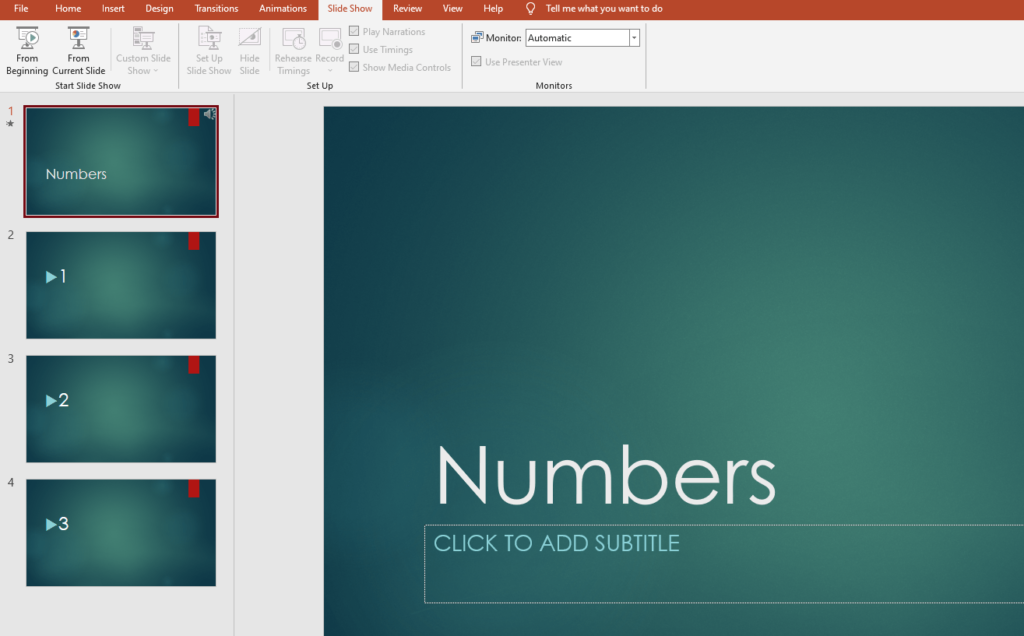
Step 10: Open the PowerPoint slide and check if everything is in order.
Step 11: Press the F5 button to begin the Slideshow.
Step 12: Press the Record Button after selecting a recording mode. In the lower right corner, a new window with basic controls such as Pause, Stop, Time Duration, and Screenshot option will display.

Step 13: In the mini tray, click the red square to stop recording. Stopping the recording can also be done with the F9 key.
Step 14: When the recording is finished, go to the hamburger menu in the upper right corner of the screen and select Open Recording Folder.
Step 15: A new File Explorer window with all of your screenshots and screen recordings will open.
Step 16: While the program is open, press F11 on the keyboard to snap a screenshot.
Important: If you’re still seeing black screens, make sure the hardware acceleration setting on your Google Chrome and Edge browsers is turned off before recording. You can alternatively use Mozilla Firefox, which currently does not appear to offer this feature. By heading to Chrome’s settings and searching for Hardware Acceleration in the Settings Tab’s search box, you may disable this feature.
Advanced Screen Recorder: Screen Recorder With All Features

Advanced Screen Recorder is the best way to record your screen in high-definition (HD) with audio. This is an excellent and powerful screen recorder with easy-to-use controls. It has great and advanced screen recording features that are uncommon, and it can be used by anyone, whether a novice or an expert. You can record noises from the screen, system, or microphone using the simple user interface, and you can start, pause, or stop recording at any moment.
- With this application installed on their computer, users can record the full screen, a specified region, or a specific window with or without sound.
- Create a watermark and add it to screen recordings to personalize your video recordings.
- Record footage from a camera or use a webcam overlay to create a personal video.
- During or after recording, capture a single window, region, selected window, or scrolling window.
- Record audio from the system as well as a voice-over, either simultaneously or independently, using a microphone.
The Final Word On How To Record PowerPoint Presentations With Audio?
Advanced Screen Recorder is an excellent program for taking screenshots and recording your computer screen. This can be used to record online meetings, webinars, and virtually anything else that appears on your screen. On a Windows PC, it can also be used to take screenshots. Advanced Screen Recorder is a must-have utility for your PC, with features like recording games, streaming videos, and recording remote desktop sessions.
Follow us on social media – Facebook, Instagram, and YouTube. For any queries or suggestions, please let us know in the comments section below. We would love to get back to you with a solution. We regularly post tips and tricks, along with answers to common issues related to technology.