
One of the best features offered by Windows 10 to provide additional protection is a password expiration policy. Though, most users don’t know about this feature as it comes disabled by default. But once it is enabled and Windows sends a message “Your password has expired and must be changed,” which raises your eyebrows and some of us panic and reaches out to Microsoft Windows support for a solution.
However, there is nothing to worry, as password expiration policy is a feature offered by Windows 10, that can be easily disabled. Here we have mentioned 4 ways to disable password expiration notification in Windows 10.
4 ways to disable password expiration notification in Windows 10 are as follows:
Way 1: Using Computer Management
To disable password expiration notification in Windows 10 using Computer Management follow steps explained below:
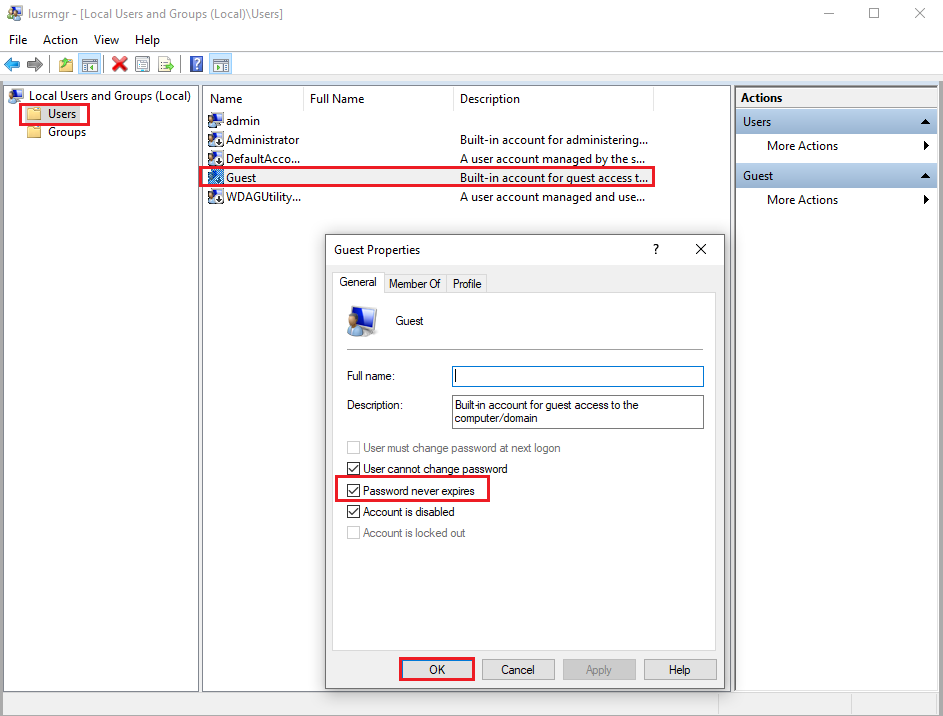
- Open Computer Management by right-clicking on My PC < Manage.

- Here, under Computer Management window look for Local Users and Groups.
- Next in the right pane double click on Users > select your user account and double click on it.
- Now, check mark the box next to Password never expires. Click Apply and OK to disable Windows 10 password expiration.


To re-enable password expiration notification in Windows 10 follow the above-mentioned steps and instead of checking the box, uncheck Password Never Expires, click Apply > OK.
 Top 15+ Best PC Software For New Windows...Looking for the best free PC software for your system? We’ve rounded up the greatest Windows 10 apps that are...
Way 2: Disabling Windows 10 password expiration via netplwiz
- Open Run window by pressing Windows + R keys. Here type netplwiz and press Enter.
- This will open User Accounts
- Here click on Advanced tab > then Advanced button. You will find it under Advanced user management.
- Next, double click on Users in the right pane, select user account.
- Here, in the new window then open under General tab check the box next to Password never expires. Then click Apply > OK.


 Windows 10 Keyboard Shortcuts That You Could Use!In this blog post, we share a list of Windows 10 keyboard shortcuts with you. Using them will give the...
Way 3: Disabling Windows 10 password expiration via Command Prompt
If you are using Windows 10 Home, you’ll need to disable Windows 10 password expiration via Command Prompt. To do so, follow the steps below:
- Open elevated Command Prompt i.e. run Command Prompt as Administrator.
- Next, to disable password expiration for your user account type: wmic UserAccount where Name=’your account name’ set PasswordExpires=False and press Enter to run the command.
Note: Remember to enter your user name in place of ‘your account name.’

This way you’ll be able to disable password expiration for your user account.
Note: To disable password expiration for all user account you’ll need to type: wmic UserAccount set PasswordExpires=False, and press Enter.
To enable password expiration via Command Prompt type: UserAccount where Name=’your account name’, set PasswordExpires=False, and press Enter.
 How to Recover Permanently Deleted Files in Windows...Do you want to recover permanently deleted files in windows 10? Well, you can restore your lost files, photos, videos...
Way 4: Modifying Windows 10 password expiration time
You set a limit on number of days after which your Windows 10 password should expire.
To set password expiration time on Windows 10 follow the steps below:
- Open Run window by pressing Windows+R.
- Here type gpedit.msc and press Enter. This will open Local Group Policy Editor.
- Under Local Group Policy Editor windows navigate to Computer Configuration\Windows Settings\Security Settings.
- Now, in the right pane double click on Password Policy.
- Next double-click Maximum password age and Minimum password age to edit password expiration time in Windows 10.
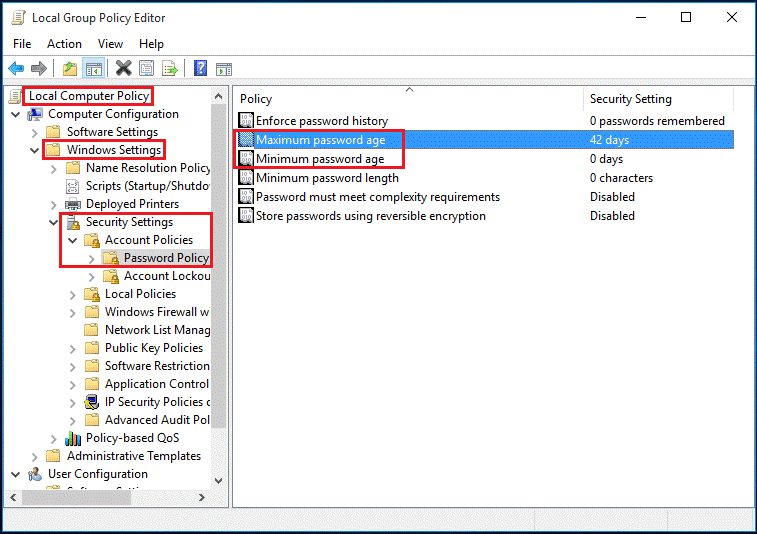
This way you will be able to set maximum and minimum password age for a password set on Windows 10.
Most of us head to Microsoft Windows support for when face problems with Windows 10. Here we have compiled answers for most common Windows 10 problems found at Microsoft Windows support. We hope using the ways explained above you were able to Disable Password Expiration Notification on Windows 10. Please leave your feedback in comments section below.
Joey Smith
Does not work for Windows 10 HomeDheeraj Manghnani
Hi Joey, If you are using the Windows 10 Home then you need to use the Command Prompt in an Elevated Mode or as an Administrator and then try out the steps.RInoa
If you get an error about unacceptable command, you should edit query like “name=’user'” with two types of quotes.Mridula Nimawat
Thank you for sharing.