
Finally, after a long wait of almost 14 years Google has revamped Gmail. But this time it isn’t just about the cosmetic changes. It has added new privacy and business features too. Users for a long time were looking for these features.
Using these features now users can access mail without Internet connection and can send mails in Confidential mode.
Earlier, a separate Google Chrome app or extension was required to access offline email. However, with this new feature, an extra app is no longer required.
Some users may not be able to use the feature as the service is still in the process of being rolled out. If you are few of those who hasn’t received the update yet, you can access the feature via Chrome desktop browser (version 61). Users will now be able to create, view, and delete emails offline. Plus they can also search for an email from the inbox. All the activities performed offline will automatically be synced once you are online.
To enable and use the Offline feature on Gmail, follow the steps explained below:
Step 1: Make sure you have the Latest Version of Gmail Running
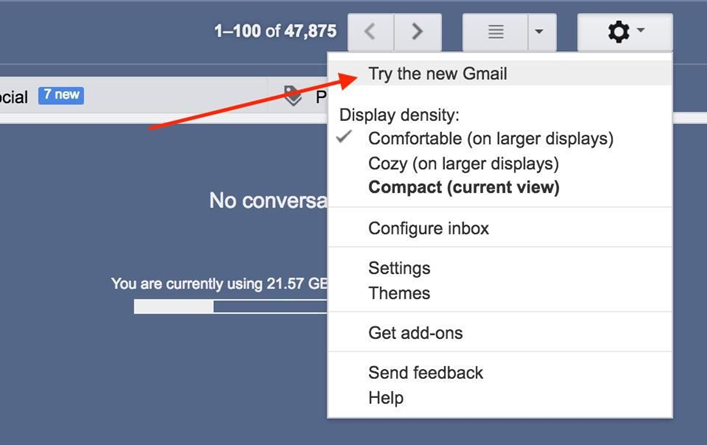
You need to check if you are using latest version of Gmail. Many users have received notification to switch to the latest version. However, if you haven’t received any yet, you need to check if it is available for you. To do so, open Gmail > click on the Gear icon > here you will be able to see the option “Try the new Gmail.” Click on it to start using the latest version.
However, if you don’t see this option you can use Chrome desktop browser version 61.
Step 2: Remove Offline Data
Next, you need to remove offline data before enabling the offline mode. To do so, follow the steps below:
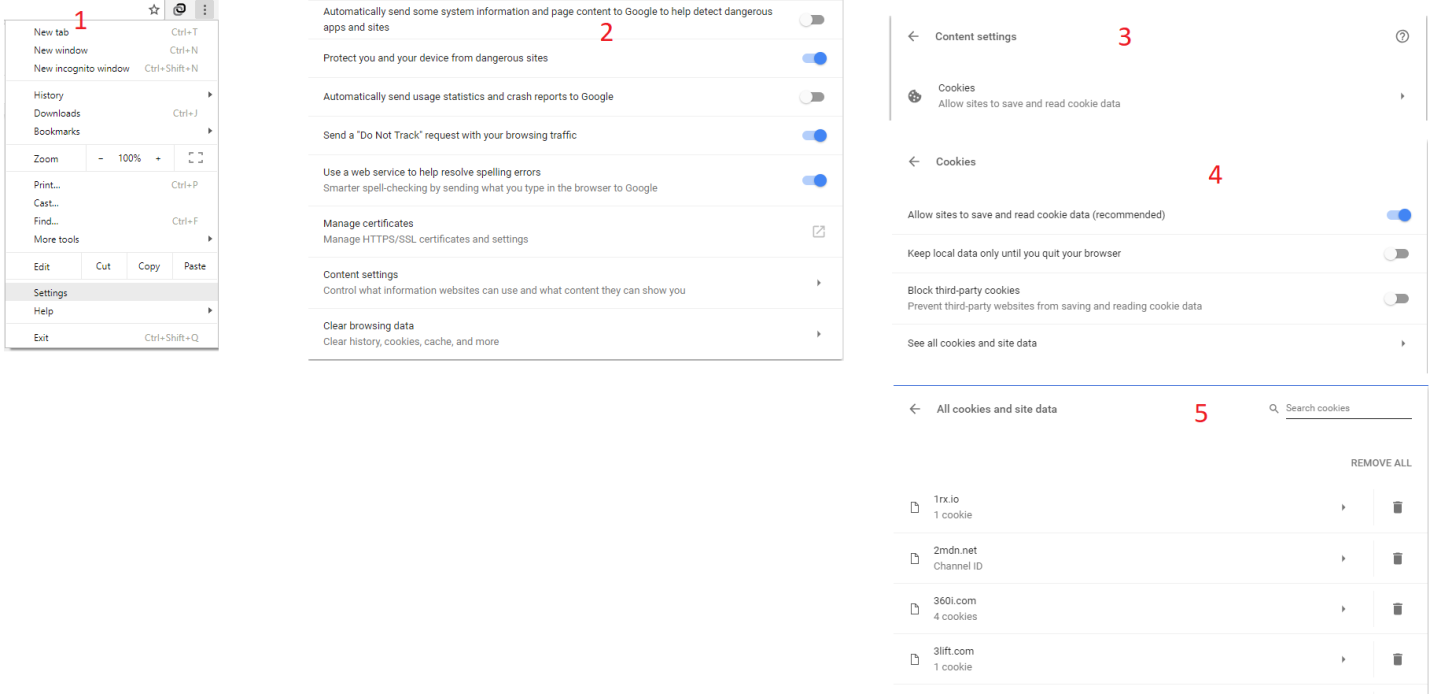
- Click on the three dots at the top right corner of your browser to open Settings window.
- Here, scroll down and click on “Advanced” at the bottom of Settings.
- Next, click on “Content settings” > Cookies.
- In the new window that opens click on “See all cookies and site data”.
- Next in the new window that opens click on “Remove all” button.
This way you will be able to delete all the offline data.
Step 3: Enable Offline Feature
Once offline data is removed, go to offline section of Gmail settings, and choose the option “enable offline mail.” If latest version of Gmail isn’t running you will see the option as Install Gmail Offline.
Enable offline mail option to start accessing mail while you are offline.
Here you will be able to see few sections – storage, sync settings and security.
Storage section displays the amount of space used for offline mail on your system. The size will vary based on your hard disk storage space.
Sync settings section provided with the option to see mails from 7, 30 or 90 days along with the attachments.
Security section seeks your permission whether you want to store offline data on system or want to delete it.
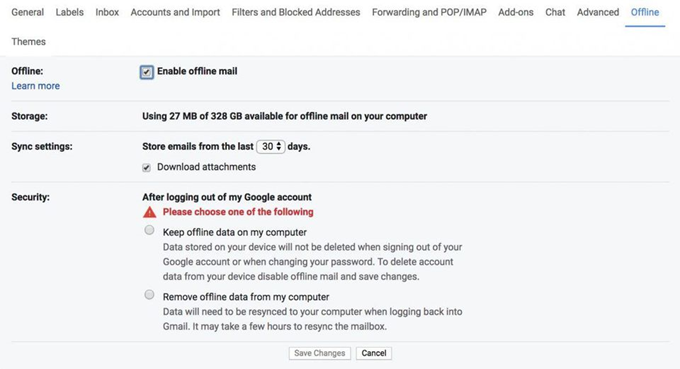
Plus under Security section you will see two options: “Keep offline data on my computer” and “Remove offline data from my computer”. Select that as per your choice.
If you select “Keep offline data on my computer,” data stored on your device will not be deleted once you logout from Gmail or change the password. However, if you wish to delete account data from the PC you will need to deactivate offline mail.
If you select “Remove offline data from my computer,” you will need to resync data at each login.
To keep data in sync while using offline mode, keep Gmail running on the system on Chrome browser that is connected to Internet. This will help to send the mails that are saved in Outbox when you were offline.
Using these steps you will be able to access your Gmail mail offline.
Now, let’s know about the other game changing feature and what it has for us. The feature is known as Confidential Mode. For those who are privacy centric this feature works wonders because with Confidential Mode, you can compose and send mails with an expiry date.
This means, if you don’t want a message to stay in receivers inbox for an infinite time you can set an expiry date, after which the message will self destruct.
Note: If you are using this feature for the first time you will need to use Chrome browser as the feature will not be visible in Firefox. After you have used Gmail in Chrome browser you can then see it in Firefox browser too.
How to use Confidential Mode
- Open Gmail and start composing an email.
- At the bottom of the compose mail window you’ll be able to see a small lock on which there is a clock.

The Confidential Mode icon is ready - Click on it to use Confidential Mode.
- Once you do so, a new pop up window will open, here you can set expiry date and other settings for the message.

Note: This feature works on pre-email basis therefore, you need to configure the settings each time you want to send a message with an expiry time.
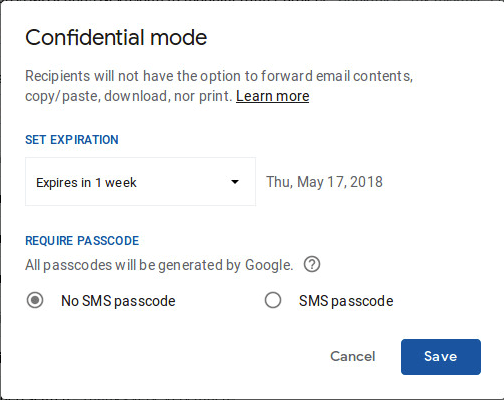
- Now, set the expiry date.
- Once done configure the passcode. You can choose any of the two options available:
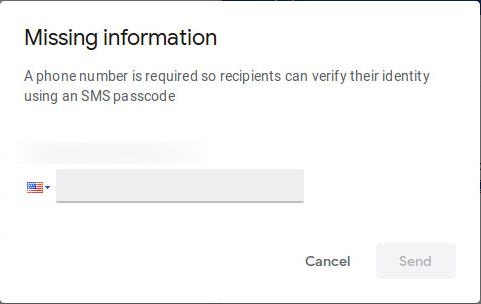
- SMS passcode: Without the passcode sent via text receiver will not be able to view the email.
- No SMS passcode: Passcode is not mandate to access the email.
Now, complete writing the message and Send. If SMS passcode option is selected, a pop up window will appear. Here you need to provide a phone number where the passcode will be delivered.
Note: SMS passcode expires after five minutes.
Figure C

Alternatively, if you select No SMS passcode option, anyone who has access to recipient’s email can view it.
Note: If you want that only the concerned person can read your mail then select SMS Passcode option.
And this is all your Confidential Mode in now configure, you can send an email with an expiry date.