
Computers and connectivity through them have already been in process since ages now. And with the growing use of Mac computers, whether in home or workplace, the demands related to the its functions have hiked up as well. One such question that has gone common now is about screen sharing on Mac.
Whether you wish to connect a remote Mac desktop, or your boss needs to see it immediately from his cabin, all you need to do is change a few settings and let the system run smoothly the way it was going till now.
Method 1: Using System Preferences
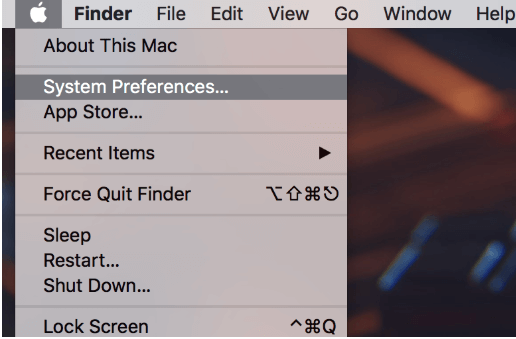
Step 1: To apply the method in order to see the remote Mac desktop or Windows, check out the Apple icon on the left corner side of the screen. Once you click over it, you will find an option of ‘System Preferences’.
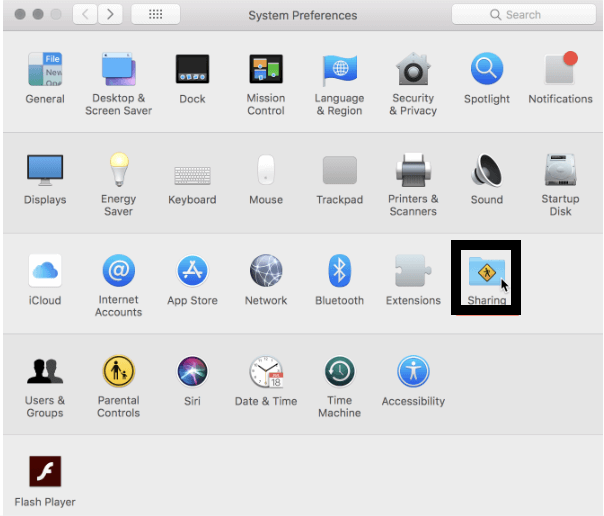
Step 2: As you click it, a window will pop up where you have to select ‘Sharing’ block.
 10 Best Mac Cleaner Apps & Optimization Software...Checkout the list of best Mac cleaner software for complete mac disk cleanup. Optimization apps like SmartMacCare, CleanMyMac & Ccleaner...
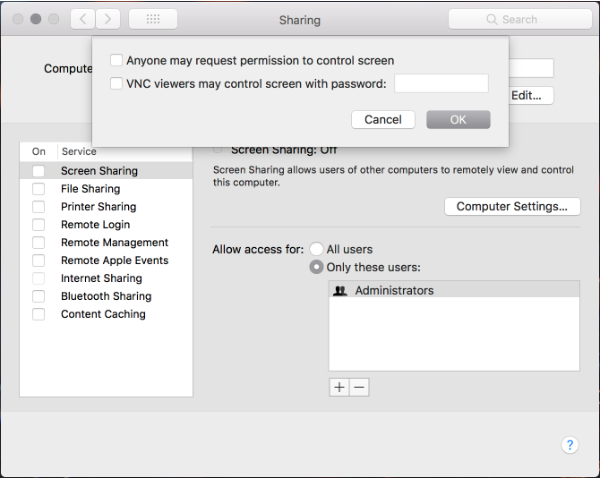
Step 3: Click the option, find Screen Sharing in the left scroll under the ‘Service’ list. The window will look something like the picture below.
You can choose the service on and customize it by picking the option ‘Allow access for’. Choose the users or send access to all, as per the requirement, using ‘+’ sign to add and ‘-’ to remove.

Step 4: If you are willing to make some more changes, you need to check the Computer Settings on the right-hand side of the block. Once you click it, you will be able to find another blow-up where security passwords can also be made.
Step 5: Once you tick mark the Screen Sharing block under ‘Service’ list, you need to copy “vnc://IP Address/” into your browser. This action will take you to a separate Virtual Network Computing or VNC window where you can confirm the IP address.
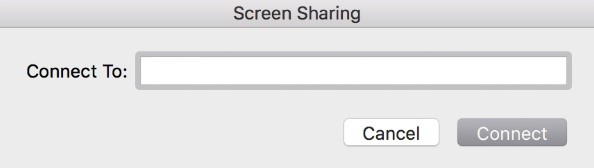
Step 6: After writing the IP address and press Connect below. After the same, you will be able to connect with the other computer.
Note that once you are connected, you can use ‘Control’ for viewing option, ‘Scaling’ to set the size of the window and handle the ’Display’ according to which you want your device to be viewed.
Method 2: Using iMessage
Through this method, you have to reach the ‘Messages’ app on macOS from where you can connect the one who is also using an Apple ID.
Note that the other user connected through the pop-up window can also access your desktop by requesting access. Make sure that you provide it to the one you trust only.
Step 1: Once you click the ‘Messages’ app, select ‘Preferences’. Make sure you are logged in to your Apple ID.
Step 2: Begin the chat with the one whom you are willing to share the screen. Where the name is written, click ‘Details’ beside it (From the top right corner of the window)
Step 3: Choose the Screen sharing button where you can pick ‘Invite to share my screen’ or ‘Ask to share screen’ to connect accordingly.
Conclusion:
The methods described above are applicable without downloading any third-party software. Hence, there are other options available as well for screen sharing on Mac to be discussed soon. If you are willing to remote access Mac from your own, Method 2 will surely be the best and easiest call. For all other addresses other than Mac, Method 1 is definitely applicable.