Blog Summary: To fix the problem, the user can either upgrade their hardware to meet the system requirements or adjust some settings or drivers to make their device appear as supported. If you don’t want to spend any penny in upgrading the hardware, then you can try the following methods to get rid of the annoying “System Requirements Not Met” watermark.
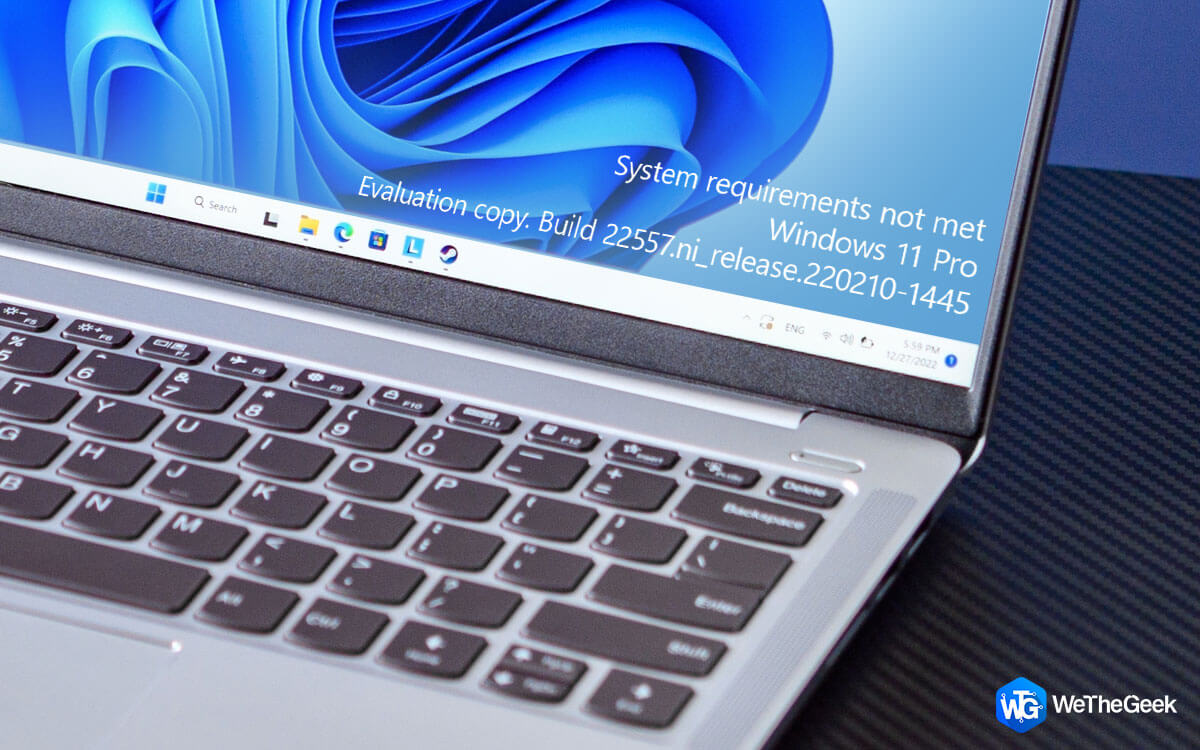
When utilizing unsupported hardware to run Windows 11, it will display a “System requirement not met” watermark in the bottom left corner of your screen. While this may not be an issue for those using the OS in a virtual machine, the watermark can be quite noticeable & annoying for the majority of users. Fortunately, you can get rid of the “System requirements not met” watermark through a registry hack and making changes in the Group Policy Editor.
What Prompts the Display of the “System Requirements Not Met” Watermark on Windows 11?
Microsoft’s Windows 11 imposes more stringent hardware requirements compared to its predecessors. If your system falls to meet the minimum criteria, which includes the necessity of TPM 2.0, the installation process comes to an abrupt halt.
However, a multitude of workarounds have emerged to bypass these restrictions, enabling the installation of Windows 11 on unsupported hardware. Initially, Microsoft allowed such installations with a warning about potential security risks and the absence of future updates. Subsequently, a permanent watermark has been introduced to serve as a persistent reminder to users that their system is not supported. A similar message may also appear in the Settings app. Let’s discuss the methods to remove the watermark.
Expert Recommended Methods: How To Remove The “System Requirements Not Met” Watermark In Windows 11
Method 1: Use The Registry Editor To Remove The Watermark
If you encounter the “system requirements not met” watermark on your PC, you can eliminate it by adjusting a DWORD value in the Registry Editor. Since modifying the Windows Registry carries inherent risks, it is advisable to create a restore point before making any changes using the Registry Editor. Follow these steps to eradicate the “System requirement not met” watermark in Windows 11:
Step 1: Hit Windows + R to launch the Run box.
Step 2: Type regedit and click OK to launch the Registry Editor.
Step 3: Go to the following route in the Registry Editor. Alternatively, you may copy and paste the path into the Registry Editor address bar to speed up navigation:
HKEY_CURRENT_USER\Control Panel\UnsupportedHardwareNotificationCache
Step 4: Right-click on the SV2 DWORD value in the right pane and choose Modify.
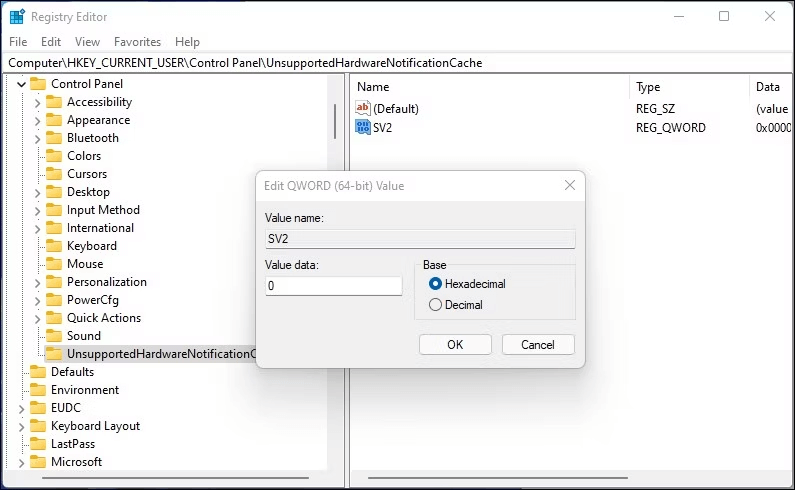
Step 5: Input 0 in the data box for value.
Step 6: To save the changes, click OK.
Step 7: To apply the changes, exit Registry Editor and restart your computer.
Windows 11 will no longer show the unsupported hardware watermark after restarting.
You must create a new UnsupportedHardwareNotificationCache key and set its value if you don’t already have one. To carry out this:
Step 1: Right-click HKEY_CURRENT_USER\Control Panel, the Control key, in Registry Editor, and choose New > Key.
Step 2: Give the key a new name, UnsupportedHardwareNotificationCache, after that.
Step 3: Once the new key is selected, right-click on it and choose New > DWORD (64-bit) value.
Step 4: Rename the new value as SV2.
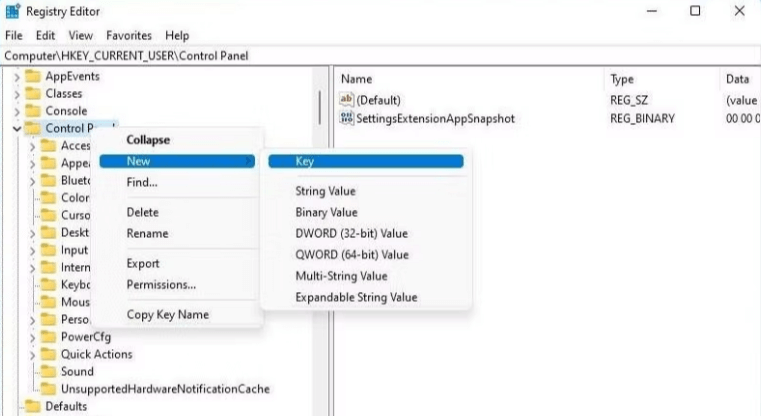
Step 5: Next, adjust the value of the SV2 DWORD and set its Value data to 2.
Step 6: To save the changes, click OK.
With fresh upgrades, the watermark can return. To maintain a clean desktop, you must repeat the procedures after installing the update.
Method 2: Use The Group Policy Editor To Remove The Watermark
In Windows 11, you may disable the “System requirements not met” warning by using the Group Policy Editor. To do this, you need to change the “Hide notifications when Windows system requirements are not fulfilled” Group Policy and set it to enable this. It’s important to note that the Local Group Policy Editor is installed by default only on the Windows 11 Pro, Enterprise, and Education editions. If you are using Windows Home, you can follow the steps outlined below to enable the Group Policy Editor.
To disable the watermark follow these steps:
Step 1: Hit Windows + R will bring up the Run dialog.
Step 2: Click OK to launch Group Policy Editor after typing gpedit.msc.
Step 3: Go to the following entry in Group Policy Editor:
Local Computer Policy > Computer Configuration > Administrative Templates > System.
Step 4: Scroll down in the right section and search the entry labeled “Hide messages when Windows system requirements are not met”.
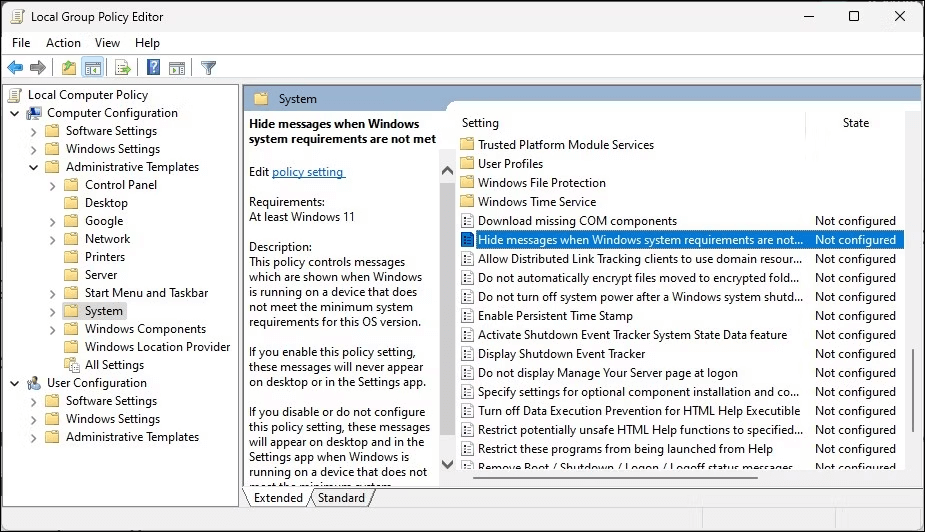
Step 5: Double-click on the entry and the Properties window will open.
Step 6: Choose the Enabled option and click on the Apply button followed by OK.
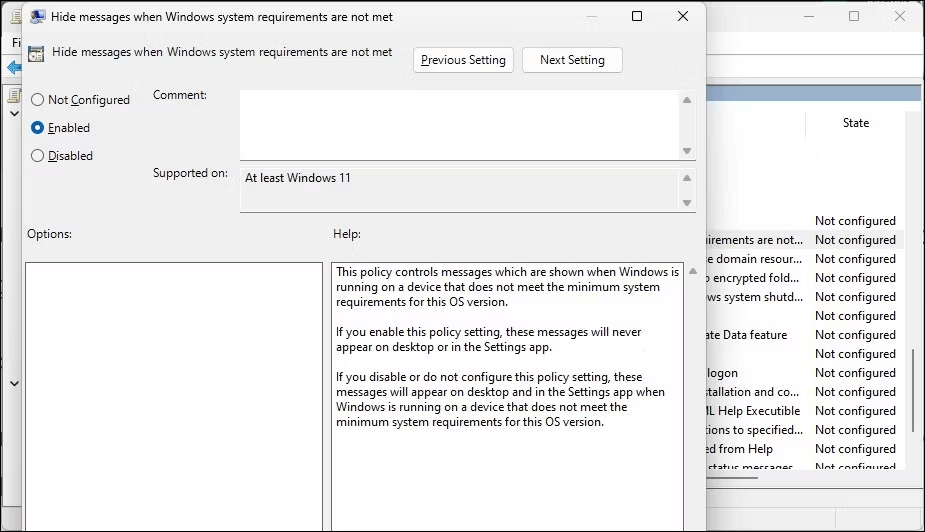
Note: To make the modifications take effect, you must restart your computer now. The “minimum system requirements are not met message” won’t show up on the desktop after the restart. Open the Hide messages when Windows system requirements are not fulfilled policy once again and set it to Not Configured if you need to undo the modifications.
No More “System Requirements Not Met” Watermark In Windows 11 | Enjoy A Clean Desktop
You may probably see the System requirement not fulfilled watermark on your computer if you installed Windows 11 without complying with the TPM secure boot requirement. Thankfully, you can use GPedit to configure a group policy or change a Windows registry item to get rid of the watermark. If you know any other workarounds that can help to remove the “System Requirements Not Met” pop-up, do share them in the comments section below! Follow us on social media – Facebook, Instagram and YouTube.