
Microsoft Word is the most important and one of the most used tool of Microsoft Office. We use it to create documents like letters, blog, resume, notes, assignments etc. It consists of a lot of features and most of us don’t even know about them. In this article, you will learn MS Word basic features and in later blogs you will get to know about all its advanced features. In this article, we will take you through the basic features of MS Word 2016.
Introduction to MS Word 2016
MS word 2016 is mostly like its previous versions 2010 and 2013. Let us have a look at some of the basic features.
We will go step-by-step to learn MS word 2016. Here are some of the basic features of MS Word interface.
- Ribbon
- Quick Access Toolbar
- Backstage View
- The Ruler
- Microsoft Account
- Document View and Zoom function
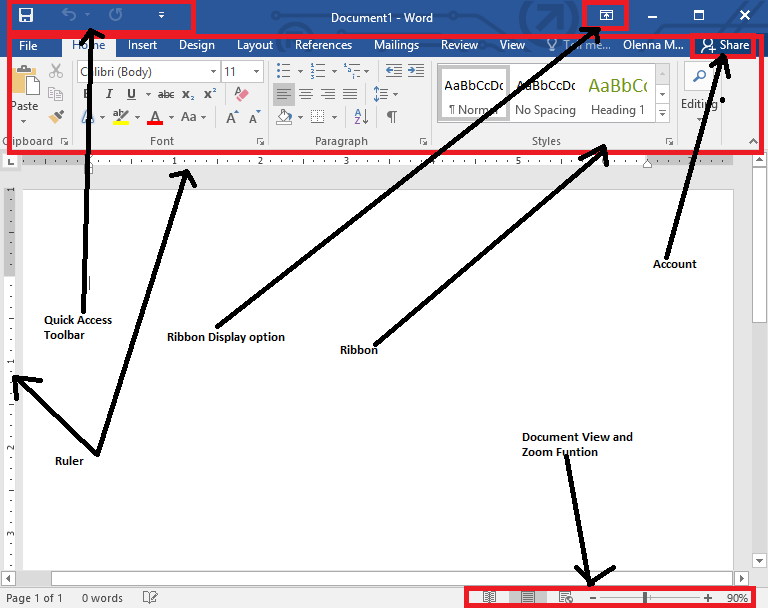
When you open MS Word document for the first time to write any content on it you will see its interface similar to the image above. To open the word document, type Run in the Cortana search bar located near Windows 10 Start button and type Enter key. Now, type “Winword” and type Enter key. Here, click on Blank document to enter in MS Word interface.
Start Learning MS Word:
Now, we will start our MS Word learning with its basic features. As we have mentioned above, we will start one-by-one.
1. Ribbon
The Ribbon consists of 9 tabs named File, Home, Insert, Design, Layout, References, Mailing, Review, View. The tabs are divided in various Groups and the Groups are divided in various Functions or Command. For example, (see the image above): If we talk about Home tab, it is divided in 4 Groups, Clipboard, Font, Paragraph, Styles. Each Group contains various functions, like Clipboard has Paste, Cut, Copy, Format Painter. At bottom right corner of Group, you can see a small arrow symbol to get more options in that particular Group.

Can we Hide this Ribbon from MS Word interface?
Surely, you can hide the Ribbon from the Ribbon Display Option located near the Account section. You need to click on that option. Once you click you will get three options: Auto-hide Ribbon, Show Tabs, Show Tabs and Commands.

- Auto-hide Ribbon: This option will help you view your MS Word document in full-screen mode.
- Show Tabs: This option will help you to hide all commands.
- Show Tabs and Commands: This option will maximize the Ribbon. This option is activated by default. Once you tap on this option, it will show you all tabs and Commands.
If you face any problem in searching any command you wish, you can take the help of Tell Me feature located next to the View Tab. You just need to type what are you looking for, it will show you the list of options. From there, you can use that command.
2. Quick Access Toolbar
Quick Access Toolbar is located above the Ribbon section. This toolbar helps user to access the commands quickly. By default, it displays Save, Undo, and Redo commands. However, you can add any command as per your requirement. You can also customize the Quick Access Toolbar from the drop-down button located near the Redo button. From there, you can add the command to access quickly. You can also change the location of the toolbar from the Show below the Ribbon option.

3. Backstage View
Once you click on the File Tab, you will see the various options like Info, New, Open, Save, Save As etc. This view is called as a Backstage view.

4. The Ruler
Ruler helps you to correct your document with accuracy. It is placed on the left and top of the document. It is also referred to, as Vertical Ruler and Horizontal Ruler. To show/hide the Ruler on your document, you need to go the View Tab, here you will see Ruler under Show Group. Once you check/uncheck the Ruler option it will show/hide you on the document.

5. Microsoft Account
From the Account section, you can login your Microsoft Account to access it. One you log in it will show you the user name in the Account Pane.

6. Document View and Zoom function
MS Word consists various view options to display a document. You can view your document in 3 modes Read Mode, Print Layout, or Web Layout. These modes are used in different tasks as per your requirement. For example, if you wish to print the document, you can use Print Layout View. You can also use Zoom function to increase the readability of the document.
You can see Document view options located near bottom right corner of the document. From there you can switch the document view as per your need.
- Read Mode: This mode is helpful to read the document in full screen mode.
- Print Layout: It is the default view mode, used to print the document.
- Web Layout: This view can be helpful if you are writing a blog to publish on webpage.
Zoom-in and Zoom-out
From the zoom slider you can increase/decrease the size of the document as per your need. If you slide the slider to the + direction it will increase the size of the document. Vice-versa if you slide the slider to the – direction it will decrease the size of the document.
So, this concludes part 1. We hope you have learned MS Word basics. Do check out part 2 to learn more about MS Word Features.